...
...
...
...
...
...
...
...
...
...
...
...
...
...
...
...
...
...
...
...
...
...
...
...
...
...
...
...
...
...
...
...
...
...
...
...
...
...
...
...
...
...
...
...
...
...
...
...
...
...
...
...
...
...
...
...
...
...
...
...
...
...
...
...
...
...
...
...
...
...
...
...
...
...
...
...
...
...
...
...
...
...
...
...
...
...
...
...
...
...
...
...
...
...
...
...
...
...
...
...
...
...
...
...
...
...
...
...
...
...
...
...
...
...
...
...
...
...
...
...
...
...
...
...
...
...
...
...
...
...
...
...
...
...
...
...
...
...
...
...
...
...
...
...
...
...
...
...
...
...
...
...
...
...
...
...
...
...
...
...
...
...
...
...
...
...
...
...
...
...
...
...
...
...
...
...
...
...
...
...
...
...
...
...
...
...
...
...
...
...
...
...
...
...
...
...
...
...
...
...
...
...
...
...
...
...
...
...
...
...
...
...
...
...
...
...
...
...
...
...
...
...
...
...
...
...
...
...
...
...
...
...
...
...
...
...
...
...
...
...
...
...
...
...
...
...
...
...
...
...
...
...
...
...
...
...
...
...
...
...
...
...
...
...
...
...
...
...
...
...
...
...
...
...
...
...
...
...
...
...
...
...
...
...
...
...
...
...
...
...
...
...
...
...
...
...
...
...
...
...
...
...
...
...
...
...
...
...
...
...
...
...
...
...
...
...
...
...
...
...
...
...
...
...
...
...
...
...
...
...
...
...
...
...
...
...
...
...
...
...
...
...
...
...
...
...
...
...
...
...
...
...
...
...
...
...
...
...
...
...
...
...
...
...
...
...
...
...
...
...
...
...
...
...
...
...
...
...
...
...
...
...
...
...
...
...
...
...
...
...
...
...
...
...
...
...
...
...
...
...
...
...
...
...
...
...
...
...
...
...
...
...
...
...
...
...
...
...
...
...
...
...
...
...
...
...
...
...
...
...
...
...
...
...
...
...
...
...
...
...
...
...
...
...
...
...
...
...
...
...
...
...
...
...
...
...
...
...
...
...
...
...
...
...
...
...
...
...
This session will walk you through taking off pipe. You will be instructed on inputting different diameters of pipe and following through calculations for the pipe.
| Table of Contents | ||||
|---|---|---|---|---|
|
Mouse and Keyboard Takeoff
Items can be taken off with the mouse and keyboard OR with the digitizer. Even with the digitizer being utilized, you can still use the mouse when taking off risers, “not to scale” details, and other times when scale is not available.
NOTE: The steps for taking off items are always as follows: SIZE, ITEM, QUANTITY.

Shortcuts to Entering Items in the Takeoff List
After you enter in the quantity (or length), you can log the item into the Takeoff List by doing one of the following:
- Either press Enter on the keyboard or touch
 on the keypad.
 - Select the next item to be taken off. This second item must be of the same size.
- Select the next size of items to be taken off.
Exercise 33: Taking Off Vertical Pipe (without Digitizer)
In this exercise, you will takeoff Vertical Pipe instead of Horizontal Pipe. This is a good way to learn about taking off items without getting confused with hangers and side components.
- With your mouse, touch the 1″ size, touch
 , touch 15′ and then touch .
 - Touch 2″, touch , touch 30′, and then touch .
- Touch 4″, touch , touch 30′, and then touch .
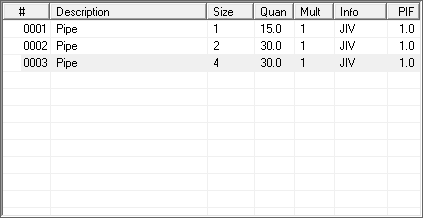
Instead of taking off more items, we want to show you how these pieces of pipe are calculated and where the information comes from. - Close and save this Takeoff by clicking
 on the top right corner.

To track the flow of data, refer to the Pipe Flow charts.
Exercise 34: Taking Off Horizontal Pipe and Pipe Branches (without Digitizer)
Now you will take off Horizontal Pipe where you will learn about hangers.
- Click on the Zones tab at the top of the screen. Click
 .
. - For Zone Name, type Hangers.
- Touch ¾”; touch
 . Note that the information box in the top middle of the screen contains Pipe Info from our Spec. This information includes the Group and Class of the pipe.
 - Click on C-Clamp w/Clevis. A pulldown list appears. This is where you could change the type of hanger.
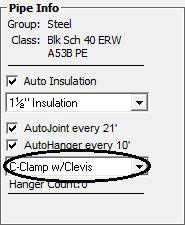
- Continue by touching 14′; and then touch . Once a length of pipe is “Accepted”, it will be logged into the Takeoff List in the upper right hand corner of the screen.
- To continue, touch ¾”; touch
 (Pipe Branch); touch 14′; and then touch .
 - Close this Takeoff by clicking Close.
Exercise 35: Taking Off Fittings (without Digitizer)
Before going into Takeoff, set up another zone. This one will be for Fittings.
- Click on the Zones tab at the top of the screen. Click .
- For Zone Name, type Fittings.
- Click
 . The Takeoff screen for this Zone appears.
 - With your mouse, touch 1″; touch
 ; and then touch .
 - Touch 4″; touch
 ; and then touch .
 - Touch (Reducing Tee). A popup screen appears asking what you would like to select for the second dimension of the Reducing Tee. Touch 4×2; and then touch .

To track the flow of data, refer to the Elbow Flow charts.
Exercise 36: Taking Off Valves (without Digitizer)
Set up another zone for Valves.
- Click on the Zones tab at the top of the screen. Click .
- For Zone Name, type Valves.
- Click . The Takeoff screen for this Zone appears.
- With your mouse, touch 1″; touch
 ; and then touch .
 - Touch 4″; touch
 (Butterfly); and then touch .
 - Touch 4″; touch
 (Flange 3-way); and then touch .
To track the flow of data, refer to the Valve Flow charts.
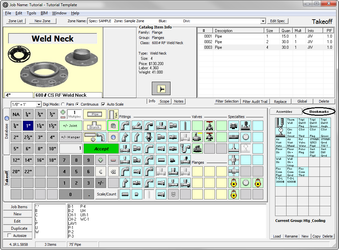
Exercise 37: Taking Off Flanges (without Digitizer)
Set up another zone for Flanges.
- Click on the Zones tab at the top of the screen. Click .
- For Zone Name, type Flanges.
- Click . The Takeoff screen for this Zone appears.
- Touch 4″; touch
 (Weld Neck); and then touch .
Exercise 38: Taking Off Assemblies, Specialties, Job Items, Database Items, and Bookmarks (without Digitizer)
Set up another zone for these miscellaneous items.
- Click on the Zones tab at the top of the screen. Click .
- For Zone Name, type Miscellaneous.
- In Takeoff, start by taking off an assembly. Select CL-T09 Coil Thread w/2way on the Assemblies list.
- Touch .
- Next take off a Specialty. Touch 4″; touch
 (Floor sleeve); and then touch .
NOTE: Notice that the size changed to 8″. - Go to File/Takeoff Options.
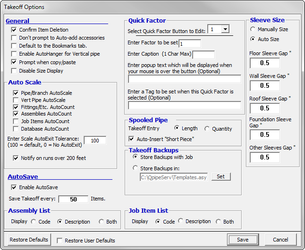
- Auto Size is turned on for Sleeve Size. That is why it bumped up to the bigger size. Touch
 .
. - Next take off a Job Item. At the bottom of the screen, touch B-1 Boiler 1 and then touch .
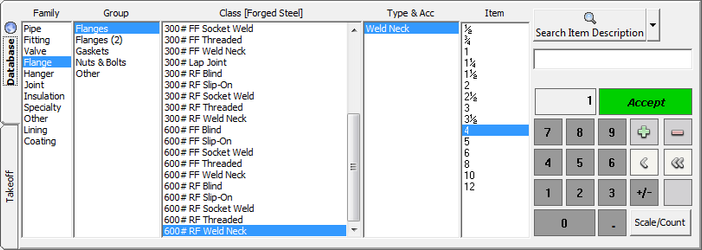
- Take off a database item. Touch Database (middle left side of the screen). Continue touching the Family, Group, Subclass (Forged Steel), Class, Type, and Item to match the following screen. Touch .
- Click Takeoff to return to the Takeoff screen.
- Before taking off the next item, add a new bookmark.
- Click on the
 tab (middle right side of screen).
 - Hover your mouse pointer over an empty bookmark box.
- Right mouse click. A screen similar to the Database screen appears. Continue touching the Family, Group, Subclass (Forged Steel), Class, Type, and Item to match the following screen.
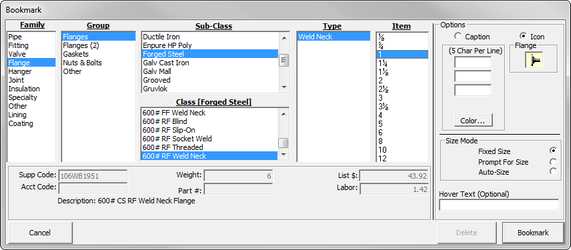
- Touch
 to save your selection.
 - A picture of the Flange appears in the bookmark square.
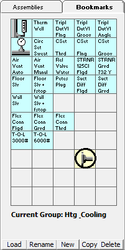
- Touch the new bookmark (Flange). The Item Size window appears.
- Select 4 and then
...
- touch .
We need information on taking off a job item and utilizing the fast find tool bars for items.
Exercise 39: Closing Takeoff
When you are done taking off all the items on your blueprint, you are ready to run reports.
To save and close Takeoff, click on the upper right corner of the screen.

FOR THE TRAINING CLASS, you want to close BUT NOT SAVE Takeoff.
To do this, click File. A pull-down list appears.
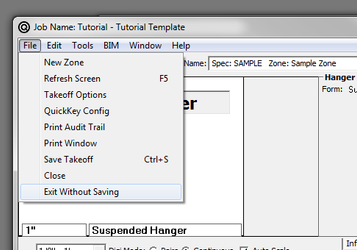
At the bottom of the list, click Exit Without Saving. You can leave Takeoff without saving anything you changed or added.