If you click the  button on the Main Menu, you will be taken to the Customer File screen.
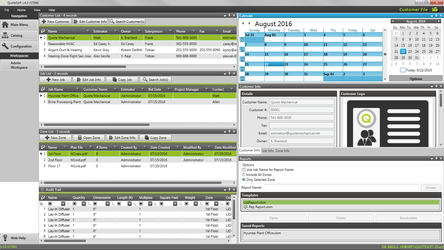
From there, you can do a variety of tasks such as creating and modifying customers, creating and modifying jobs, creating and modifying zones, as well as others.
[placeholder]
| Table of Contents | ||||
|---|---|---|---|---|
|
Navigation
The Navigation sidebar on the left gives you five options to assist you in finding your way around other parts of QuoteSoft Rep while in the Customer File screen.

The Main Menu button will allow you to return to the Main Menu of QuoteSoft Rep.

The Catalog button will allow you to access the Catalog, where you can view, edit, or add new items to be used in Takeoff in QuoteSoft Rep.

The Configuration button will allow you to access the Configuration screen and make changes to the settings in QuoteSoft Rep.

The Web Help button will take you to the QuoteSoft Request Support form where you can request assistance from a QuoteSoft support representative.
Ribbon Menu
The Ribbon Menu appears at the top of the screen in the Customer File, and you can click its different items to view the functions they contain.
In addition, when you right-click the Ribbon Menu, you are presented with two settings with regard to the display of the Ribbon Menu.

Minimize the Ribbon
- The Ribbon Menu will be minimized by default. However, you can uncheck this option and the Ribbon Menu will display in full view at all times.
- If you want to minimize the Ribbon Menu again, simply select the option again to uncheck it.
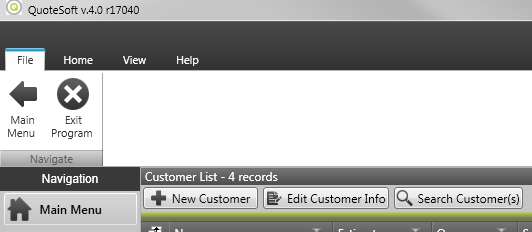
File

- Click this button to return to the main menu of QuoteSoft Rep.

- Click this button to exit the QuoteSoft Rep program and return to your desktop.


Home

- Click this button to create a new customer.

- Click this button to edit the customer selected on the Customer List palette.

- Click this button to duplicate the customer selected on the Customer List palette.

- Click this button to bring up the Search Customer screen, which will allow you to search for a customer using a variety of different search terms.

- Click this button to deleted the customer selected on the Customer List palette. You will be prompted to confirm your decision before the customer is deleted.

- Click this button to export the Customer List to a CSV file, which you can edit in a text editor or Microsoft Excel.

- Click this button to import a list of customers from a CSV file, such as one edited in a text editor or Microsoft Excel.

- Click this button to pull up the Contact List for the selected customer on the Customer List.
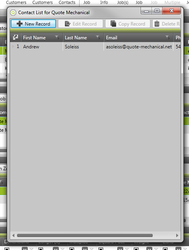
- Click this button to pull up the Contact List for the selected customer on the Customer List.

- Click this button to create a new job in the Job List.

- Click this button to open the Edit Job Info screen for the job currently selected on the Job List palette.

- Click this button to delete any jobs currently selected on the Job List palette. You will be prompted to make sure you would like to delete the jobs.

- Click this button to copy the job currently selected on the Job List palette.

- Once you have copied a job, click this button to paste a new copy of that job on the Job List palette.

- Once you have copied a job, click this button to paste multiple copies of that job onto the Job List palette.

- Click this button to bring up the Search Jobs window, which will allow you to search for a job on the Job List palette using a variety of search terms.

- Click this button to bring up the Recent Jobs window, which will allow you to view the last several jobs that have been edited.

- Click this button to open the Attachments folder for the currently selected job in Windows Explorer. This will allow you to view which files are currently attached to the selected job, as well as to remove old ones or add new ones.

- Click this button to create a new zone in the Zone List.

- Click this button to open the Edit Zone Info screen for the zone currently selected on the Zone List palette.

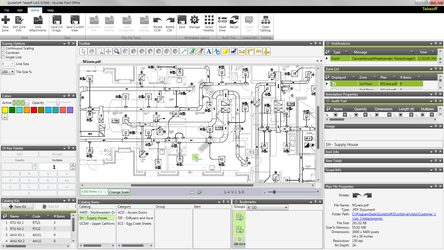
- Click this button to open the currently selected zone in Takeoff.

- Click this button to delete the currently selected zones from the Zone List palette.

- Click this button to copy the zone currently selected in the Zone List palette.

- Once you have copied a zone, click this button to paste a copy of that zone into the Zone List palette.

- Once you have copied a zone, click this button to paste multiple copies of that zone into the Zone List palette.

- Click this button to bring up the Search Zones window, which will allow you to search for a zone on the Zone List palette using a variety of search terms.


View

- This button will allow you to save the current layout of the Customer File screen and the palettes as a Workspace, so that you can easily access that layout. You will be prompted to enter a name for the new workspace, as well as to add an icon or a tooltip if you so desire.
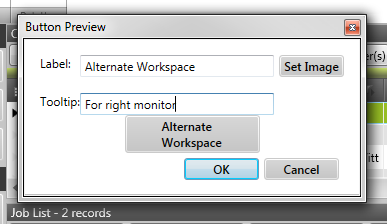
- This button will allow you to save the current layout of the Customer File screen and the palettes as a Workspace, so that you can easily access that layout. You will be prompted to enter a name for the new workspace, as well as to add an icon or a tooltip if you so desire.

- This button will open the Manage Workspaces screen, which allows you to modify workspaces as well as import and export selected ones or delete them.

- This button will open the Manage Workspaces screen, which allows you to modify workspaces as well as import and export selected ones or delete them.

- This button will open the Select Palettes screen, which allows you to select which palettes you would like to display on the Customer File screen and which ones you would like to hide. Alternately, you can click the button at the bottom to load all of the palettes.
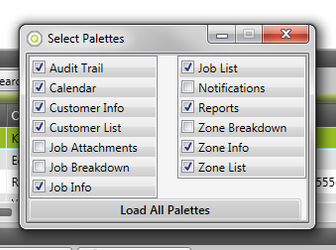
- This button will open the Select Palettes screen, which allows you to select which palettes you would like to display on the Customer File screen and which ones you would like to hide. Alternately, you can click the button at the bottom to load all of the palettes.


Help

- This will take you to the QuoteSoft website.


- This will bring you to the QuoteSoft Request Support form, where you can send an email to QuoteSoft Technical Support staff with questions or issues.

- This will bring you to the QuoteSoft Video Training site, which features video tutorials about key aspects of the software.

- This will bring you to the QuoteSoft Knowledge Base, which features detailed information about each feature of QuoteSoft Rep.

- This will bring you to the QuoteSoft Web Help page, where you can get in contact with a QuoteSoft Technical Support representative to answer any of your questions.


Palettes
Audit Trail

[placeholder]
Calendar

The Calendar palette works the same as the Calendar widget (link) on the Main Menu, displaying the dates of jobs where appropriate.
Customer Info

The Customer Info palette displays information about the customer currently selected on the Customer List. It looks similar to the Edit Customer screen, except it displays the information in a read-only fashion; you cannot edit the customer’s information unless you open up the Edit Customer screen.
Customer List

The Customer List palette allows you to view a list of customers, as well as to create new ones and make changes to existing ones.
Creating a Customer
To create a new customer, click the  button above the Customer List. You will be taken to the New Customer screen.

Enter the information about the new customer and then, when you are finished, click the Create Customer button to save the new customer.
Editing Customer Info
To edit customer info, click the  button above the Customer List. You will be taken to the Edit Customer Info screen.

Modify the information about the customer and then, when you are finished, click the Save Changes button to save the changes you have made. If you do not want to save your changes for whatever reason, click Cancel.
Searching for Customer(s)
To search for a customer, click the  button. You will be taken to the Search Customers screen.

You can use the Search Customers screen to search for customers based on any of the attributes you entered on the info screen. Simply enter in whichever attributes you want to search for and then click the Search button at the bottom.

The Customer List will now display all of the customers that have attributes matching your search query. To clear the search filter and return to the main Customer List, click the ![]() button.
button.
Job Details

The Job Details palette displays information about the currently selected Job in a simple text-only format, focusing on the costs of materials and labor.
Job Info

The Job Info palette displays information about the Job currently selected on the Job List. It looks similar to the Edit Job screen, except it displays the information in a read-only fashion; you cannot edit the Job’s information unless you open up the Edit Job screen.
Job List

The Job List palette allows you to view a list of jobs, as well as to create new ones and make changes to existing ones.
Creating a Job
To create a new job, click the  button above the Job List. You will be taken to the New Job screen.

Enter the information about the new job and then, when you are finished, click the Create Job button to save the new job.
Editing Job Info
To edit job info, click the  button above the Job List. You will be taken to the Edit Job Info screen.

Modify the information about the job and then, when you are finished, click the Save Changes button to save the changes you have made. If you do not want to save your changes for whatever reason, click Cancel.
Copying a Job
To copy a job, click the  button above the Job List.
[placeholder]
Searching for Job(s)
To search for a job, click the  button. You will be taken to the Search Jobs screen.

You can use the Search Jobs screen to search for customers based on any of the attributes you entered on the info screen. Simply enter in whichever attributes you want to search for and then click the Search button at the bottom.

You will then be taken to the Job List Search Results screen, which displays all of the jobs that match your search criteria. To exit out of this screen, click the red X in the corner of the Search Results window.
Notifications

The Notifications palette displays notifications about how QuoteSoft Rep is being operated.
Reports

The Reports palette allows you to export [placeholder] to a Microsoft Excel spreadsheet.
Zone Details

The Zone Details palette displays information about the currently selected
...
Zone in a simple text-only format, focusing on the costs of materials and labor.
Zone Info

The
...
Zone Info palette displays information about the
...
Zone currently selected on the
...
Zone List. It looks similar to the Edit
...
Zone screen, except it displays the information in a read-only fashion; you cannot edit the Zone’s information unless you open up the Edit
...
Zone screen.
Zone List
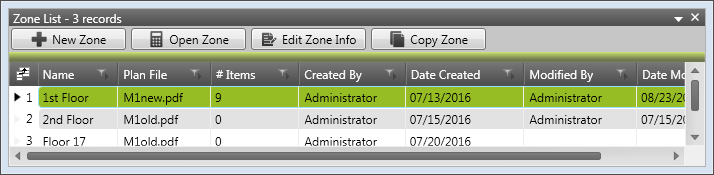
The Zone List palette allows you to view a list of all zones in the currently selected job, as well as to create new zones and edit or copy new zones.
Creating a Zone
To create a zone, click on the  button above the Zone List. You will be shown the New Zone screen.
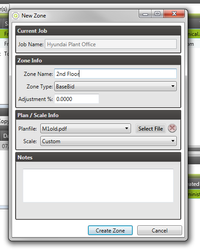
On this screen, you can fill out the different fields about the zone to how you see fit. When you are done, click the Create Zone button.
Editing Zone Info
To edit a zone’s info, click on the  button above the Zone List. You will be shown the Edit Zone Info screen.
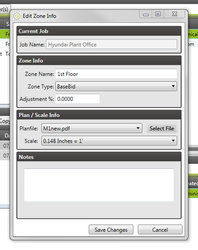
On this screen, you can modify the different fields about the zone to how you see fit. When you are done, click the Save Changes button or, if you do not want to save your changes for whatever reason, click Cancel.
Editing a Zone in Takeoff
To edit a zone in Takeoff, select the zone in the Zone List and then click the  button above the Zone List.