| Table of Contents | ||||
|---|---|---|---|---|
|
Voice Verification File Names
| FA01 | MA01 | SMCNA SPIRAL PIPE |
| FA02 | MA02 | SHORT RADIUS ADJUSTABLE 90 DEGREE ELBOW |
| FA03 | MA03 | Y 1 |
| FA04 | MA04 | STOCK TAPER |
| FA05 | MA05 | SPIN IN |
| FA06 | MA06 | CONICAL SPIN IN |
| FA07 | MA07 | FLEX 1 |
| FA08 | MA08 | ALUMINUM FLEX 1 |
| FA09 | MA09 | ACCESS DOOR SQUARE |
| FA10 | MA10 | GRD |
| FA11 | MA11 | HANGER STRAP |
| FA12 | MA12 | UMC SPIRAL PIPE |
| FA13 | MA13 | SPIRAL PIPE |
| FA14 | MA14 | SHORT RADIUS ADJUSTABLE 45 DEGREE ELBOW |
| FA15 | MA15 | Y 2 |
| FA16 | MA16 | STOCK TAPER WITH COLLARS |
| FA17 | MA17 | SPIN IN WITH DAMPER |
| FA18 | MA18 | CONICAL SPIN IN WITH DAMPER |
| FA19 | MA19 | FLEX 2 |
| FA20 | MA20 | ALUMINUM FLEX 2 |
| FA21 | MA21 | ACCESS DOOR ROUND |
| FA22 | MA22 | SEALERS |
| FA23 | MA23 | STOCK FILE 1 |
| FA24 | MA24 | WRAPPED SMCNA SPIRAL PIPE |
| FA25 | MA25 | LONG RADIUS ADJUSTABLE 90 DEGREE ELBOW |
| FA26 | MA26 | Y 3 |
| FA27 | MA27 | SADDLE FLAT |
| FA28 | MA28 | SPIN IN WITH DAMPER AND SCOOP |
| FA29 | MA29 | CONICAL SPIN IN WITH DAMPER AND SCOOP |
| FA30 | MA30 | METAL JACKET FLEX 1 |
| FA31 | MA31 | ROUND VOLUME DAMPER LOOSE |
| FA32 | MA32 | HALF BLAST GATE |
| FA33 | MA33 | DUCT TAPE |
| FA34 | MA34 | STOCK FILE 2 |
| FA35 | MA35 | SNAPLOCK PIPE |
| FA36 | MA36 | LONG RADIUS ADJUSTABLE 45 DEGREE ELBOW |
| FA37 | MA37 | END CAP |
| FA38 | MA38 | SADDLE FLAT |
| FA39 | MA39 | START COLLAR |
| FA40 | MA40 | CEILING BOX |
| FA41 | MA41 | METAL JACKET FLEX 2 |
| FA42 | MA42 | ROUND VOLUME DAMPER INSTALLED |
| FA43 | MA43 | FULL BLAST GATE |
| FA44 | MA44 | B VENT FLU PIPE |
| FAcpt | MAcpt | ACCEPTED |
| Fcopy | Mcopy | COPY |
| Fedit | Medit | EDIT |
| FO01 | MO01 | OVAL SPIRAL PIPE |
| FO02 | MO02 | LONG SEAM PIPE |
| FO03 | MO03 | 90 DEGREE GORED ELBOW EASY WAY |
| FO04 | MO04 | 90 DEGREE GORED ELBOW HARD WAY |
| FO05 | MO05 | VARIABLE DEGREE GORED ELBOW EASY WAY |
| FO06 | MO06 | VARIABLE DEGREE GORED ELBOW HARD WAY |
| FO07 | MO07 | MITERED ELBOY EASY WAY |
| FO08 | MO08 | MITERED ELBOY HARD WAY |
| FO09 | MO09 | OFF SET EASY WAY |
| FO10 | FO10 | OFF SET HARD WAY |
| FO11 | MO11 | BULL HEAD TEE EASY WAY |
| FO12 | MO12 | BULL HEAD TEE HARD WAY |
| FO13 | MO13 | Y BRANCH EASY WAY |
| FO14 | MO14 | Y BRANCH HARD WAY |
| FO15 | MO15 | OVAL TO ROUND |
| FO16 | MO16 | ECCENTRIC REDUCER |
| FO17 | MO17 | CONCENTRIC REDUCER |
| FO18 | MO18 | FLEX CONNECTOR |
| FO19 | MO19 | END CAP |
| FO20 | MO20 | BELL MOUTH |
| FO21 | MO21 | GORED Y BRANCH |
| FO22 | MO22 | 90 DEGREE HEAL TAPPED ELBOW |
| FO23 | MO23 | COUPLER 1 |
| FO24 | MO24 | COUPLER 2 |
| FO25 | MO25 | VOLUME DAMPER |
| FO26 | MO26 | RECTANGULAR TEE |
| FO27 | MO27 | STRIGHT TEE |
| FO28 | MO28 | CONICAL TEE |
| FO29 | MO29 | STRAIGHT CROSS |
| FO30 | MO30 | CONICAL CROSS |
| FO31 | MO31 | LATERAL TEE |
| FO32 | MO32 | CONICAL LATERAL TEE |
| FO33 | MO33 | LATERAL CROSS |
| FO34 | MO34 | CONICAL LATERAL CROSS |
| FO35 | MO35 | MITERED TEE |
| FO36 | MO36 | BOOT TAP TEE |
| FO37 | MO37 | MITERED CROSS |
| FO38 | MO38 | BOOT TAP CROSS |
| FO39 | MO39 | STRAIGHT TAP IN |
| FO40 | MO40 | CONICAL TAP IN |
| FO41 | MO41 | LATERAL TAP IN |
| FO42 | MO42 | CONICAL LATERAL TAP IN |
| FO43 | MO43 | MITERED TAP IN |
| FO44 | MO44 | BOOT TAP TAP IN |
| FO45 | MO45 | RECTANGULAR TAP IN |
| FO46 | MO46 | RECTANGULAR CROSS |
| Foval | Moval | OVAL ENAVELED |
| FR01 | MR01 | SPIRAL PIPE |
| FR02 | MR02 | LONG SEAM PIPE |
| FR03 | MR03 | 90 DEGREE GORED ELBOW |
| FR04 | MR04 | VARIABLE GORED ELBOW |
| FR05 | MR05 | 90 DEGREE PLEATED ELBOW |
| FR06 | MR06 | 45 DEGREE PLEATED ELBOW |
| FR07 | MR07 | 90 DEGREE MITERED ELBOW |
| FR08 | MR08 | 90 DEGREE HEAL TAPPED ELBOW |
| FR09 | MR09 | BULL HEAD TEE |
| FR10 | MR10 | Y |
| FR11 | MR11 | CONCENTRIC REDUCER |
| FR12 | MR12 | ECCENTRIC REDUCER |
| FR13 | MR13 | OFF SET |
| FR14 | MR14 | GOOSE NECK |
| FR15 | MR15 | END CAP |
| FR16 | MR16 | BELL MOUTH |
| FR17 | MR17 | VOLUME DAMPER |
| FR18 | MR18 | ROUND FLEX CONNECTION |
| FR19 | MR19 | COUPLER 1 |
| FR20 | MR20 | COUPLER 2 |
| FR21 | MR21 | STRAIGHT TEE |
| FR22 | MR22 | CONICAL TEE |
| FR23 | MR23 | STRAIGHT TEE |
| FR24 | MR24 | CONICAL TEE |
| FR25 | MR25 | STRAIGHT CROSS |
| FR26 | MR26 | CONICAL CROSS |
| FR27 | MR27 | LATERAL TEE |
| FR28 | MR28 | CONICAL LATERAL TEE |
| FR29 | MR29 | LATERAL CROSS |
| FR30 | MR30 | CONICAL LATERAL CROSS |
| FR31 | MR31 | MITERED TEE |
| FR32 | MR32 | BOOT TAP TEE |
| FR33 | MR33 | MITERED CROSS |
| FR34 | MR34 | BOOT TAP CROSS |
| FR35 | MR35 | STRAIGHT TAP IN |
| FR36 | MR36 | CONICAL TAP IN |
| FR37 | MR37 | LATERAL TAP IN |
| FR38 | MR38 | CONICAL LATERAL TAP IN |
| FR39 | MR39 | MITERED TAP IN |
| FR40 | MR40 | BOOT TAP TAP IN |
| FR41 | MR41 | RECTANGULAR TAP IN |
| FR42 | MR42 | RECTANGULAR TEE |
| Fround | MSound | ROUND ENABLED |
| FS01 | MS01 | STRAIGHT DUCT |
| FS02 | MS02 | 90 DEGREE SQUARE ELBOW |
| FS03 | MS03 | VARIABLE SQUARE ELBOW |
| FS04 | MS04 | 90 DEGREE RADIUS ELBOW |
| FS05 | MS05 | VARIABLE RADIUS ELBOW |
| FS06 | MS06 | GOOSE NECK |
| FS07 | MS07 | 90 DEGREE SQUARE THROAT RADIUS ELBOW |
| FS08 | MS08 | VOLUME DAMPER |
| FS09 | MS09 | TRANSITION ONE WAY |
| FS10 | MS10 | TRANSITION TWO WAY |
| FS11 | MS11 | MITERED OFFSET |
| FS12 | MS12 | RADIUS OFFSET |
| FS13 | MS13 | SQUARE TO ROUND |
| FS14 | MS14 | SQUARE TO OVAL |
| FS15 | MS15 | ANGLE TAP IN |
| FS16 | MS16 | TAP IN |
| FS17 | MS17 | SMOKE FIRE DAMPER |
| FS18 | MS18 | BULL HEAD TEE |
| FS19 | MS19 | FIRE DAMPER |
| FS20 | MS20 | TAKE OFF |
| FS21 | MS21 | 45 DEGREE TAKEOFF |
| FS22 | MS22 | 45 DEGREE RADIUS TAKEOFF |
| FS23 | MS23 | PANTS |
| FS24 | MS24 | RADIUS BULL HEAD TEE |
| FS25 | MS25 | JOINT FRAME LOOSE |
| FS26 | MS26 | TURN VANE LOOSE |
| FS27 | MS27 | FLEX CONNECTION 1 |
| FS28 | MS28 | FLEX CONNECTION 2 |
| FS29 | MS29 | END CAP |
| FS30 | MS30 | REGISTER BOX SIDE DISCHARGE |
| FS31 | MS31 | ROOF FLASHING |
| FS32 | MS32 | BOX PLENUM |
| FS33 | MS33 | REGISTER BOX TOP DISCHARGE |
| FS34 | MS34 | MISCELLANEOUS ITEM |
| FS35 | MS35 | SLEEVE |
| Fscale | Mscale | SCALE |
| PDTONE | ||
| SDTONE |
QuoteSoft Duct Pre-Training
Software
- Tech Support make initial call to Customer
- Install software on ALL workstations & the server
- Install proper keys & key driver
- Install VTI on ALL digitizer workstations
- Align templates on all digitizer workstation
- IF customer is “switching” from AutoBid explain how to enable & disable VTI
Duct / FABshop
- Overview of Software
- Proceed going thru each button in the Main Menu
- Brief overview of the data file & how the pricing structure works in the program
- Brief overview of the 2in galvanized pressure file
- Explain what type of items they can put in the catalog
- Overview of the rectangular item options
- Overview of the take-off screen
- Data File Pricing (input pricing)
- Galvanized Material
- 1in Duculinae
- 18 or 20ga Hanger strap
- 3/8 Rod & 1 5/8 Uni-Strut Hanger
- 2in Dbl Turning Vane
- S & D / Standing S & D / TDF or DM35 Rectangular Joint
- Labor Rate
- 2in Pressure File (setup)
- Labor Rate
- Material
- Scrap
- Seams
- Joints & Reinforcement
- Hangers
- Turning Vane
- Wrap-Liner Options
- General Options
- Job or Customer Setup
- Enter new job called QXP Test (only fill in Job Name & Estimator)
- Create new zone
- Select 2in pressure file
- Select standard Labor Rate
- Take-Off Zone or Job (take-off items)
- 150ft – 24×24 straight duct
- 1- Sq. 90 W/Turning Vane 24×24
- 1- Rad. Offset 24×24
- 1- 2-Way Transition 24×24 to 20×16
- 50ft- 20×16 straight duct
- 1- Rad. 90 elbow 20×16
- 1- 1-Way transition 20×16 to 16×16
- 75ft- 16×16 straight duct
- 1- End Cap 16×16
- 5- Spin-in W/Damper 8in dia
- 5- Insulated Flex 5ft long 8in dia
- 25ft- Snaplock Pipe 8in dia
- 5- Lay-Inn Diffusers 24x24x8
- Reports (Explain)
- Run Summary List Report (Crystal)
- Item Detail Report (Crystal)
- Final Bid Report (Crystal)
- Final Estimate Summary (Excel)
- Final Bid Report (Excel)
- Equipment Check list
- Conference Room
- Computer in Conference Room (1 per person)
- Digitizer in Conference Room (Min 1 digitizer for every 2 students)
- Projector (Do they have or Scott bring in)
- White Board (If they have one)
- Blue Prints
- All QuoteSoft Duct Literature
Digitizer Commands
| ~SCA | Scale |
| ~MSC | Multi-Scale |
| ~CNT | Bring up Count window |
| ~ARA | Bring up Scale Area window |
| ~SSW | Scale Setup Window |
| ~SC + B–Z | set scale to a certain value / B = first item in the Scale dropdown C = second B = 1/16 C = 3/32 D = 1/8 E = 3/16 F = 1/4 G = 3/8 H = 1/2 I = 1 in J = 100mm K = 50mm L = 40mm M = 20mm N = 1mm O = Custom |
| Item Commands | |
|---|---|
| ~S## | Bring up Rectangular Item, e.g. ~S01 = Duct, ~S35 = Sleeve |
| ~R## | Bring up Round Item, e.g. ~R01 = Spiral Pipe |
| ~O## | Bring up Oval Item, e.g. ~O01 = Oval Spiral Pipe |
| ~A## | Bring up Accessory Item |
| ~C## | Bring up Catalog Item |
| ~SNS | Bring up Rectangular Duct, but do not scale |
| ~RNS | Bring up Round/Oval Spiral Pipe, but do not scale |
| ~SDE | Bring up Rectangular Duct, Acpt it in, bring up Square Elbow |
| ~SDT | Bring up Rectangular Duct, Acpt it in, bring up Transition |
| ~SDR | Bring up Rectangular Duct, Acpt it in, bring up Radius Elbow |
| ~RPE | Bring up Round/Oval Spiral Pipe, Acpt it in, bring up Gored Elbow |
| ~RPL | Bring up Round/Oval Spiral Pipe, Acpt it in, bring up lateral Tee |
| ~RPT | Bring up Round/Oval Spiral Pipe, Acpt it in, bring up reducer |
| General Commands | |
| `E### | Enter a number as if you clicked on the Entry window, this means it can autoadjust for liner |
| `+### | Adder for “`E###”. “`+000” would set the Adder to 0, “`+050” would set the Adder to 50 |
| ~ACC | Accept |
| ~ACS | Accept then bring up Duct |
| ~ACR | Accept then bring up Spiral Pipe, Round/Oval depending on Switch |
| ~ACA | Accept then bring up Accessory A01 |
| ~DEL | Clear text of field with focus |
| ~EGG | Play the spinning logo movie |
| `RINT | Reinitialize current item |
| ~ADD | Add identical item |
| ~QUP | Add 1 to quantity |
| ~QDN | Subtract 1 from quantity |
| ~MUP | Add 1 to multiplier |
| ~MDN | Subtract 1 from multiplier |
| ~FUP | Add 1 to whichever field has the focus |
| ~FDN | Subtract 1 from whichever field has the focus |
| ~RND | Switch the template to do Round items |
| ~OVL | Switch the template to do Oval items |
| ~ITV | Item Viewer |
| ~IDV | Item Detail Viewer |
| ~QTS | Quick Totals |
| ~QTW | Quick Totals Wizard |
| ~CAL | Calculator |
| ~UCO | Unit Conversion |
| ~TCA | Time Calculator |
| ~NTS | Item Notes |
| ~ASM | Insert Assembly File |
| ~GLW | Global Wizard |
| ~IFA | Install Labor Factor |
| ~FFA | fab Labor Factor |
| ~OFA | Other Labor Factor |
| ~MFA | Material Cost Factor |
| ~GFA | Grand Total Factor |
| ~VFN | Set Voice Feed Back to None |
| ~VFM | Set Voice Feed Back to Male |
| ~VFF | Set Voice Feed Back to Female |
| ~SSS | Set Scale Style to Single Point |
| ~SSD | Set Scale Style to Pairs |
| ~ABT | About QXP window |
| `AROO | Flip Width and Depth/Height—Offset Drop down for offsets/trans |
| `AROO | Flip Width and Depth/Height all items, no offset dropdown |
| Navigation Commands | |
| ~JBF | Return to Customer/Job File |
| ~GOQ | Select Quantity field |
| ~MOV | Tab around size fields |
| ~MVB | Tab around size fields, backwards |
| `PREV | Go to the previous item |
| `NEXT | Go to the next item |
| `GOTO | Bring up Jump to Item # dialog |
| ~CAT | Open the Catalog |
| ~PLM | Open the plenums Calculator |
| `LRCT | Open the Rectangular Pressure File loader |
| `LRND | Open the Round Pressure File loader |
| `LOVL | Open the Oval Pressure File loader |
| ~LNR | Set focus to Linear Dropdown |
| ~WRP | Set focus to Wrap Dropdown |
| ~GAU | Set focus to Gauge Dropdown |
| ~ZON | Set focus to Zone Dropdown |
| ~PHA | Set focus to Phase Dropdown |
| ~SYS | Set focus to System Dropdown |
| ~TAG | Set focus to Tag Dropdown |
| ~VNE | Turn Vane ON or OFF |
| Fun Commands | |
| SHK | EarthQuake |
| BNC | Mass Bounce |
| FTB | Fade to Black (win2k and up only) |
| TRV | Transparent View (win2k and up only) |
Training Agenda
The QuoteSoft Duct onsite set-up and training has been broken into sessions. Each session will give you an in depth look at the QuoteSoft Duct program and its inner workings. We will be following this agenda to maximize the amount of training you will receive. QuoteSofttraining is designed to get you setup and estimating as quickly and as easily as possible.
Pre-Training
Please fill out your pre-training survey and locate all required information that will be needed to setup QuoteSoft Duct. Your QuoteSoft trainer will call a week before your scheduled training to go over the data needed for a successful implementation.
Not everyone who will be using QuoteSoft Duct is required for all sessions. In general there are two types people being trained: 1. People who will be using the program to input jobs – Takeoff and run reports (Users) and 2. Setting up the material and labor database. (Data Administrators)
Day One
Training – Quick Start – 10 Min. – Personnel required – (Users) & (Data Administrators) Open QuoteSoft Duct / Make a new Job / Make a new zone / Takeoff 10 items / Go to reports / Export to Excel. QuoteSoft Duct is easy.
Training – Program Orientation – 20 Min. – Personnel required – (Users) & (Data Administrators) This will be a general walkthrough of the program. This session is designed to get you comfortable with the programs many screens and explain the general principles of how the program works.
Training – Basic Takeoff Training – 1 Hour – Personnel required – (Users) & (Data Administrators) Discuss the 3 rules Takeoff process. In this section you will be instructed on the basics of doing a Takeoff and running reports.
Training – Basic Digitizer Training – .5 Hours – Personnel required – (Users) & (Data Administrators) Discuss setting up and hands on using the digitizer. Discuss basic digitizer operation.
Break
Setup – Data File – 2 Hours – Personnel required – (Data Administrators)
Start the data entry process with the Data File. The Data File is the heart of the program and where you will be entering such things as your material costs, the type of joint connectors you will be using, which hanger systems are to be included and much more.
Lunch
Setup – Rectangular Pressure File Construction 3 Hours – Personnel required – (Data Administrators)
The construction of the your first Rectangular Pressure File will be a thorough explanation of how pressure files are used and setup in the program. While setting up this file you will be taught how to have the program automatically select certain gauges, joints, hangers etc. Depending on the size and pressure class of the item. Should set-up Low /medium pressure file that are most commonly used. Also covered will be the basic management of your Pressure Files, including the copying to make new and deleting any unused files.
Setup – Rectangular Data Validation – 1 Hour – Personnel required – (Data Administrators) Input of a small list (duct / fittings) of known specification and labor hours. Check pressure file defaults of joints, sealants, hangers, etc. Check and adjust labor hours.
Day Two
Training – Review – Q & A 30 Min. – Personnel required – (Users) & (Data Administrators) Open QuoteSoft Duct / Make a new Job / Make a new zone / Takeoff 20 items / Go to reports / Export to Excel. QuoteSoft Duct is easy to learn and use.
Setup – Accessory Files 1.5 Hours – Personnel required – (Data Administrators) This file is setup to store the material cost and labor needed for the items that are generally store bought such as Snaplock Pipe, Adjustable Elbows, Flexible Duct, etc. All items are modifiable his file can be setup for rectangular or round items and you can even import your own pictures.
Break
Setup – Accessory Files Data Validation – .5 Hour – Personnel required – (Data Administrators) Input of a small list (GRD’s Flex duct adj. Elbows) of known cost and labor hours. Check and adjust labor hours and material cost.
Setup – Round Pressure File Construction 1.5 Hours – Personnel required – (Data Administrators) Build or buy – The construction of the your first Round Pressure File will be a thorough explanation of how round pressure files are used and setup in the program. While setting up this file you will be taught how to have the program automatically select certain gauges, joints, hangers etc. Depending on the size and pressure class of the item.
Lunch
Setup – Round Data Validation – 1 Hour – Personnel required – (Data Administrators) Input of a small list (pipe / fittings) of known specification and labor hours. Check pressure file defaults of joints, sealants, hangers, etc. Check and adjust labor hours.
Setup – Catalog File – 1.5 Hours – Personnel required – (Data Administrators) The Catalog file stores all of your equipment and custom items that do not fall into the Rectangular, Round, Oval or Accessories categories. The Catalog File also allows you to import your own custom items like equipment and HVAC accessories like controls, flue, sealers, angle, flat stock, etc. This training will cover the use of the Catalog file as well as how to setup custom items.
Training – User Takeoff Validation – 1.5 Hours – Personnel required – (Users) & (Data Administrators) Discuss the set up of the program by inputting a job using the rectangular round and accessory files that have been created. Make adjustments to program.
Day Three
Setup – Data and Pressure File additions – 2 Hours – Personnel required – (Data Administrators) Central options file and Item Options files fix and adjust data and pressure file set up issues discovered in day two user validation.
Training – Job File – 1 Hour – Personnel required – (Users) & (Data Administrators) Instruction on the use of the Job File components. We will cover the Job List, Zone Info and the Reports, Excel Export page. The Job File is used in the management of jobs and zones as well as the exporting of data and reporting options that are available to you.
Training – Advanced Takeoff Training- 1 Hours – Personnel required – (Users) & (Data Administrators) Instruction on options in Takeoff. You will be taught how to use all the tools available to you as well as track items that have been accepted and how to group zones and sub-zones. Assemblies and bookmarks are covered as well as factors to standard labor and material and making changes to groups of fittings. Advanced digitizer options and techniques.
Lunch
Training – TEST- .5 Hours – Personnel required – (Users) & (Data Administrators) Test on how to create a job, add a new zone, go into Takeoff input test job and print standard reports and export data into Excel.
Training – Review – Q & A 30 Min. – Personnel required – (Users) & (Data Administrators) Open QuoteSoft Duct / Make a new Job / Make a new zone / Takeoff 20 items / Go to reports / Export to Excel. QuoteSoft Duct is easy to learn and use.
Setup – Labor Comparison- Personnel required – (Data Administrators) Final adjusting of the labor will take place. We will look at the labor in its two individual categories, Item and Components. This session is an ongoing session that will take use of all of your recently gained expertise in the program. Having developed a comfortable use and navigation knowledge will aid in the adjusting of the labor. This process is designed to help you more accurately adjust the program to represent what your shop and field installers can produce.
Setup – Oval Pressure File Construction 2 Hours – Personnel required – ( Data Administrators ) The construction of the your first Oval Pressure File. While setting up this file you will be taught how to have the program automatically select certain gauges, joints, hangers etc. Depending on the size and pressure class of the item.
Congratulations you have completed the QuoteSoft Duct Basic Onsite Training Program. You should be able to comfortably navigate the program and with help from our phone and internet training make any changes and additions that are still needed. This training program was designed to get each user up and estimating as quickly and efficiently as possible. By following the sessions outlined above we have devised a system that will allow the training process to cover each area with more depth and to leave you with a better understanding of the inner workings of your QuoteSoft Duct program.
Takeoff Key Shortcuts
| F1 | Item Viewer |
| F2 | Item Detail Viewer |
| F4 | Quick Totals |
| F6 | Calculator |
| F7 | Unit Conversion |
| F8 | Plenums Calculator |
| F9 | Time calculator |
| F10 | Voice Command |
| F11 | Global Wizard |
| F12 | Hide All Palettes |
| Ctrl + D | Will bring up the Digitizer Open Scaling Setup Menu |
| Right Clicking Job File | Will take you to the Base Setup Menu |
| Right Clicking Code | Will bring up the Item Detail Viewer |
| Right Clicking Number Entry Palette | Will tab through selectable option (Height, width, and quantity) |
| Right Clicking Catalog Palette | Will bring up the Catalog File |
| Right Clicking Scale | Will bring up the Digitizer Open Scaling Setup Menu |
| Right Clicking Multi Scale | Will bring up the Area Scale Mode |
While in the Data File:
- Clicking on the header of a column will allow you to change (or factor) the entire column
- Right clicking in a column will highlight the entire column
While in Pressure File:
Transfer Function while on the Joints & Reinforcements page. By left clicking on CL Length number you will get to choose where you want to transfer the info to. You can either do 1 at a time or all at once. For example if you wish to transfer the info from the 72″ CL Length to the 60″ you would click the 72, then enter 60 into the box when it appears, hit OK and you will see the changes appear there. The same goes for transferring any of them to the other. Or if you would like to transfer one to all you would simply type in all.
Takeoff Shortcuts
- Right clicking on your entry palette will tab you through available data entry points i.e. width, height, length, etc.
- Right click on a job/zone while on your customer file or job file to copy/paste, delete or rename.
- You can use your reporting options on the reports page to specifically run a report on a single zone, or even an item type. Combine the two to run even more specific reports.
- Use the quick totals while in take off (F4) to see an accurate total of the job/zone you are currently working in.
- On your Administration page you can archive jobs by a specific date. I.e. you can archive jobs from 2 weeks ago and beyond. Also while in your Customer/Job file you can view jobs in archive or add jobs to archive, which is found on the job dropdown.
- While in takeoff you can use the Item Detail Viewer (F2) to check out the specifics on whichever item you have on screen at the time. You can also choose it from the tools dropdown.
- Using your pen, puck or mouse, right click on Qty to bring up the count box. Each click of the pen will add one to your quantity. When you are done counting right click again to end the function.
- The item detail viewer is a great tool for seeing items already accepted into your takeoff. You can also use the filter wizard to look at only certain items. I.e. round, lined, or items in a specific pressure file.
- If you have catalog bookmarks showing at the bottom of your screen and you would like to clear them up. Simply hold shift and right click each one you wish to delete.
- To see your weight for the particular item on screen click the Sq Ft found below your wrap options. It will now show the weight of that item. To see the Sq Ft again, click weight.
- To browse to a specific item number in your job/zone click the large item number button on the top left hand corner of the takeoff screen. Now type in the specific item number your looking for or leave browse in there and click ok to bring up the item viewer.
- Double click the green arrows found on the bottom right of the takeoff screen. Double clicking the left arrow will take you to item number one. Dbl. clicking the right arrow will go to the last accepted item.
- Going to your edit menu at the top of your takeoff screen and choosing show inner dimensions on item will place a height and width field on your screen. This will show you the inner dimensions of the item.
- You can click on the item name while in takeoff to switch the height and width dimensions for that item.
- You can choose to have the program speak to you. It will tell of your every move. When you click straight duct it will say straight duct. When you click scale it will say scale. Hit the accept button and the program will let you know is has been accepted. This option is under the digitizer options at the top. Choose voice feedback and then choose either male or female.
- Our built in install calculator can be found by clicking on the word install while you have an item that is ready to be accepted (green or yellow accept button) Doing so will bring up the factor percent box. In the box it will say calculator. Click ok on that. You will now see the install calculator where you can choose the type of difficulty and the percentage to factor.
- You can recalculate the entire job. By going to Globals and choosing general recalc. This will recalcu late the entire job with the existing pressure file changing everything back to the default of the pressure file as well.
- To set a custom scale for your takeoff go to your digitizer menu and select "Set Custom Scale" You will then enter the number of feet per inch, or leave the box blank, click ok, and then scale off a known length (doorway?) and then enter the amount scaled
- Once you have completed your multi-scale double click the pen or puck in the same spot to end the scaling. You can also hit escape on your keyboard.
- The pen and puck that came with your digitizer can be programmed to do a multitude of different things. From a simple right click/tab to inputting a specific fitting or even to accept.
Tees and Crosses Cost Calculations
If you purchase your tees and crosses for either spiral or oval you will want to follow the following procedure to input the correct info. To come up with the proper costs and/or labor data you will need to understand how QuoteSoft Duct calculates the tees and crosses. In order to calculate the item correctly the program treats it as an assembly of different items (body, collars, taps, reducers, etc).
We have prepared an example on this training sheet to better explain this process. The tee below is actually an accumulation of items in order to build one full body fitting. In order to understand this process refer to the example below and it will explain how to calculate your own costs and labor.
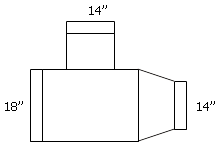
This tee is made up of 6 separate items:
- 1 – 18in. collar
- 2 – 14in. collars
- 1 – 18in. body
- 1 – 18in. to 14in. concentric reducer
- 1 – 14in. straight tap body
If you are purchasing these as one complete item then you will have to follow these simple instructions listed below to come up with the 6 individual prices to be input into the round or oval pressure files.
- Request the cost of the complete item. With collars and a straight tap.
- Then the costs of each of the parts, the collars by themselves, the tap without a saddle or body, the reducer, etc.
- Then subtract each of these items from the cost of the full body fitting and you will have your body cost.
Example:
18 x 14 x 14 Straight Body with Reducer and Straight Tap = $175.00
| 18 to 14in Reducer | $35.00 |
| 18in Collar | $7.50 |
| 14in Collar | $3.75 (x2) |
| 14in Tap | $25.00 |
| Total for parts | = $75.00 |
The total for the complete item is $175 then subtract the total for the parts ($75) which leaves you with a cost for the 18in body at $100.
This worksheet is designed to explain how to break up the cost of a full body fitting that you purchase. The same principles can apply if you were to manufacture the item and only know the labor for the full item.
Voice Input Commands
Duct & Fittings
- Duct / Pipe
- Radius Elbow
- Square Elbow
- Transition
- Tap In
- Spiral Pipe
- Grill
- Diffuser
- Register
- Flex Duct
- Spin In
- Fire Damper
Functions
- Accept
- Next (next field on current fitting)
- Scale (run of pipe/duct)
- Multiplier Up
- Multiplier Down
- Quantity Up
- Quantity Down
- Forward (next fitting in job)
- Back (previous fitting in job)
- First (fitting in job)
- Last (fitting in job)
Numbers
- 1-9
- 10
- 15
- 20
- 25
- 30
All other numbers must be entered in the following format – 13: Say “one three”
Pounds Per Hour Conversion Formula
Part 1
W / F = H
W = Weight of the item from takeoff
F = fab Hours from takeoff
H = Pounds per hour that QuoteSoft Duct is producing
Directions:
In takeoff get the weight of the item and divide it by the fab hours shown. This will give you the QuoteSoft Duct pounds per hour.
Part 2
(H / AH) L = AL
H = Pounds per hour that QuoteSoft Duct is producing
AH = Desired Pounds per hour
L = Labor that is in the pressure file
AL = Actual labor figure
Directions:
Use the pounds per hour that are given to you from QuoteSoft Duct and divide them by the actual pounds per hour that is desired. Then multiply that by the labor that is currently in the pressure file to get the actual labor figure that should be entered in the pressure file.
Installation Labor Calculations
There are two types of Install labor in the program, Item and Component. The Item Labor is the labor that is specific to the individual item and not changed when any of the components are changed for example TDC changed to Slip and Drive. The Component Labor will be changed when any of the components are changed in Takeoff. This Component Labor is also stored separately with each component in the Data File, while the Item Labor is stored in the pressure file.
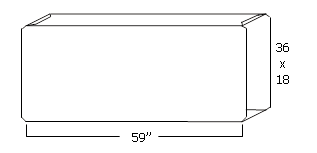
For example: the labor to install a single piece of duct that is 36 x 18 is broken apart below.
Total Labor Breakdown:
- Jobsite Layout
- Material Handling (the total time required to locate the item and prep for install)
- Raising the item (either with a lift, by hand or on a Genie, etc.)
- Joint Sealers
- Hangers
- Wrap Installation
Processes 1–3 make up the Item Labor
Processes 4–6 are the individual Component Labor items
Item Labor is stored in the pressure file with the item, it is not changed when any of the components are added or taken away during the takeoff process.
Liner Labor Calculations
The liner labor is calculated using the number of square feet per hour installed. The program simply calculates the number of square feet needed and uses the sq ft/Hr that you input to come up with the labor required.
For straight duct refer to the example below:
Using this piece of 24 x 12 that is 59 inches long as an example follow the formula below to calculate liner labor.
1″ Liner set at 200 sq ft/Hr with a 3% scrap factor
The perimeter of the duct is 72in. and the length is 59in.
72 x 59 = 4248 SqIn.
Divide that by 144 (the number of square inches in a square foot) to convert to sq ft.
4248 / 144 = 29.5 sq ft
Add in the 3% scrap
29.5 x 1.03 = 30.385 sq ft
Liner labor is then calculated using the 30.358 sq ft and the 200 sq ft/Hr factor
30.385 / 200 = .152 Hours
.152 Hours x 60 (minutes in an hour) = 9.12 minutes for installing the liner on this duct
QuoteSoft Duct Data Backup
To make a backup of your QuoteSoft Duct data follow these simple directions:
- From your Main Menu you will need to go into the maintenance page.
- On the bottom right hand corner of the maintenance page are the backup and restore buttons.
- First click the button that says “Backup server information to a single qxp file”.
- Next you will choose what you would like to back up
- Data Files – All of your pressure files, datafile, catalog & accessory items etc.
- Database Files – All of your customers/jobs and jobs/zones. As well as your passwords.
- Both – This will backup the entire program, both Data Files and Database Files.
- Once you have chosen the type of backup to perform you will be able to choose where to save it.
- Choose the directory on the right hand side and choose the name on the left e.g. (03/04/04.qxp)
- Once you click ok the program will automatically compress and backup your information.
To restore your QuoteSoft Duct data follow these simple directions:
- From your Main Menu you will need to go into the maintenance page.
- On the bottom right hand corner of the maintenance page are the backup and restore buttons.
- First click the button that says, “Restore server information from a qxp file”.
- You will now have to navigate to and then choose the .qxp file i.e. (03/04/04.qxp)
- When you hit OK on the box you will have a few warnings pop up that you will have to press restore
- The program will now automatically restore from your last backup.
A few warnings:
When you restore you will be overwriting information that you currently have in the program. This will restore only what files are saved in your backup, and will not overwrite or remove files that exist in your current setup but not in the backup. !!Important!! All other users must be out of the program before you continue with the restore.
Go Remote and Go Server
Listed below are the instructions for an user to Go Remote. Please read over the instructions completely before attempting to Go Remote and call Tech Support if you need further assistance.
Go Remote
- The first step to going remote is to make sure that you have this feature enabled. To check this setting you will need to be logged in as an administrator. From your main menu you will go into the Setup Menu and then into the Central Options File. From the Central Options File you will need to make sure that option number seven is checked. (Allow users to “GO REMOTE”.)
- Once you have verified that this feature is enabled we will make our way to the Customer/Job File. From here you will need to Choose the Options Drop down (for QuoteSoft Duct) or the Tools drop down (for FabShop) Choose Go Remote.
- When you choose Go Remote a message box will appear. This is asking you if you will be editing any jobs. If you will be doing takeoff on existing jobs you will want to choose No. If you are going remote to solely change information from your setup menu (Datafile, pressure files, catalog, stock files and item options) Choose Yes. This will create an empty job file. Meaning that the jobs you have on your server will not be imported locally.
- The program will now import your data from the server to your local machine. Once it has finished it will close out. When you next open the program you will be in remote mode. At the top of your window it will tell you that you are in –REMOTE MODE–You may now use your program as you normally would. If you are going to be doing a Take Off while remote you will need to have your hardware key plugged in as usual.
Go Server
- When you are ready to return to the normal Server mode of operation you will need to make sure that your computer is connected to the network.
- If you made changes to anything from your setup menu (Datafile, pressure files, catalog, stock files and item options) we will need to manually export and import those changes. To do this you will need to go to the Local Disk C:\ on your computer. Open the Quote Or fab Folder. Inside you will have a Remote Folder. In the Remote Folder is a Datafile folder. Right Click on the Datafile and Choose copy. We will need to Paste that into your Qserver Or FABshop Folder. Choose Yes to replace all existing items.
- When you open your program you will still be in REMOTE MODE. You will need to go into your Customer/ Job File. From here you will need to Choose the Options Drop down (for QuoteSoft Duct) or the Tools drop down (for FabShop) Choose Go Server.
- When you choose to Go Server you will be prompted as to whether you have exported any jobs you have added or made changes to. If you have not added or made changes to any jobs you can click Yes. If you have added or made changes to any of your jobs you will need to export those and then choose to go server one more time. Once you have exported the jobs you have added or changed you can click yes.
- When you next open the program it will be running from the Server. You will now need to import the Jobs that you previously exported, if any.
Enabling Macros for Your Microsoft Excel Export
Macros are used with your QuoteSoft Duct Excel reports. They allow all of your data to fully be imported before calculations are made. Often these macros are disabled. Or maybe you do not want to enable them every time you run an Excel report. Here we will walk through enabling macros for use with QuoteSoft Duct.
The first step is to open up an Excel report using the reports page. To open a report you can either double click it from the list or single click to highlight it and then click the run report button below.
When your report opens you will have the option to either disable macros, or enable macros. Choosing disable macros will not allow the report to function correctly. While enable macros will allow it to run as it was meant. You will only get this option if you have your security level set to Medium.
Setting Your Macro Security Level
In order for your reports to function fully you will need to either set your Macro Security Level to medium or low. Below are the steps to do so.
Once you have opened a report you will need to go to the tools menu. Towards the bottom of your tools menu is Macro. Once you choose macro another menu will open. On that menu you can choose Security. Now you can choose the appropriate security level (Medium or Low).
FAQ
Q: How do I backup and restore my QuoteSoft Duct information?
A: To make a backup of your QuoteSoft Duct data follow these simple directions:
- From your Main Menu you will need to go into the maintenance page.
- On the bottom right hand corner of the maintenance page are the backup and restore buttons.
- First click the button that says “Backup server information to a single qxp file”.
- Next you will choose what you would like to back up
- Data Files – All of your pressure files, datafile, catalog & accessory items etc.
- Database Files – All of your customers/jobs and jobs/zones. As well as your passwords.
- Both – This will backup the entire program, both Data Files and Database Files.
- Once you have chosen the type of backup to perform you will be able to choose where to save it.
- Choose the directory on the right hand side and choose the name on the left e.g. (03/04/04.qxp)
- Once you click ok the program will automatically compress and backup your information.
To restore your QuoteSoft Duct data follow these simple directions:
- From your Main Menu you will need to go into the maintenance page.
- On the bottom right hand corner of the maintenance page are the backup and restore buttons.
- First click the button that says, “Restore server information from a qxp file”.
- You will now have to navigate to and then choose the .qxp file i.e. (03/04/04.qxp)
- When you hit OK on the box you will have a few warnings pop up that you will have to press restore
- The program will now automatically restore from your last backup.
A few warnings:
When you restore you will be overwriting information that you currently have in the program. This will restore only what files are saved in your backup, and will not overwrite or remove files that exist in your current setup but not in the backup. !! Important!! All other users must be out of the program before you continue with the restore.
Q: How do I set my standard length for rectangular or round duct?
A: To set your standard length for round or rectangular duct follow these simple directions:
- From the main menu of the program you will need to go into your setup menu.
- On your setup menu click either the rectangular or the round tab.
- Click once to select the pressure file you would like to edit.
- Now click edit at the bottom of the screen. This will open up your pressure file.
- Once inside your pressure file you will be able to set your standard length
- For Rectangular you will go to the seams page.
- For Round you will go to the joints page.
Q: How do I add liner to an existing job/zone?
A: To add liner to an existing job/zone we will need to be on the takeoff screen looking at the job in question.
- At the top of your takeoff screen is a Globals drop down menu. Click that.
- Now click the Global Wizard at the very top of the list.
- Click OK on the warning dialog.
- Choose liner off of the drop down and choose what you would like to make the change to (rect/round/oval) then click next.
- Now choose the liner type you would like to add, and hit next again.
- You will now choose the scope of items the global will affect.
- Choose all items if you wish to do everything. It will only make the change to what you chose earlier i.e. rect or round or oval.
- You can choose a specific range of items i.e. 1-20
- You can be more specific i.e. you can choose to do the global on only items in a certain sub zone or pressure file.
- Once you have chosen the correct scope click next.
- The next screen will show you what the change entails. If you hit list it will give you the exact item num bers that will be affected. Click next to complete the global change.
Q: How do I create a new stainless pressure file?
A: To create a new stainless steel pressure file we will start on the base setup menu.
- Click on the Setup menu from your main menu.
- To make things simple we are going to copy your Black Iron Welded Pressure File.
- Right click on the Black Iron file. Choose copy file. You will be copying this as a custom file so choose custom.
- Give your file a name
- Once your file has been named you will see it appear on your pressure file list under custom.
- Double click to open your new pressure file. You can also right click and choose edit, or click on the pressure file once to highlight it and then click edit below.
- The most obvious change for the new pressure file will be on the materials page. Choose your stainless material you have setup in your datafile. You will also want to verify your seams, joints, sealants, reinforcements and labor.
Q: How do I change my material pricing for metal?
A: With the fluctuating costs of metal today, changing your material pricing is a snap.
- From the main menu of the program click your setup menu.
- While on the Base Setup Menu click the data file button.
- Once in the data file you can click on the materials page.
- Now click on the material whose price you would like to change or click Material Cost per Pound / Kilo and set all or factor all amounts. Make the changes and exit.
Q: I have made a change to my pricing in my data file and I wish to have a zone that I have already completed reflect the new prices.
A: After you have finished your pricing updates simply go to the Job File and edit each of your zones that you have completed.
- Once inside the Takeoff screen go to the Globals drop down menu and choose General Recalc. This option will ask you to input the first item and the last item that you wish to be recalculated.
- The program will automatically load the needed Setups and Pressure Files for the items as they were originally taken off and recalculate them with the new prices.
Q: How can I keep the change that I make to the default joint type on for this entire Takeoff?
A: If you are in Takeoff and you make a change to your default Joint, Joint Sealant, Seam, Seam Sealant, Vane or Hanger and you wish to have that change stay on for the rest of your items until you change it back you need to visit the Central Options File.
- From the Main Menu screen click on the Setup Menu button. Then click the Central Options button in the upper right of the screen. You will then have to go to your Takeoff Options page.
- To make your changes stay on throughout your takeoff you will have to have option 8 checked. Now when you continue your takeoff any changes you make to the default Joint, Joint Sealant, Seam, Seam Sealant, Vane or Hanger will stay on until you change them again.
Q: I buy my spiral pipe but manufacture my fittings. How do I set this up in the program?
A: The program is designed to be setup to calculate spiral and fittings by either a fabrication process for all, some or none.
- To setup spiral pipe as a purchased item you will have to edit your round pressure file. From the Main Menu go to the Setup Menu and click on the Round tab on your Pressure File List. Then select the Round pressure file you wish to make the change to and click EDIT at the bottom of the screen.
- First visit the Materials page. The Include Metal Cost option will need to be changed to EACH. Then verify that the Include Metal Cost on Tees and Crosses is set to YES. Then return to the Menu of the Pressure File.
- Next, click on the spiral pipe icon in the item grid to the right. Then look at the bottom of the page and UNCHECK the Include Metal Cost option. This will tell the program that you are going to enter a cost per foot for this item and you do not want it to use the fabrication labor or to calculate square feet of metal needed.
- Lastly, enter in your cost per foot of spiral pipe into the cost column per diameter. Then click the Non Standard Length button and do the same.
- As a verification process, you will need to click on all the items in the grid to verify that they DO NOT have Include Metal Cost unchecked.
- Now when you do a takeoff, you will get a purchased price for your spiral and your fittings will be calculated as a manufactured item.
Q. How do I run a report on only the rectangular items in two of my four zones on this job?
A: What you are asking is to run a report on Multiple Zones and filter that report to only show Rectangular items.
- To do this, from the Main Menu click on the Job File button, then the Reports button on the right of the page.
- The first step will be to setup the report options for your specific request. On the right side of the reports list you will see the report options available.
- For the first part of the requested report select Multiple Zones and then select Rectangular as your filter.
- Click the report you wish to run from the Reports List and click Run Report. You will then have to choose your zones that you wish to run the report on from the dialog box and then click OK.
- When the report opens you will see the Zone name will show the ones you have selected and the report will contain rectangular items only.