
The QuoteSoft Duct program comes with an Excel Export feature created to assist you in managing your estimates.
...
The Excel Settings button will take you to the Final Estimate Summary (FES) settings page, allowing you to select which of the pages you wish to have exported.
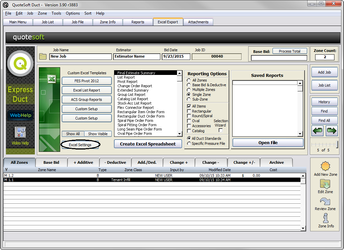
Each of the check boxes listed is a sheet in the template. For example, the Hanger Totals will list each of the hanger types used and the totals for each.
Each sheet will have calculations and an export process, so the fewer boxes that are checked, the shorter your export time will be.
Setup Exercises: Excel Export
This exercise will walk you through customizing one of the preinstalled Excel templates. This procedure is the same for importing one of your own custom templates. We'll assume that you have picked the FES2007.XLT template to start with and customize. You will also need to know the location of your Data Base (Qserver folder). You can find this by viewing the Administration page from the Main Menu (for our example we'll use the location of C:\Qserver).
Exercise 16: Customizing an Excel Template
- First you will have to navigate to your Qserver folder. Do this by double clicking the My Computer icon on your desktop. If you do not have one, click the Start button and select it from there. Double click the C drive (local disk C) and then find your Qserver folder and double click it as well. Inside the Qserver, you’ll find the Template folder; double click it.

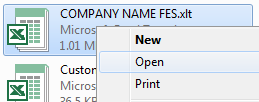
- Once inside the Template folder find the FES2007.XLT and select in. If your system is set to hide file extensions, you may not see the .XLT at the end. After selecting the template, right click it and select Copy. Then go to the Edit drop-down menu and select Paste. This will put a file called Copy of FES2007.XLT in your folder. Right click this new file and click on Rename. Type in your company name before the FES.XLT (COMPANY NAME FES.XLT) and hit Enter on your keyboard. The file will be renamed.

- If you double click to open the template, Microsoft Excel will open a COPY of your template. You will then have to choose Save As and make sure that you navigate to this location, and give it the SAME EXACT NAME as your current template to overwrite it. We recommend a simpler procedure; RIGHT CLICK your template and choose OPEN. This is a shortcut to open the template directly, not a copy of it.
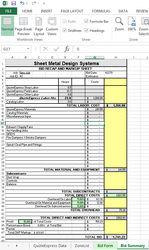
With the template open, we can begin to make our customizations. For the purpose of this exercise, let’s change the Company Name and insert lines into the Material Quotes Summary section for VAV’s and Hoods. - Click into Cell A1 and type in your company name. This cell is linked to other pages as well, so it will update all sheets with your company name.

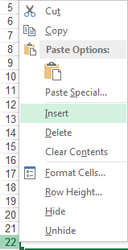
- Our next step is to insert a new line into our Material Quotes Summary section. Mouse over the line you wish to insert a line above; for this example, we’ll use 22. Right click on the 22 and choose insert.
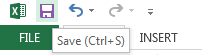
All the formulas in the report will be updated and maintained for the new line. Type in the new piece of equipment (VAV’s) and repeat for the next. These steps can also be used for the Subcontractors and Labor Summary. Continue until all of your changes have been made. - Return to the top of the page, go to the File drop down menu, and click Save.
The template will be saved with all of the customizations and changes you made. Go to the Filedorp down menu and select Exit.
The next step is to link your new custom Excel sheet into the program as the default template. We’ll also select which of the sheets we need to have filled out on the Excel settings page. - Open the QuoteSoft Duct program and click on the Job File button.

- Click the Excel Export tab in the middle of the page.

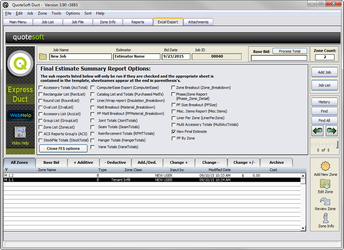
- Select the Final Estimate Summary Excel report by left-clicking it.
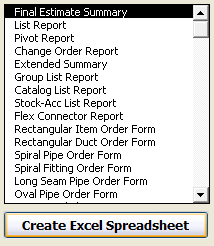
- Hold down the "SHIFT" key on your keyboard and Right-Click on the Create Excel Spreadsheet button. Let go of the Shift key.
- Select your new custom template from the list on the left and click the OK button.

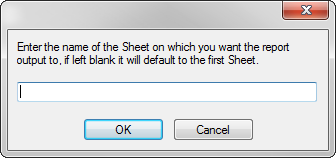
- Leave the next dialog box blank and click OK. We did not reorder the sheets in our template, so the program can continue to export the data to the same sheets as in the default.
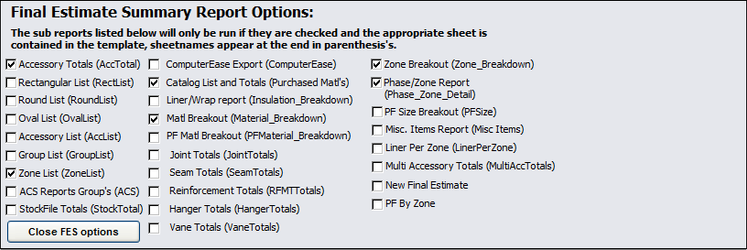
- Next we have to select which export process we want to use. Click the Excel Settings button and then the Set FES Options.


- Using the FES2007.XLT template requires only six selections to be made: Accessory Totals, Zone List, Catalog List, Material Breakdown, Zone Breakout, and Phase/Zone Report. Click Close FES options.
- Now you can run your custom Excel export by clicking the Create Excel Spreadsheet button with a left click. Be sure to select the Report Options you require to the right before running your report. Excel will open and fill in the required data