Added to the 3.16 Duct program is a new ability to export and import Vulcan CAM files. This process will allow you to import a single zone or an entire job without having to do any takeoff yourself. You will also have the ability to export desired items to the Vulcan CAM software from QuoteSoft Duct.
| Table of Contents | ||||
|---|---|---|---|---|
|
Prerequisites
- QuoteSoft Duct 3.16 or newer
- Unlock BIM feature in Duct
- Unlock necessary features in Vulcan
Things to Keep in Mind
Importing Duct and Fittings from Vulcan
QuoteSoft Duct uses a mapping system for both fitting items as well as data. The fitting map is maintained by an external file in order to make changes rapid and easy. Due to the complexity of Vulcan fabrication software versus the simplicity of QuoteSoft Duct estimating software, fitting maps could be custom depending on desired results. It is important to note the fitting maps should be reviewed to ensure proper results are reached. This is easily done by generating a few simple test files from the Vulcan software.
Exporting Duct and Fittings to Vulcan
The export function has a similar feature to running reports. Both features allow users to filter out undesired job items or sections through the Selection Wizard. A single file can either contain a whole zone or a single subzone. During takeoff it will be important to properly label Subzone, Phase, System, and/or Area to ensure the proper filter can be applied during the export.
Accessory Items
There are items QuoteSoft Duct considers as an accessory and allows users to create their own accessory library with custom cost information. Because users have the ability to completely customize the Accessory palette users will need to manually map their QuoteSoft Duct accessory items to their corresponding Vulcan items. The good news here is the mapping process will only need to be done once unless the user decides to change the map. One example of this need is a Conical Spin-In. This is not an item QuoteSoft Duct considers as a fitting but rather an accessory item. If a Conical Spin-In will be used in Vulcan and exported out to QuoteSoft Duct then users will need to manually map the Vulcan item to the correct QuoteSoft Duct Spin-In.
Catalog Items
As of this time Catalog items cannot be mapped to Vulcan items. An accessory item would need to be created in QuoteSoft Duct for any commonly used catalog items you would like to map to QuoteSoft Duct.
File Import Process
The import process allows the importing of Vulcan files. This process currently only allows the importing of one file at a time. Vulcan creates two files for every export. They will be name the same but one will end in .import and the other will end in .import.signature. Our import process will only need the .import file and the other can be discarded. The import tutorial will use the TutorialFile.import located in \QSever\Vulcan-Tutorial-SM.
Import Tutorial
- Create a Job named Vulcan Import Tutorial
- The rest of the job fields do not matter to this tutorial and can be ignored
- Create a Zone named VulcanImport
- The rest of the zone fields do not matter to this tutorial and can be ignored
- Use your standard setup
- Go to BIM>Lockformer
- BIM is a new drop down menu located at the top of the screen next to Tools
- The Vulcan Import window will appear
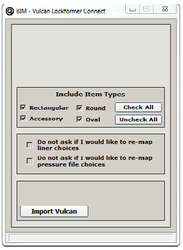
- We will leave all Item Types turned on
- Click the Import Vulcan button
- Browse to \QServer\Vulcan-Tutorial-SM and select TutorialFile.import.
- On the first import you will need to map the pressure class files
- You will only need to map the Pressure Class once; the program will remember in the future
- If an import recognizes a pressure class you have previously mapped you will be prompted to either use the previous mapping or to re-map the file.
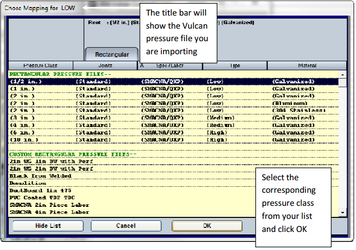
- The pressure class map window will display the Vulcan pressure class at the top of the window
- The import has intelligence built in to determine the type of fitting being imported and will only allow a pressure class selection for the appropriate type
- Simply select the appropriate QuoteSoft Duct pressure class that corresponds with the Vulcan class.
- QuoteSoft Duct will now import the items
- If there are errors with the import you will be prompted to view the import log which will list any item that did not import correctly.
- Once the import process is complete you may work with the zone as if had input the fitting manually; all other program features are available.
For more information on this process please call 800-813-7020 and speak with Chris Blair, or email him at chrisblair@quotesoft.com.
File Export Process
The export process allows the exporting of Vulcan files. Vulcan requires two files for every export. They will be name the same but one will end with .import and the other will end with .import.signature. Unlike QuoteSoft Duct, Vulcan does require both files to exist in the same folder when importing into their program.
Export Tutorial
- Create a Job named Vulcan Import Tutorial
- The rest of the job fields do not matter to this tutorial and can be ignored
- Create a Zone named VulcanExport
- The rest of the zone fields do not matter to this tutorial and can be ignored
- Use your standard setup
- Input a handful of fittings into the newly created job
- Exit the Job
- Export the whole job
- Go to Tools→Plasma Connect and click on the Lockformer button
- Click No when prompted to use the selection wizard
- For the first part of this tutorial we will simply export all items
- Select a location for the file to be saved
- The Desktop or Documents folder is a good place for the tutorial
- Name the file ExportTutorial1
- Click No when prompted to use the selection wizard
- If you browse to the location you selected to save the files you will see two new files
- ExportTutorial1.import
- ExportTutorial1.import.signature
- Both files must exist in the same folder for Lockformer to input the data
- Do not open either file in Notepad as it could corrupt the files and render them useless
- Go to Tools→Plasma Connect and click on the Lockformer button
- Export using the Selection Wizard
- Go to Tools→Plasma Connect and click on the Lockformer button
- Click Yes when prompted to use the selection wizard
- Select a location for the file to be saved
- The Desktop or Documents folder is a good place for the tutorial
- Name the file ExportTutorial2
- The selection wizard will open
- The selection wizard used for the export process is the same wizard used for reports. Users have the ability only export desired items from the customer file.
- Go to Tools→Plasma Connect and click on the Lockformer button
- Once the export process is complete you may import the files into the Vulcan software. Remember to have the .import and .signature files located in the same folder before importing into Vulcan.
For more information on this process please call 800-813-7020 and speak with Chris Blair, or email him at chrisblair@quotesoft.com.