The Manage Users feature lets you view, add, edit the individual member accounts in your team, export the user list and activity, view subscription information and access the Pulse Manage Teams window:
Note: The features described in this section are intended for system administrators and my not be available for your account. For more information, contact contact your system administrator or Customer CareService.
This section contains the following topics:
| Table of Contents |
|---|
| Anchor | ||||
|---|---|---|---|---|
|
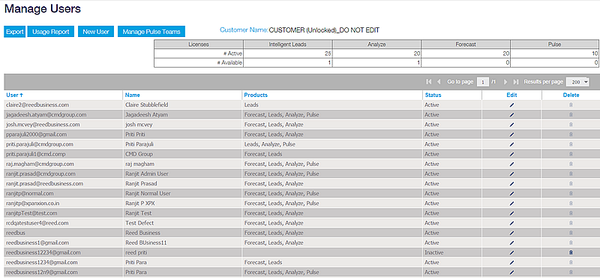
Understanding the license table
The license table at the top of the window contains the the number of active and available licenses for the subscription, as described in the following table.
| Field | Description | ||||||
| License table | The license table at the top of the window lists the number of active and available product licenses by module. Use this information to inventory product access when creating new user accounts. | ||||||
| User | The ID for the user when logging in to the Insight platform. | ||||||
| Name | The name of the team member. | ||||||
| Products | The modules user can access. | ||||||
| Status | The user status, either Active or Inactive. | ||||||
| Edit | Click to edit the user account. For more information, see Editing user information. | ||||||
| Delete | For accounts in Inactive status, click to delete the account. This function is only available to team managers. Contact your system administrator for more information.
|
Exporting the user list
You can export all the columns in the list as a formatted Excel spreadsheet.
To export the user list
- from the top of the window, click Export. The list automatically downloads as an Excel spreadsheet.
Anchor usagereport usagereport
Generating a usage report
You can generate a usage report for the members of your team in PDF format.
To generate a usage report,
1 | From the top of the list, click Usage Report. |
2 | In the menu, use the interactive calendars to select the date range for the report. |
3 | Select the users you want included in the report. You can select both Active and Inactive users. Tip: Click User Name at the top of the user name list to select all the users. |
| 4 | Click Export > Export to PDF. Result: The report is generated and opens in a separate window. |
The following table describes the information contained in the report for each user.
Field | Description | ||||||
|---|---|---|---|---|---|---|---|
| User name | The identification for the user. | ||||||
| User | |||||||
| Date range | The date range for the report. | ||||||
| Logins | The number of times the user has logged in to the system. | ||||||
| Companies Viewed | The total number of company details pages viewed. | ||||||
| Current Number of Searches | The total number of searches assigned to the user. | ||||||
| Current Number of Searches with Email Alerts | The total number of searches assigned to the user that include email alerts.
|
Creating a new user account
You can create a new user account for members based on the available company subscriptions as displayed in the license table at the top of the window.
To create a new user account,
1 | At the top of the window, click New User. Result: The New User menu is displayed | ||||||||||||||||||||||||||||||||
2 | Enter the information for the user, as described in the following table.
| ||||||||||||||||||||||||||||||||
3 | Once you have completed the user information, click Save.
Result: The new user is displayed in the list of users in the Manage Team window. | ||||||||||||||||||||||||||||||||
Accessing the Pulse Manage Teams window
The Pulse Manage Teams window is where you set up and manage the teams used in Pulse reporting. Note that Pulse must be activated for your account.
To access the Pulse Manage Teams window,
- Click Manage Pulse Teams from the top of the window.
Result: The Pulse Manage Teams window is displayed. For more information, see Working with Pulse teams.
| Anchor | ||||
|---|---|---|---|---|
|
Editing user information
The Edit User section lets you view and edit the settings for users assigned to you. Depending on your level of permission, you may not have access to every option.
Important! Make sure to click Save at the bottom of each section when you are finished making any changes.
To access a user account,
- From the Manage Users window, click either the User Name or the pencil icon on the line for the user account that you want to edit.
Result: The Edit window for the user is displayed.
The following table describes that sections of the Edit User section.
| Option | Description | |||||||||||
|---|---|---|---|---|---|---|---|---|---|---|---|---|
| Login Information | ||||||||||||
| Username | This is the name used to access the system. You cannot change this value. | |||||||||||
| Reset Password | Click to send an email to the user's email address that can be used in resetting the account password. | |||||||||||
| For each,
| |||||||||||
| Email Address | This is the email address used to send project and company alerts and product updates to the user. Type it in both fields for confirmation. | |||||||||||
| Confirm Email | ||||||||||||
| Active Status | Use to to set the account to either Active or Inactive. | |||||||||||
| Personal Information | ||||||||||||
| First Name | The first and last name of the user. | |||||||||||
| Last Name | ||||||||||||
| Company Name | The name and information of the company for the user. The company name cannot be changed. | |||||||||||
| Company Phone | ||||||||||||
| Address | ||||||||||||
| City | ||||||||||||
| Country/Region | ||||||||||||
| State | ||||||||||||
| ||||||||||||
Viewing Intelligent Leads entitlement and editing geography
The Intelligent Leads Subscription Information section lets you view and edit the geographic entitlement for the user, and view project stage and category entitlement. Use this section to control the geographic region the user can access for project and company searches.
To edit geography,
1 | Click Edit for the section you want to edit. Result: The Select menu for the section is displayed. | ||||||
2 | Click to expand the menu. Make your selections by using the boxes next to each section. Note: To see a complete list of project mapping for U.S. and Canadian data, see About NASD mappingMapping. | ||||||
3 | Click Save Changes.
|
Viewing Analyze and Pulse subscription information
Depending on your subscription, you can see subscription information for the Analyze, Forecast and Pulse modules.
- For Analyze, you can see the geographic entitlements for the user.
- For Pulse, you can see the Role assigned to the user.