The Navigation Buttons allow you to move backward and forward in the Pages you are working on.
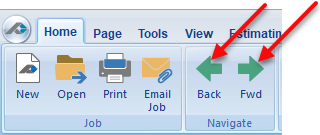
Back will move you to the page previous to the current page.
Forward will move you to the next page.
- The previous and next pages are not always the next in the list. PlanSwift goes by the pages you are viewing, similar to how a web browser history works. The buttons remain grayed out until you actually switch between pages. This way you do not need to skip pages you are not using.
Zoom / Pan:

PlanSwift 10.2 shown
Zoom allows you to select an area on your plans which will be zoomed to fill your screen area.
Fit to Page (Zoom to Fit in 9.2 and earlier) re-sizes the current plan to fit in the edit window (you will also see Sheet Size information above the plan, Measurement Type below it, and the current scale in the upper left).
Zoom to Max (9.3+) re-sizes the editing screen to show the entire editing space boundaries, including the space outside of the current plan, and the page information.
Zoom In zooms into the plan, centering on the center of your desktop. You can also zoom in by rolling the wheel on a wheel mouse up.
Zoom Out zooms out of the plan, centering on the center of your desktop. You can also zoom out by rolling the wheel on a wheel mouse down.
Pan, when selected, allows you to left-click on the plan and drag a different part of it into the current view. You can also pan by clicking and holding down the wheel on a wheel mouse.
Scrolling:
There may be times when you are digitizing or moving an item that the placement for the next node or the item is located out of the current view. There are a number of ways to handle this dilemma.
Hover Scrolling:
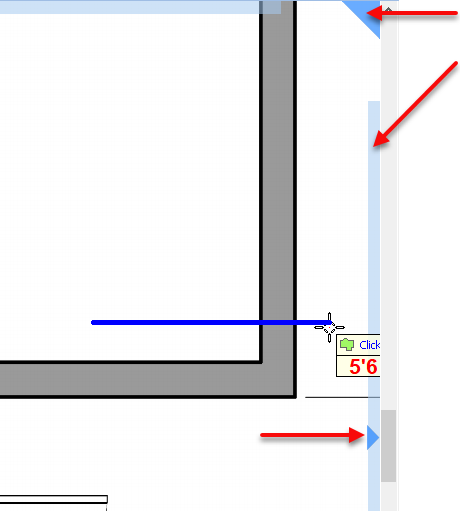
- As your mouse nears the top, right, bottom, or left of the plan/takeoff screen, you will notice two transparent blocks of blue (see the Hover Scroll image, below); the darker of the two has an arrow in it.
- Hovering (not clicking) your mouse in the darker blue box will make the plan scroll quickly in the direction of the arrow.
- Hovering your mouse in the lighter blue box will make the plan scroll slowly in the direction of the arrow.
- While scrolling, pressing the Spacebar reverses the direction of the scroll (see the Hover Scroll after Space Bar image below). This is useful if you went too far and don't want to move the mouse to the other side of the screen to scroll down.
Note: If you reach the edge of the PlanSwift drawing area, you will be presented with red boxes instead of blue; this means that you cannot scroll anymore in that direction.
Hover Scroll:
Wheel Mouse Pan:
- Hold your wheel mouse button down and "drag" the plan.
- Release the button to continue digitizing, or repeat step 1 to pan some more.
Pan via the Zoom / Pan tool:
- This tool is discussed in detail in the Zoom and Pan section.
Scroll Bars:
- On the right and the bottom of the current view, you will see scrollbars. You can click and drag these scrollbars to move around the plan.