Legacy Duct EastCoast BIM Connect
Added to the 3.14 Duct program is a new ability to import EastCoast XML exports. This process will allow you to import a single zone or an entire job without having to do any takeoff yourself. After importing, you can export the labor and material costs for each item imported back into the XML file to be re-imported into the EastCoast drawing.
Prerequisites
- QuoteSoft Duct version 3.14 or newer
- Purchase CAD Connect Module for EC CAD
- XML file from EC CAD
Things to Keep in Mind
Fitting Items
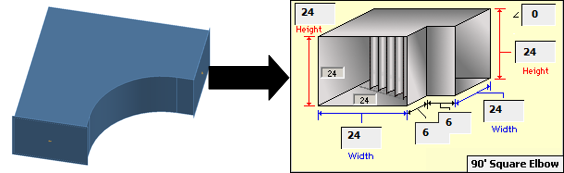
We have worked hard to ensure items from EC CAD that fall under the QuoteSoft category of “fitting” have been properly mapped. Simple and common fittings are coming across 1:1 on a 100% basis, such as a square elbow or a round reducer. However, it is important to mention that EC CAD does have the ability to draw fittings outside of QuoteSoft’s library. The fittings that do not currently have a 1:1 match are listed in the known issues section.
We will mark each of these fittings that come across without a precise match as such in the notes. Every fitting QuoteSoft has in its library does have a corresponding fitting in EC CAD and is mapped to fit its partner.
Accessory Items
There are items QuoteSoft considers as an accessory and allows users to create their own accessory library with custom cost information. Because users have the ability to completely customize the Accessory palette users will need to manually map their QuoteSoft accessory items to their corresponding EC CAD items. The good news here is the mapping process will only need to be done once unless the user decides to change the map. One example of this need is a Conical Spin-In. This is not an item QuoteSoft considers as a fitting but rather an accessory item. If a Conical Spin-In will be used in EC CAD and exported out to QuoteSoft then users will need to manually map the EC CAD item to the correct QuoteSoft Spin-In.
Catalog Items
As of this time Catalog items cannot be mapped to an EC CAD item. So an accessory item would need to be created in QuoteSoft for any commonly used equipment items you would like to map to QuoteSoft.
Mapping Accessory Items
- Create temporary job
- Create temporary zone with the accessory file you would like to use
- Any pressure class files can be used
- Inside the zone go to Tools->Import EastCoast CAD/CAM
- The options shown in the window do not matter at this point. They will be addressed later.
- Click the Scan Import File button and select the XML file you would like to scan.
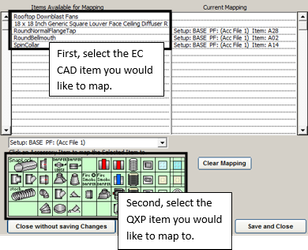
- You will then see this dialog box if there are items that need to be mapped.
- The left column shows you the items from EC CAD that do not have a corresponding QuoteSoft item
- Simply select an item in the left column and then select the accessory item from the green section.
- It is not necessary to map every item. There could be EC CAD items that do not have a corresponding QuoteSoft item. This is based on the particular accessory file being used.
- Once you have finished mapping the items click the Save and Close button; the program will remember the specified mapping in the future and will only need to be updated should the user desire it.
- It is a good idea to Scan the first several EC CAD files until all accessory items have been mapped.
File Connect Process
There are two different processes that allow the importing of EC CAD XML files. Each process also allows labor and material cost to be “pushed” back out to the same XML file. This gives contractors the ability to be 5D BIM compatible where the coordination process requires pipe and fittings to contain time and cost information. The first process requires a user to create a job and a zone. The second process will create the job and subsequent zone(s) based on information in the XML file. Each process explanation will use the OfficeComplexEA.xml located in \QServer\EC-Tutorial. (If using Fabshop, the file will be in \Fabshop\EC-Tutorial.)
Connect Process 1 – Used to map accessory items
- Create a Job named EastCoast Import Tutorial
- The rest of the job fields do not matter to this tutorial and can be ignored
- Create a Zone named EastCoast1
- The rest of the zone fields do not matter to this tutorial and can be ignored
- Use your standard setup
- Go to Tools->Import EastCoast CAD/CAM
- You will notice options in the top right and bottom corners of this dialog box
- Include Item Types gives you the ability to decide which items to import
- Other Options gives you the ability to store the import file with job via the attachments folder as well as export cost information back into the EC CAD XML.
- Click “Scan Import File” button and follow the Mapping Accessory Items steps above
- Click “Import East Coast CAD” button
- Browse to location of your XML file and import the file
- On the first import you will need to map the pressure class files
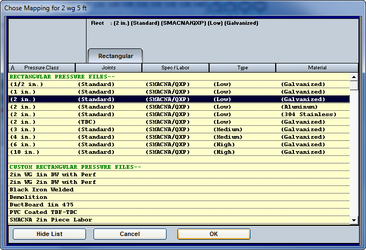
The title bar will show the EC CAD pressure file you are importing.- You will only need to map the EC CAD Pressure Class once and the program will remember in the future
- If an import recognizes a pressure class you have previously mapped you will be prompted to either use the previous mapping or to re-map the file.
- QuoteSoft will now import the items
- If there are errors with the import you will be prompted to view the import log which will list any item that did not import correctly. Any EC item in this list that does not have a map to a corresponding QuoteSoft item will get a placeholder and allow you to plug in a cost for the item.
- In this tutorial I do not have Rooftop Downblast Fans mapped to an appropriate accessory item. However the item was still brought in and given a placeholder with the same name as the item
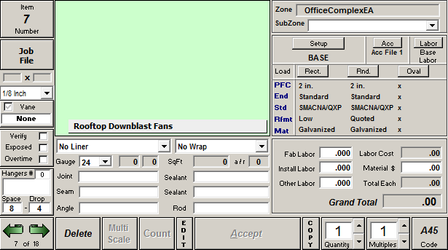
- I can now manually put in a cost for this item if I wish
- At this point the import process is complete. If you chose to export cost data back into the XML file the program will do so after all items have been brought in and processed.
Connect Process 2 – Automatically creates zones
- Use the Job named EastCoast Import Tutorial we created above
- Go to Tools->Import EastCoast CAD
- Do not worry about creating a zone. This process will create your zone(s) automatically from the file
- You do not have the option to Scan a file as we did above. If you would like to scan a file for accessory items will need to follow the steps under Mapping Accessory Items
- Turn on Import Multiple Files
- Click “Import East Coast CAD” button
- Browse to \QServer\EC-Tutorial and then click OK
- The files in this tutorial contain the same pressure class data as the tutorial above and introduce new ones. You will first be prompted to keep the previous mapping or to re-map; choose Use Previous. You will then be prompted to map the new pressure class files it does not recognize.
- QuoteSoft will now import the items
- If there are errors with the import you will be prompted to view the import log which will list any item that did not import correctly. Any EC item in this list that does not have a map to a corresponding QuoteSoft item will get a placeholder and allow you to plug in a cost for the item.
- At this point the import process is complete. If you chose to export cost data back into the XML file the program will do so after all items have been brought in and processed.
Known Issues
Gored Elbows
Gore count is not coming across correctly.
Importing Multiple Files
Currently there is an issue with importing more than 18 XML files at a time. As a workaround ensure you have selected less than 18 files through the multiple files import option.
Fittings Without a Map
- Rectangular Elbow, Radius Angle Throat has been mapped to S04-90 Degree Radius Elbow
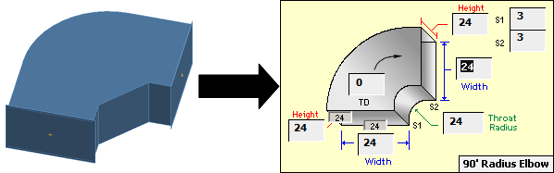
- Rectangular Elbow, Square with a Radius Throat has been mapped to S02-90 Degree Square Elbow
- Stamped Elbows
- EC CAD has the ability to draw reducing stamped elbows; QuoteSoft does not allow this option as stamped elbows do not generally change size. Reducing stamped elbows are mapped to our stamped elbow. EC CAD also will allow detailers to draw a stamped elbow with an angle different than 90 or 45 degrees. QuoteSoft does not allow this as it is not provided by most fabricators.
- Rectangle Fire Dampers
- All Rectangle FDs from EC CAD are currently mapped to QuoteSoft fitting S35 which is a standard Sleeve fitting. We will be expanding this functionality in the future to include the option to map certain fire dampers to accessory items.
- Square Tee
- The straights for square tees are not being mapped to the appropriate field
- Rectangle Tee with Radius Branch
- Straight Body Tap Tee
- Catalog Items
- Round Duct Bellmouth
For more information on this process please call 800-813-7020 and speak with Chris Blair, or email him at chris.blair@quotesoft.com.
©2022 ConstructConnect, Inc. All rights reserved.