
Takeoff Drop Down Menus
File Menu
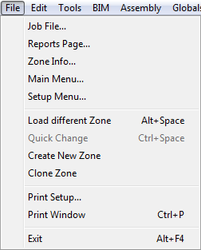
- Job File… – returns you to the Job File screen.
- Reports Page… – shortcut to jump to the Reports page.
- Zone Info… – shortcut to jump to the Zone Info page.
- Main Menu… – shortcut to jump to the Main Menu.
- Setup Menu… – shortcut to jump to the Setup Menu.
- Load different Zone – returns you to the Job File and brings up the Zone List for you to select a Zone to edit.
- Create New Zone – returns you to the Job File and brings up the New Zone screen.
- Print Setup and Print Window – to select the printer to use. Print Window allows you to print what is currently on screen.
- Save and Restore Settings – save the current configuration of all your palettes and user modifications. Use restore if your settings are ever changed.
- Exit – same as clicking the X in the upper right; closes the program.
Edit Menu
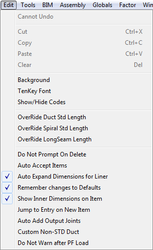
- Cut, Copy, Paste, Clear – basic Windows functions
- Background – use to change the background from Windows gray to any color of your choice.
- Ten Key Font – allows you to set the font for Ten Key Entry
- Show/Hide Codes – will remove/show the codes of the items instead of the icon.
- Override Duct Standard Length – set a new standard length of duct without having to edit the pressure file. Will only remain for this Takeoff session.
- Override Spiral Standard Length – set a new standard length of spiral pipe without having to edit the pressure file. Will only remain on for this Takeoff session.
- Override Long Seam Pipe Standard Length – set a new standard length of Long Seam Pipe without having to edit the pressure file. Will only remain on for this Takeoff session.
- Auto Accept Item – when you have an item on screen and click on another item, the program will automatically accept the item you have up before bringing up the new items.
- Auto Expand Dimensions for Liner – will increase the OD for the Liner thickness.
- Remember Changes to Defaults – any overrides you make to the Joint, Seam, Sealers, Hangers, etc. will remain until you change them back.
- Show Inner Dimensions on Item – will show the item’s ID in small boxes on the big picture.
- Jump to Entry on New Item – select a new item and the arrow will jump to the Entry Palette.
- Auto Add Output Joints – will automatically accept a loose Joint Connection immediately following an item you’ve changed the Joint Connection on.
- Custom Non-Standard Duct – will allow you to price and labor the length on screen as one single piece of duct.
Tools Menu
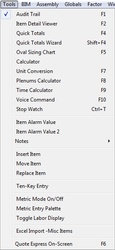
- Item Viewer – shows the list of items you’ve accepted into your zone.
- Item Detail Viewer – will show you details on the items. Used during data proofing.
- Quick Totals – a total for the zone, dollars, and labor hours. The Wizard allows you to select what you want totaled.
- Calculator – basic Windows calculator
- Unit Conversion – will assist you in converting items from standard to metric, round to rectangular, etc.
- Plenums Calculator – utility to aid in calculating the material and labor required for plenums.
- Time Calculator – converts decimal hours to minutes and hours.
- Voice Command – gives the ability to call up items with voice.
- Oval Sizing Chart – will let you see the round/oval chart.
- Item Alarm 1 & 2 – set an alarm for a grand total too low or high.
- Item Notes – attach a note to an item for order processing.
- Insert, Move, Replace Items – manipulating the items already accepted into your bid.
- Ten-Key Entry – will allow you to bring, edit, and accept items via the ten-key.
- Metric Mode and Entry Palette – for metric blueprint takeoffs.
- Toggle Labor Display – will show minutes and hours rather than decimal hours.
- Excel Import -Misc Items – imports lists of items from Excel without having to take them off.
- CAD-Connect – import a CAD drawing automatically
- Palm Pilot Connect – import a takeoff from your Palm Pilot
Assembly Menu
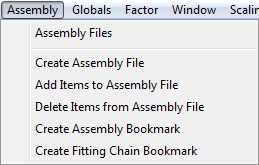
- Assembly Files – shows the list of assemblies already created.
- Create Assembly File – begins the process to save items to an assembly file.
- Add/Delete Items to/from Assembly File – add new items or remove items from already-created assembly files.
- Create Assembly Bookmark – add a button to the Bookmark palette for an assembly file.
- Create Fitting Chain Bookmark – add a button to the Bookmark palette for a fitting chain.
Globals Menu
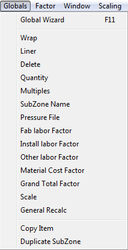
- Global Wizard – opens the Global Wizard utility.
- Wrap, Liner, Delete, etc. – perform simple global changes under the categories listed.
- General Recalc – update pricing or construction standards on your own items after making changes to your data files.
- Copy Item – copy a range of items.
- Duplicate SubZone – copy the entire subzone and have the ability to rename each copy.
Factor Menu
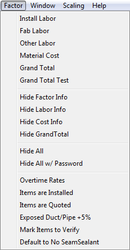
- Install, Fab, Other, Material Cost, Grand Total – apply a percentage factor to those fields.
- Grand Total Test – apply a percentage factor to the grand total but don’t have it stored.
- Hide Factor/Labor/Cost/Grand Total Infor – removes those fields from view. Use Hide All to quickly hide everything. You can also assign a password.
- Overtime Rates – turn on the overtime percentage.
- Items are Installed/Quoted/Exposed – same as the check boxes on the left of the screen. Used for adjustments.
- Mark Item to Verify – will allow you to attach a note to the item, viewable in the reports.
- Default to No Seam Sealant – items will have seam sealant disabled.
Window Menu
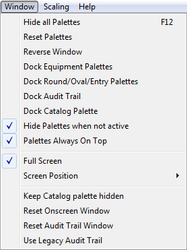
- Hide all Palettes – hides the palettes from view
- Reset Palettes – will place them back in default configuration.
- Reverse Window – flips the palettes’ locations.
- Dock Equipment/Round/Oval/Entry/Item View/Catalog – attaches the palettes to the takeoff window.
- Hide Palettes when not active – minimizes palettes
- Full Screen – fills in the background with the program’s default screen. You can set the screen position when in full screen.
- Keep Catalog Palette hidden – if you do not use the catalog, you can hide the palette.
Digitizer Menu
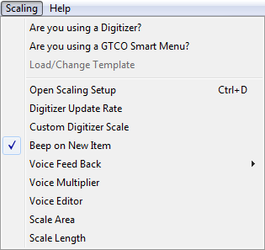
- Are you using a Digitizer/Smart Menu? – check to enable.
- Open Scaling Setup – customizations for the scaling process.
- Set Custom Scale – establish a scale not listed as a default.
- Open Scaling Setup – customizations for the scaling process.
- Set Custom Scale – establish a scale not listed as a default.
- Beep on New Item – audible sounds for item selections.
- Voice Feed Back and Multiplier – sounds played for items
- Voice Editor – record your own names of fittings.
- Scale Area – get the square feet of a drawing.
Help Menu
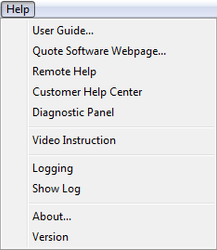
- User Guide – on screen version of the user manual.
- Support Phone – the QuoteSoft support number.
- Quote Software Web page – opens our website
- Webex Webpage – launches the Webex log in page
- Customer Help Center – our website help center
- About – version numbers
Ten Key Entry Instructions
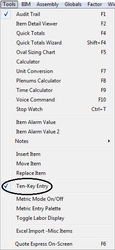
Once the feature is enabled under the Tools drop down menu, you will see the Item Codes appear over each of their icons on the Rectangular, Accessory, Round, and Oval palettes
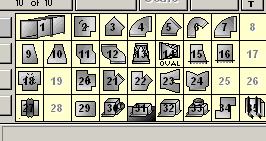
Now that this feature has been turned on you can use your 10 key pad on your keyboard to call up items, input their sizes and enter them into your Takeoff.
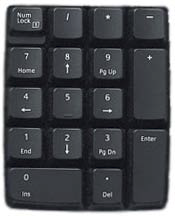
To use the 10 key simply call up the item by typing + then the number of the item and then hitting Enter. Example: to call up a Rectangular Square Elbow, type in + 2 Enter. You can then use the - key to move through the entry fields as you put in the dimensions needed.
The / key will allow you to then use the arrow keys to select a gauge change if needed. The * key will allow you to use the arrow keys to change the liner is so required.
Page Up and Page Down keys will allow you to scroll up or down.
Adding New Users and Assigning Permissions
Open the QuoteSoft Duct program and follow the instructions listed below to set up new users with permissions.
- Click the Administration button from the Main Menu.
- Click the Add New User button below the list of users.
- Type in the user’s log in name. This should be something that can be typed quickly and easily.
- Type in the user’s password. Only numbers and letters are allowed in the password. You can leave this field blank and the program will not require a password.
- Type in the user’s real name. Use their full name (for reporting purposes).
- Select the new name in Users List and click one of the attribute buttons:
- Administrator – full access to the program
- Power User – full access EXCEPT no access to the Administration page
- Regular User – only allowed to input jobs, takeoff zones, and run reports
- Custom User – specify exactly what you wish to allow them access to by clicking the Show Security Settings button and enabling/disabling access to sections of the program.
- Return to the Main Menu and your user has been set up.
Creating a Backup of the Jobs and Data Files
Open the QuoteSoft Duct program and follow the instructions listed below to create a backup of the Jobs, Data Files, or both.
- Click the Maintenance button from the Main Menu.
- On the lower right of the page, click Backup Server Information to a Single QXP File.
- Click one of the options available to you:
- Both – will back up both the Data Files and the Job Files
- Data Files – will only back up the Data Files
- Job Files – will only back up the Job Files
- Type in a file name for your Backup. We recommend using the date in the file name (e.g. 9-3-15_Backup)
- Choose a location to save the file and click OK.
- Once the program has completed the file, you have successfully backed up your data.
When you restore, you will be overwriting information that you currently have in the program. This will restore only what files are saved in your backup, and will not overwrite or remove files that exist in your current setup but not in the backup.
!!Important!! All other users must be out of the program before you continue with the restore.
Transfer Pressure File Information
Open the QuoteSoft Duct program and follow the instructions below to transfer information from one pressure file to another or to a group at the same time.
- Go to the Setup Menu and click the Transfer button at the bottom of the page.
- In the top (red) section, click the Choose button and select the file to use as the base (the file to pull information from).
- Select either Single Pressure Files or Multiple Files in the Yellow section.
- Select the pressure file(s) that you wish to push the information into.
- In the green section, check the boxes of the data you wish to have transferred from the base file.
- Click the Transfer button. When it is complete, click OK and then Return to Setup Menu.
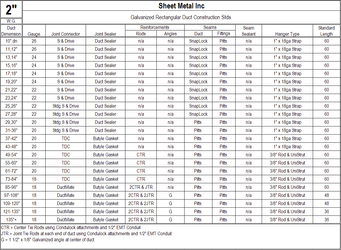
Sample 2″ W.G. Construction Standards
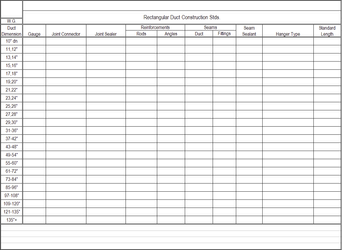
Blank Construction Standards
Printing a new Accessory Palette for Digitizer Template
Within QuoteSoft Duct you are allowed to move item locations in the Accessory Palette. Doing so will cause the Digitizer Template to no longer match what is available on the Takeoff screen. Follow these instructions to print a new template.
- Click on the Setup Menu button from the Main Menu.
- Click the Accessories Tab and select the Accessories File. Click the Edit button at the bottom of the screen.
- Click on the Create Template Picture button.
- Select the Server 2005 Template option and click the Print Screen Picture button.
- Cut out the new template and tape it over the original.
Creating a New Setup
QuoteSoft Duct has the capacity to use up to 10 different Setups. To create a new setup, follow these simple instructions:
- Click on the Setup Menu button from the Main Menu.
- Select the Central Options button on the left hand menu.
- Click the Program Architecture page.
- The Data Setup list is on the left, click the button just to the right "Add New Setup"
- Type in the name for the new Setup. You can create separate Setups for;
- Material Types – have a setup for Galvanized, Black Iron, Stainless, etc.
- Locations – create a setup for each city, state, area that you work in.
- Construction Types – have setups for New Construction, Remodels, whatever is required to have a completely different setup and labor hour calculations.
- Next you'll be asked a series of questions about copying pressure files, data files, options files, etc.
- After completing these steps, close the Central Options file, return to the Main Menu and you'll see the progress bar load the new Setup. You can now make changes to the new Setup that will not affect the original.
ACS Report Groups
ACS Reports Groups are used to organize Accessories, Catalog and Stock Items together into categories for reporting purposes. For example some grills, registers, and/or diffusers (GRDs) will be in the Accessory File as well as in the Catalog. But on your report you need all the items in the GRD classification to be listed in one area. The best way to accomplish this is by using the ACS Report Groups.
Creating an ACS Report Group
- Go to the Setup Menu and click "ACS Report Groups" on the lower left of the screen.
- On this page you will see the first 15 Groups available. There are arrows located at the bottom to create more then 15 Groups if needed. Click into the first groups' header and type in the title you wish to use. For our example use GRD.
- Click the Back button at the bottom of the page you are done.
Adding an Accessory Item to an ACS Report Group
- Click on the Accessories tab and edit the Accessories File. Once opened, click on one of the Diffusers.
- Go to the Options drop down menu at the top of the screen and click “Add Item to ACS Group”.
- Select GR from the pull down and you will see “ACS – GRD” appear over the item’s picture in the main window. This item will now be reported as part of the GRD Group in the ACS Groups tab on the Final Estimate Summary.
Adding a Catalog Category or Group to an ACS Report Group
- Open the Catalog and select the Category you wish to add to the ACS Group.
- If you desire to have the ENTIRE Category added to the Group, go to the Tools drop down and select “Add Category to ACS Group”. Select GRD from the pulldown.
- If you wish to have a specific Group added, then select the appropriate Group and go to the Tools drop down and select “Add Group to ACS Group”. Select GRD from the pulldown.


