...
This section contains the following step-by-step instructions for creating an Invitation to BidBid (ITB) project: Table of Contents
...
This section contains basic information you can use while creating a project.
Starting With
...
an Existing Project
You can create a new project using an existing project as a basis. This is particularly helpful if you are creating a project that is similar in scope, type, or has the same bid or build start date. The copied project includes copy will include the information on from the first main page of the existing project, but the copy does not include documents or any it will not copy over documents, bidder or trade information from the source project.
Saving Your Work
You can save and exit the form at any time - ; your work is to that point will be automatically saved. Click Save & Exit at the bottom left of the window to save the information you have already entered and close the form.
Moving to the Next Section
Once you have completed a section you can move to the next section by clicking Next at the bottom right of the page.
Note:
| Info |
|---|
| Note |
If you have not completed the required information, you cannot move to the next section. The systems alerts you to any unfinished information. |
...
The first section to complete is the Information section containing the basic information for the section.
About the Email Preview
The Email Preview panel on the left side of the page lets you see how the invitation will look to your invited bidders. As you enter the details for the project, the preview automatically updates with the information for the project. This feature gives you the opportunity to verify and edit the information before you send out the invitation.
Project Details
...
or incomplete fields. |
Project Details
This section contains the basic information for the project. Note that all of the fields in this section are required .The following table describes the fields in the Project Details sectionand are described in detail below.
| Field | Description | ||
| Project Title | The project title. This value must include at least three characters.
To use this feature: Start typing the existing project name in the Project Name field to display a list of matching projects in the list. Click on the name of the existing project you want to use as a basis for the new project. Result: The fields in the Information this section will populate with information from the existing informationsource project. Edit the information as needed for the new project. | ||
| Location | The physical location of the project, including street name and number, city, state and postal code. Tip:
Click to select the correct address. | ||
| Building Use | Click to select the building use for the project from the list. | ||
| Project Type | Click to select the project type for the project from the list. | ||
| Status | Click to select the status, or stage, for the project from the list. |
Events
The Events section lets you add a bid date and time and other important dates for the project, such as request for proposal or site walkthrough.
Adding the Bid Date
To add the bid date:
- In the calendar menu, select the bid date.In the time field, select the time for the bid event.
Entering Project Events
To add project events:
- Click the drop-down list and select the event for the project.
- Enter the date and time in the fields.
| Info |
|---|
| Note: You can delete events from the project by clicking the "X" on the line for the event. |
Primary Contact
This is the main contact for the project. The default setting names the ConstructConnect Bid Management account owner as the primary contact. You can use the tools in the section to select another account for this role.
Description
The Description section lets you add a text description of the project for items such as scope and other details. Enter as much information about the project to increase the bidding potential for the project.
Note to Bidders
Use to enter this field if you have specific information for potential bidders on the project.
Tip: Once you have completed the Information section of the project, click Next on the bottom right side of the page to move to the Documents section.
Completing the Documents Section
The Documents section is where you add plans, specifications and other documents to the project. You can browse and attach documents and also use use drag and drop:
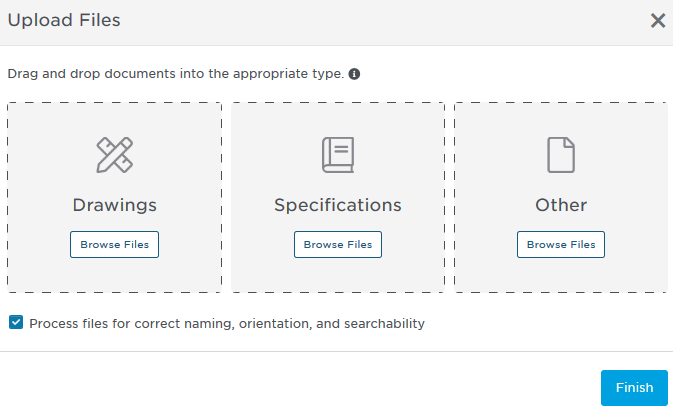
Uploading Documents
| 1 | Choose from Drag and Drop or Browse and Select to upload your project documents. Using Drag and Drop
Using Browse and Select
Result: The file is will be uploaded and is displayed in the Documents section (shown below).
| ||
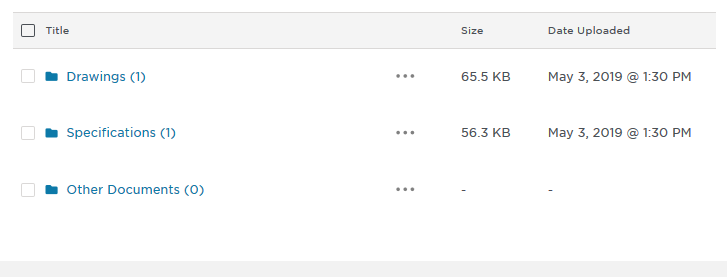
| 2 | Once you are done attaching documents, click Finish to complete the process. Result: The process runs and the documents are displayed in the appropriate file locations:
Tip: Clicking a file-type displays the details of the attached files:
| ||
| 3 | Once you are done, click Next in the bottom right corner to move to the next section. |


Completing the Trades Section
By default, there are no trades automatically attached to the project. You can add trades using a variety of methods, including by searching, using a template, and copying from the your previous projects. You can also have the system auto-identify the required trades using the documents attached to the project.
To add trades, click the Add Trades drop-down menu and select an option, as described in the following table
...
:
| Option | Description |
| Add TradesFrom List | Displays a menu with a full list of trades and codes. You can select an entire trade or just (i.e., Concrete) or individual sub-codestrades (i.e., Selective Demolition for Concrete). Click Apply to add the selected trades to the project. |
| By Template | Click and select the template to use a pre-populated list of trades. |
| From Project | Displays the Add Trades from Projects with a list of the trades from your previous projects. Select the project with the trades you want to add and click Add. |
| Auto-Identify Trades | Only available when specifications are loaded in the project, select . Select to have the system extract the list of required trades from project documents and add them to the project. |
...
Once you have completed adding trades to the project, you can then add bidders.
To add bidders:, click Save and Add Bidders at the bottom right of the Add Trades page.
...
Result: The Trades & Coverage window is displayed showing will display the trades you have selected for the project. You can then use the options in the menu to add bidders to your project. To continue and for more information, see Working with Trades and Coverage.
...