| Note |
|---|
|
When you are installing or upgrading PlanSwift, please close any running Microsoft Office applications (Excel, Outlook, etc.) and disable your virus scanner for the duration of the installation. See Check for and Install Using PlanSwift Automatic Updates to see if there is an upgrade to your existing version of PlanSwift. Curious about MAC support, check out: Can I Install PlanSwift on a Mac? Before you install PlanSwift, be sure your computer meets or exceeds our System Requirements. You must be a local (Windows) administrator to install and update PlanSwift. |
To Install PlanSwift:
Download the PlanSwift version for which you are licensed from MyAccount, see The PlanSwift Customer Portal (MyAccount) for more information. Typically, your browser will save the installer to your Windows "Downloads" folder.
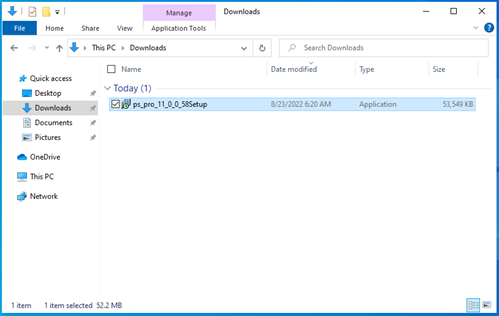
When the download is complete, locate the file that was downloaded and double-click it. (If you are using Chrome browser, you can just click on the downloaded file in the lower-left corner of your browser to launch it.)
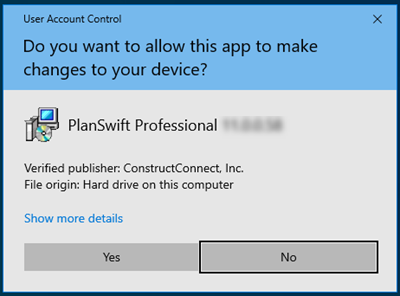
When prompted by User Account Control, click Yes.
The PlanSwift Setup wizard starts, and the first screen you see is the License Agreement (aka "EULA").
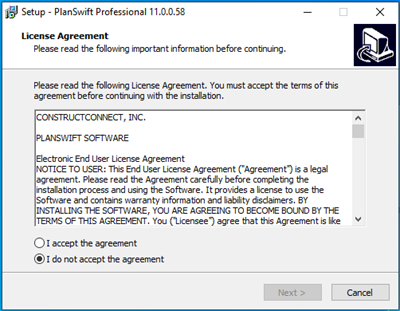
Please review the EULA, select "I Accept the Agreement", and then click Next.
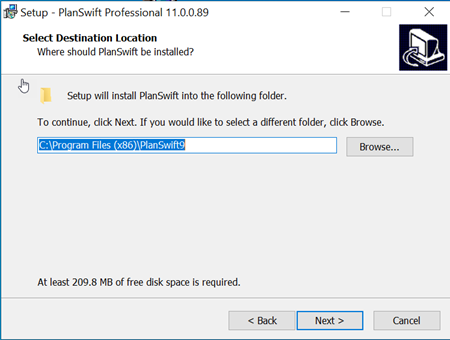
Next, you are asked where you want PlanSwift installed...
...
| Info |
|---|
| title | Upgrade or Side-by-Side Install |
|---|
|
| Version you are installing | Fresh Install (no previous version) | Upgrading from Previous Version of PlanSwift |
|---|
| 11.0.0.89 | The Default installation location will be <system drive>:\Program Files (x86)\PlanSwift. You can change this location to any valid location you like on your local hard drive, however changing the folder may cause issues with future installations. | Default Installation: upgrade-in-place, replaces highest previous version located The Default installation location will be <system drive>:\Program Files (x86)\PlanSwiftX where X represents the highest PlanSwift version located. You can change this location to any valid location you like on your local hard drive; we encourage you to change this to PlanSwift11 and import your data from the previous version to avoid the possibility of losing data. When you are done installing 11.0.0.89 and launch the program (assuming you installed to a new folder, not an upgrade-in-place), Click Home > Import Jobs and Templates to import data from the previous version of PlanSwift. (If you have already upgraded from say PlanSwift 9 to PlanSwift 10 but never uninstalled PS9, PS11.0.0.89 allows you to import jobs/templates from PS9 only. To import data from PS10, you must uninstall PS9 first.)  Image Added Image Added
Upgrading PlanSwift 10.3.0.56 to PlanSwift 11.0.0.89
Upgrading PlanSwift 10 to PlanSwift 11.0.0.89 (PS10 upgraded PS9)
| | 10.0.0.56 | The Default installation location will be <system drive>:\Program Files (x86)\PlanSwift10. You can change this location to any valid location you like on your local hard drive, however changing the folder may cause issues with future installations. | Default Installation: upgrade-in-place, replaces highest previous version located The Default installation location will be <system drive>:\Program Files (x86)\PlanSwiftX where X represents the highest PlanSwift version located. You can change this location to any valid location you like on your local hard drive; we encourage you to change this to PlanSwift11 and import your data from the previous version to avoid the possibility of losing data. 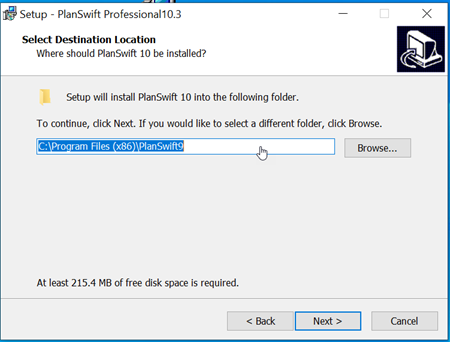
Upgrading PlanSwift 9 to PlanSwift 10.3.0.56
|
|
|
|
If you are performing an upgrade-in-place over a previous version of PlanSwift, you will see a prompt that this folder already exists, click "Yes" to confirm installation to the existing folder. |
...