Before sending out an invitation ConstructConnect’s Bid Manager includes default templates for invitations to bid (ITB) or any follow-on bidder communications, you must first access theITBs), project updates and other communications you will want to send to bidders for your project. After you select and add your bidders - by contact list, email or name - you can simply click on Add Bidders and then simply click on View & Send Pending Invites to send your invitations (shown below).
...
If you prefer to customize your communication template, Bid Manager also includes a Communications Template Editor in ConstructConnect's Bid Manager . Bid Manager’s Communications Templates enable enables you to easily create, configure and manage your key communications to your intended bidders, helping to streamline your preferred bidders (i.e., invitations to bid, sending project addenda, no response follow-ups, etc.), helping streamline your communications workflow and save you time.
The Communications Template Editor includes three starter templates for invitations to bid (ITBs), project addenda and any custom communications you wish to create and send. The Communications Template Editor can be found in the new Application Administration Panel. Begin by clicking on the gear icon at the bottom of the main navigation panel (as shown below).
The Communications page contains a list of the communications you have made with the bidders on the project:

To access the Communications window, click the Communications tab at the top of the project window.
Expanding the list
To expand the list and view the details of each communication, choose either of the following:
- click the gear icon on the right side of the page and select Comfortable for the Display Density.
- click the arrow on the right side of the line for a company in the list.
...
To get an overview of the Communications Template Editor, click on this video.
To begin using the Communications Template Editor, click on the gear icon in the new Application Administration Panel (as shown below).
...
Choose from three off-the-shelf templates: Invitation to Bid, Addendum Notification or Custom Message. Select the template you want to use and click on the document clone icon at the far right.
...
A new window will appear, enabling you to enter a unique name for your new template as shown below.
...
In addition, you can choose from two off-the-shelf themes (color schemes, font treatment, etc.): CC Light or CC Dark. Select the theme you wish to apply to your template by clicking on the document icon at the far right.
...
A new window will appear, enabling you to enter a unique name for your new theme, as well as the name of your company. You can use the standard colors for headers, body text and buttons as shown below.
...
Click Save Theme when you have finished making your selections. Your custom theme will be automatically added to the list of available themes in your library for use the next time you login to the system.
...
Using Communications Templates
When you use the standard templates in the Communications Template Editor, the body of your message will auto-populate with information from your account profile, including the recipient’s name, name of the project, and your company name as
shown below.
NOTE: The fields below appear as they are ordered for each of ConstructConnect’s standard templates. The order of the fields may not be changed, but they may be made “visible” or “hidden”, depending upon how much information you want to share with and/or require of the bidder.
...
Beyond the body of the message, you can fully customize what you want included in your communication. Simply click on the toggle button to make any of the fields listed below visible or not visible in the template. The only field that cannot be edited is Key Details which pulls information from your account profile and project development page, and the order of the fields may not be changed but may be made “visible” or “hidden”, depending upon how much information you want to share with and/or require of the bidder.
...
The table below provides more information about each of the fields in the above template, including which fields are required.
Field Name | Field Description |
|---|---|
Key Details | Includes key details about your project to assist your contact in making a bid decision, including your corporate address, bid date and whether there will be a mandatory Pre-bid meeting. Only the bid date and time are fixed and are automatically pulled from the project details page. 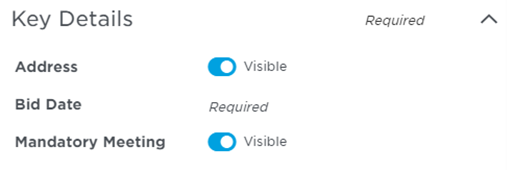 |
Bid Intent | Displays up to three (3) bidding statuses: Will Bid (required), Under Review (optional), Not Bidding (optional).  |
Events | Displays up to seven (7) event statuses: Bid Date (required), Start Date (optional), Pre-Bid Meeting (optional), Municipal Meeting (optional), Req. for Proposal (optional), Req. for Qual (optional), End Date (optional).  |
Trades | Indicates which trades will be invited to bid on this project. This information is pulled from your Trades & Coverage tab in your managed projects.  |
Note to Bidder | Any additional notes / considerations you wish to include to the bidder(s). This information is pulled from the Note to Bidders section of the project development page.  |
Description | Provides a brief summary of your project. This information is pulled across from the project development page.  |
Content | Includes the name, email, and phone for the main point of contact for the project. This does not necessarily have to be the person sending out the communication. 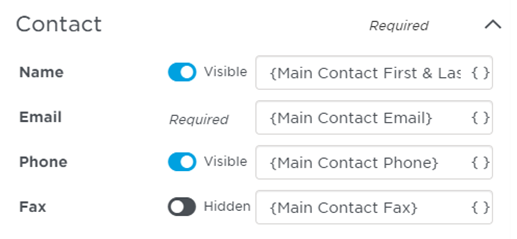 |
Documents | Displays a list of documents relevant to the project. This information is pulled across from the project development page.  |
PQ Request | Indicates that a pre-qualification request form is needed for the project. This information is pulled across from the project development page.  |
Check the Set as Default box if you wish to make this your standard template. When you are finished making your changes, click the Save Template button. Your template will be automatically added to the list of available templates in your library for use the next time you login to the system.
...
Creating a Custom, Branded Theme / Template
Should you wish to create a new template that reflects your company’s branding, begin by clicking on Create New Template. Choose from the available templates in the drop-down menu below.
...
Once you have selected the template of your choice, click on Create New Theme. A new window will open, allowing you to fully customize your templates with your own corporate branding. Watch this video to see how easy it is to upload your corporate logo and adjust your color scheme and fonts to match your corporate branding.
Click Save Theme when you have finished making your selections. Your custom theme will be automatically added to the list of available themes in your library for use the next time you login to the system.
...
Confirming Communications to Bidders
Once you have sent out your communications to your preferred bidders, you can confirm the type of information sent and when, as well as a chance to resend your message if needed. To access the Communications window, go to your Managed Projects. Click on a project, then click on the Communications tab at the top of the project window. You will see the communication detail as below.
...
Each communication-type contains the following information:
Field | Description |
Type | The type of communication of sent to your bidder:
|
Note: Click the Filters tab and select Type to filter the list by the type of communication.
Subject | The Type value and the name of the project. Note that clicking on the project name displays a preview of the message. |
Delivery | How the message was sent, which can be email, fax or online only. |
Note: Click the Filters tab and select Delivery to filter the list by the type of delivery.
Status | Can be either Sent or Failed. |
Note: Click the Filters tab and select Status to filter the list by the status.
Sent Date & Time | The date and time the message was sent. |
Action |
To resend the message, |
click Resend |
Result: The preview of the message is displayed.
Click Resend to resend the message. |