The Documents window displays all of the documents attached to the project. From here you can can view, upload, download, rename, add folders, auto-identify, rearrange and delete project documents.
...
You can use the documents already attached to the project or upload your own. You can also subscribe to the ConstructConnect document services team to have your documents professionally formatted and processed. Contact your sales representative for more information.
...
Understanding the Layout
The following table describes the information for each of the document types displayed in the window.
Field | Description |
Title |
Describes the document category, such as Drawings or All Addenda Documents. |
The number next to a category name indicates the number of documents attached to the project for the category. |
Clicking on the category name opens the folder and displays all of the documents for the category. | ||
... Options | Click the three buttons to access options to rename or delete selected documents.
|
Rename - Click Rename and enter the new name in the box. Click Rename to confirm and save. Delete - Click Delete and then click Delete when prompted. |
This action cannot be undone. | |
Size | The size of the document in |
either kilobytes (KB, smaller) or |
megabytes (MB, larger). |
Date |
Uploaded | The date and time that the documents were uploaded. |
...
Viewing Documents
Each document type is represented by a line in the document window. The number of attached documents for each type is shown next to the type name on the line.
Clicking on the line for a document type displays the attached documents for the type.
Information for each document includes the name and document type, such as Plans, the size of the document and the date uploaded to the system.
Clicking on a document opens the document in the viewer.
...
Using the Actions Menu
The options at the top of the document list let you perform a variety of standard document tasks
...
Using the Actions menu

...
: Upload Files, Add Addendum, or Prepare Takeoff.
Under the Actions menu, you have additional actions you can take as shown below:
...
Note: You must first select a document to activate some of the menu options.
Option | Description |
Delete Selected File(s) |
Click Delete and then click Delete when prompted. |
This action cannot be undone. | |
Download Selected Documents(s) | Use to download the selected project documents to your local device. |
Add Folder | Use to add folders to the document set. Note that the folders appear at the top of the list and cannot be reordered. |
Reorder Documents | Click to open the Reorder Documents window. |
In the list, drag the documents to the desired location. |
Folders cannot be reordered or moved. |
Auto-identify |
Trades | Click to have the system automatically identify the required trades from the project plans. |
Uploading
...
Files
You can attach project plans, specifications, addenda and other document types to a project. You can also select to have documents you upload be processed for correct naming, orientation and search-ability.
To upload project documents,
...
click Upload Files from the top of the window to display the Upload Files menu as shown:
...
Attach your documents from your local device into the proper categories using either drag and drop
...
by browsing and locating the files.
...
Once you are done attaching documents, click Finish.
...
Attaching addenda
...
Attaching Addenda to a
...
Project
1 |
Click Addendum. |
You will see the Create Addendum menu |

as shown below. 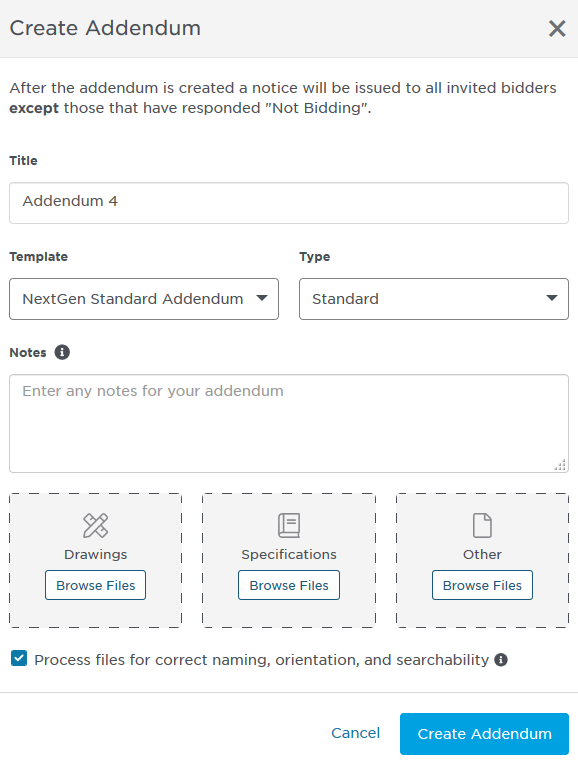 | |
2 | Enter the title for addendum |
. By default, the addendum is numbered in sequence with all other addenda to the project. You can choose any title that you want to fit with the project. | |
3 | Select the template for the addendum from the drop-down list. |
4 | Enter any notes you want included in the addendum. Notes appear in the addendum notice. |
5 |
Use the steps described above to attach the addendum to the project.
Results:
The addendum |
will be attached to the project and now appears in the list of addenda. |
Any bidders attached to the project receive a notice that there is a new addendum attached to the project. |