
The Quick-Start Tutorial will show you how to create a Job, do takeoff input, and create reports. Using the guide on the following pages and the blueprint supplied for you below, you will see a complete Job File walkthrough. Follow this Takeoff Tutorial and you will be lead through the entire Job File and learn all the necessary steps in doing a Takeoff.
The Saturn print shown below gives you an example of how to create a new Job. This Job has a single Air Handling Unit running out to 3 supply Lay Ins and 2 surface mount Return grilles in an open area. The Return duct is to be lined while the supply is left uninsulated.
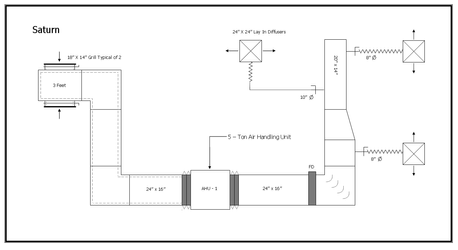
This tutorial is designed to give you an example of doing a complete job Takeoff. All the steps from creating the Job File to running a report will be covered during this exercise. Our Example Job will be called Saturn and has one Zone, a single Air Handling Unit. The supply and return sides of the ducting will be separated into Sub-Zones for future reporting purposes. Please follow the steps as listed below.
Creating a Job
Double click the QuoteSoft Duct icon on your desktop and enter the program with your Login and Password.

On the Main Menu screen click the Job File button to create your first Job. The Job File will normally open to the last Job that was being worked on or to the Job List if that is how you last viewed the Job File.
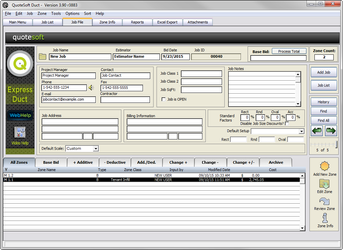
To start the Saturn Job click the “Add Job” button in the upper right hand corner and type in the job name “Saturn”.
You then have the option of filling the rest of the information such as Owner, Estimator, Phone and Fax numbers as well as the billing and shipping addresses.
The rest of the Job screen is used for sorting and tracking of information. You can use the data entered to help you in your reporting at a later time.
Starting the Zone Takeoff
The first step in starting your takeoff, now that you have created the Job is to add your first zone. All takeoffs are done at the zone level with sub-zones inside of them. Using sub-zones will allow you to report information in a more detailed format.
To start click the Add New Zone button in the upper right corner of the Job Info screen and fill in all the requested Zone Information.
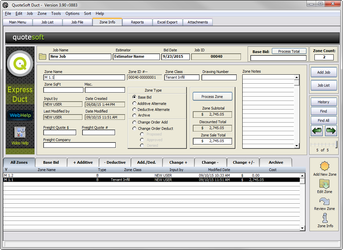
Type in the Zone Name “AHU-1″ as this is the unit number on our Saturn print.
Zone Class should be filled in with Air Handler Unit. Using this field will allow you to sort at a later date and see totals for all of the items that fit a criteria that you state at that time.
The Optional Startup Settings for our Saturn takeoff should be set to 1/4” scale, 8ft spacing for the hangers with a 4ft drop. The Sub- Zone should be entered as Supply. For this example you should leave Phase System and Starting Tag blank.
When you have finished filling out the required Zone information click OK at the bottom. You will now need to choose which Pressure files you wish to have loaded first. Click each of the tabs Rect/Round/Oval/Acc and choose a file to load from each.