02. Quick Start
- April Friedman (Unlicensed)

The Quick-Start Tutorial will show you how to create a Job, do takeoff input, and create reports. Using the guide on the following pages and the blueprint supplied for you below, you will see a complete Job File walkthrough. Follow this Takeoff Tutorial and you will be lead through the entire Job File and learn all the necessary steps in doing a Takeoff.
The Saturn print shown below gives you an example of how to create a new Job. This Job has a single Air Handling Unit running out to 3 supply Lay Ins and 2 surface mount Return grilles in an open area. The Return duct is to be lined while the supply is left uninsulated.
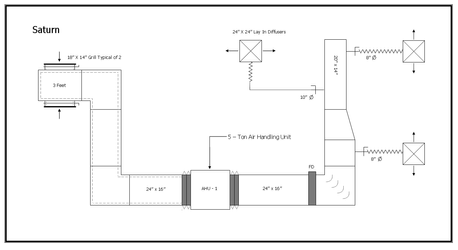
This tutorial is designed to give you an example of doing a complete job Takeoff. All the steps from creating the Job File to running a report will be covered during this exercise. Our Example Job will be called Saturn and has one Zone, a single Air Handling Unit. The supply and return sides of the ducting will be separated into Sub-Zones for future reporting purposes. Please follow the steps as listed below.
Creating a Job
Double click the QuoteSoft Duct icon on your desktop and enter the program with your Login and Password.

On the Main Menu screen click the Job File button to create your first Job. The Job File will normally open to the last Job that was being worked on or to the Job List if that is how you last viewed the Job File.
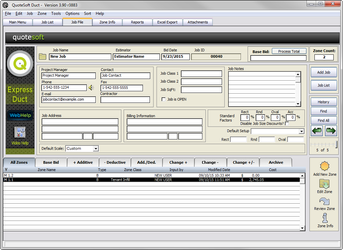
To start the Saturn Job click the “Add Job” button in the upper right hand corner and type in the job name “Saturn”.
You then have the option of filling the rest of the information such as Owner, Estimator, Phone and Fax numbers as well as the billing and shipping addresses.
The rest of the Job screen is used for sorting and tracking of information. You can use the data entered to help you in your reporting at a later time.
Starting the Zone Takeoff
The first step in starting your takeoff, now that you have created the Job is to add your first zone. All takeoffs are done at the zone level with sub-zones inside of them. Using sub-zones will allow you to report information in a more detailed format.
To start click the Add New Zone button in the upper right corner of the Job Info screen and fill in all the requested Zone Information.
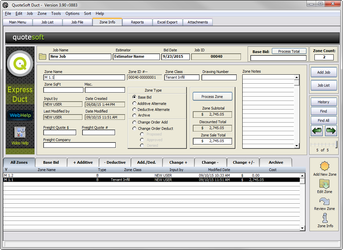
Type in the Zone Name “AHU-1″ as this is the unit number on our Saturn print.
Zone Class should be filled in with Air Handler Unit. Using this field will allow you to sort at a later date and see totals for all of the items that fit a criteria that you state at that time.Type in the Zone Name “AHU-1″ as this is the unit number on our Saturn print.
The Optional Startup Settings for our Saturn takeoff should be set to 1/4” scale, 8ft spacing for the hangers with a 4ft drop. The Sub- Zone should be entered as Supply. For this example you should leave Phase System and Starting Tag blank.
When you have finished filling out the required Zone information click OK at the bottom. You will now need to choose which Pressure files you wish to have loaded first. Click each of the tabs Rect/Round/Oval/Acc and choose a file to load from each.
Zone Class should be filled in with Air Handler Unit. Using this field will allow you to sort at a later date and see totals for all of the items that fit a criteria that you state at that time.
The Optional Startup Settings for our Saturn takeoff should be set to 1/4” scale, 8ft spacing for the hangers with a 4ft drop. The Sub- Zone should be entered as Supply. For this example you should leave Phase System and Starting Tag blank.
When you have finished filling out the required Zone information click OK at the bottom. You will now need to choose which Pressure files you wish to have loaded first. Click each of the tabs Rect/Round/Oval/Acc and choose a file to load from each.
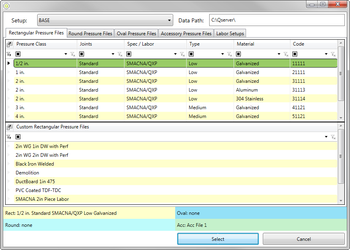
For our AHU-1 Zone we will load the 2in. Rectangular, 2in. Round, 2in. Oval and the Acc Items files.
Once you have chosen these files click OK. You will then see the screen change and the files will begin to load.
Beginning the Takeoff with the Catalog
Now we are in the Takeoff module of the program. Our first item is an Air Handler Unit. Click on the catalog button on the bottom left of the Takeoff screen, down on the catalog bookmark bar.

Choose Category #2, Air Handling Units (AHU), Group #1, then choose Item #2, the 5 ton unit.
As soon as you click on that item number you will be taken back to the Takeoff screen and can then Click Accept to add this item to your takeoff. You will see in the upper left that the item number is a 1 as well as bellow the two green arrows on the left we are viewing item 1 of 1.
Duct Takeoff
Supply Trunk Line
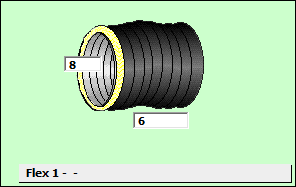
We will now start the duct takeoff. For the purpose of this tutorial we will start with the Supply trunk line. Our first item is a flex connection, click on the Ward Neoprene Flex Connector located in the bottom left of the Rectangular items (items with the yellow background).
Then go to the upper right of the Takeoff window and type in “Supply” as the Sub-Zone name. Using Sub- Zones will allow you to be more specific with your reporting requests at a later time.
You will now use the entry palette (small screen floating to the right of the takeoff window with numbers and a small accept button on it) to enter in your dimensions. For this example we will need to set the width to 24 and the height to 16. You can then click Accept to add this as the second item in your takeoff.

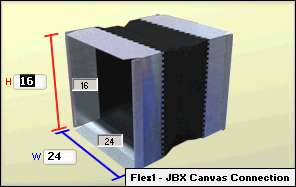
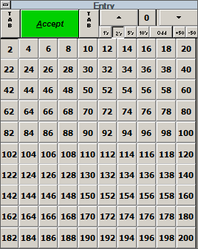
Right clicking the mouse while hovering over the entry palette moves you from field to field. In this case, we entered in a 24 for the width by left clicking it, then right clicked the 24 again to move to the next field and entered in a 16.
The next item to takeoff is a run of straight duct. To start this click on the straight duct icon, which is on the top row of the rectangular items all the way to the left. You will notice that the dimensions of the item are carried over from the flex connection, you will simply just have to right click on any of the numbers on the entry palette to move to the Feet box and then left click on the 6 to put in the proper length, upon doing this, the program will then change the inches to a 0 trying to speed up the takeoff process for you. Click the Accept to add this duct run as item number 3.
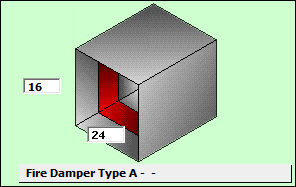
You now have to take off a Fire Damper, which is located in the Accessories File (items with the green background) on the second row, second from the left. Again, the proper dimensions are carried over so you can click Accept, to add item number 4.
The next item is a 90 degree square elbow with turning vanes (top row of the rectangular, second from the left). If the vanes are not on in the big item picture simply check the vane box on the right hand side of the screen. This will remain checked until you turn them off. Again, the proper dimensions are carried over from the last item. As you may have noticed we have only had to enter in the sizes needed once since we have started this takeoff. You can now click Accept to add into our takeoff item number 5.
We are back to a run of duct click rectangular duct again, right click on the entry palette and enter in a length of 2 feet. Clicking Accept will enter in this as item number 6.
We are now changing in size so we need a 2 way transition, both dimensions are changing in size so we will need a 2 way transition. This item is located on the second row of the rectangular items and second from the left. The large dimensions are carried over from the last item and you will only have to enter the reducing dimensions. The cursor is already in the outlet (top) width and ready for you to enter in that dimension.
![]()
You will then notice that when you right click on the entry palette that the cursor then jumps to the depth, which is the next entry field. Once you have entered in the proper dimensions click Accept and we are up to 7 items.
Our next item is also the last run of duct so click the duct icon again and right click on the entry palette to move and to enter in the length needed. Our dimensions are carried over correctly from the transition. You can now click Accept, which takes us to 8 items.
For our last item click on the End Cap, bottom row of the rect items, third from the left. Dimensions will be correctly brought over from the last item. Click Accept to ad this end cap as item number 9. This will end the Rectangular takeoff portion of the supply side, now we will start the branch lines.
Supply Branch Lines
We will start the Accessory Item branch lines now. These are the low pressure run outs to the registers. The first item needed is a Spin In with damper, on the second row of accessory items and 6th from the left. Click on the number 8 on the entry palette to enter in the proper diameter needed. We will then need to change the quantity to 2, located on screen just to the right of the big green Accept button. Simply click the little up arrow to change the quantity to 2. You will then click Accept and we have entered in our first Accessory Item, which is item number 10 in our Takeoff.
Coming off of the Spin In is Flexible Duct, which is located in the accessory items, on the top row, and 7th from the left. Diameter will be carried over correctly from the last item entered. The length is a standard and entered into the Accessories File per diameter during setup. All we have to do is change the quantity to 2 again and click Accept.
You will now need to add the lay in diffusers, which are located on the second row of the accessory items last item on the right.
Again diameter will be correct, simply change to a quantity of 2 and click Accept.
The last branch line is a 10″ diameter run and starts with a Spin In. You will need to click on a new one, change the diameter to 10 using the entry palette and click Accept.
Now you will need a run of Snaplock Pipe. You will find the pipe on the bottom row of the Accessory Items, first on the left. Diameter will be correct simply change the length to 6 feet using the entry palette and click Accept.
You now need an adjustable elbow, third row of Accessory Items, second from the left. The diameter is correct so you will only have to click Accept.

Now on to the flex duct, simply click the icon and go directly to Accept as the diameter is correct.
Lastly is a diffuser, you will find it in the Accessory items on the second row and the last item on the right. Click Accept to finish the branch line takeoffs and complete the supply side of the print.
Return Trunk Line
The Return side starts with a trunk line of duct as well. We will start with the unit connection and work our way down to the registers.
Click the Ward Neoprene Flex Connector as our first item off of the Air Handling Unit. Go to the upper right and change the Sub-Zone name to “Return” and use the entry palette to input the dimensions given on the blue print. Before clicking Accept we need to turn on the Liner. Just below the big picture of the item on screen you will see a drop down menu for the Liners that are available. Click the arrow and choose 1 Inch Liner. You will notice your dimensions are now expanded to allow for the liner.
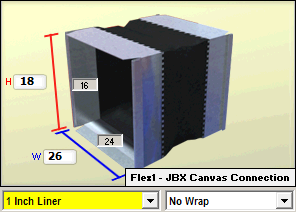
Go to the Edit drop down menu at the top of the screen and choose “Show Inner Dimensions on The Item”, you will now see the ID appear directly on the big picture on screen.
You can now click Accept to add in your first item to the Return Sub-Zone.
Your next item is going to be a piece of straight duct. Click the duct icon and you will notice the dimensions are again carried over from the last item and expanded for the liner. The inner dimensions being shown on the item are also correct from the last item. Click Accept to add this item into our takeoff.
Click the 90 degree square elbow, dimensions are correctly carried over from the last item, uncheck the Vanes box which is located half way down your screen on the left hand side. You will see the vanes removed from the item and looking at your print you will see that the next elbow in line is the exact same as this one, so change the quantity to 2 and click Accept to add these items to your takeoff.
Click on the straight duct again, we will need to change the length to 5 feet, to do this use the entry palette to right click until the 4 in the Feet box is highlighted, you can then left click on the 4 and then simply click the little up arrow at the bottom of the entry palette to change that 4 to a 5. You will then see the inches were changed to 0 for you, click Accept and add it to your takeoff.
You then have one last run of duct, click the icon and then change the length to 3 feet and click Accept as the dimensions are properly carried over from the last entry.
The last item we need for the trunk line of the return is an end cap, which is located on the bottom row of the Rectangular items and third from the left, simply click the icon and click Accept.
You now need two Square Taps, for the Return Registers. Click on the Tap In icon, second row of the Rect Items, second from the Right. Use the Entry Palette to enter in the proper dimensions that are given to you on the blue print. Then change the Quantity to 2 and click Accept.
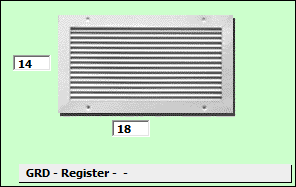
Now you need Registers, they are located on the third row of Accessory Items, second from the Right. The dimensions will be carried over correctly. Change the Quantity to 2 and click Accept to add the last two items to our takeoff.
We have now completed our duct takeoff. The next step is to run reports to get our takeoff totals and complete your bid.
Reporting
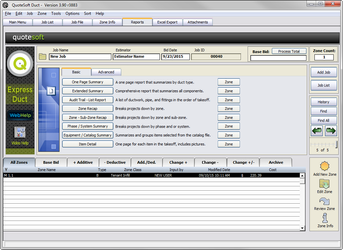
To leave the Takeoff module simply click the Job File button, second button down in the upper left of the screen. You will be taken to the Zone Info page for the zone you have just completed. You will see all the info that you typed in at the creation of the zone was carried over to this page. You can now also see the COST of the zone as it was processed when you left takeoff.
Now click on the Reports Page Button on the right to run a report. The two most common reports used in the program are the List and Summary Reports.
The List Report will show you the items that you took off in the exact order that you accepted them, giving you general information about each and every item. It is used to check and make sure you did in fact get all the items and to view the items in order to check for errors.
The Summary Report is a one page summary of all the components and items involved in your takeoff such as; Hangers, Vanes, Joint Connectors, Metal Lbs., Accessory Counts and much more data.
Running a Report
In the Crystal Reports list on the left side of the screen click on the List Report. You will then need to make sure that the report options on the right side of the screen are correctly set. You need to have Entire Job selected, including all items from any file. You want to run a single report and have it open in a window.
You can then click the green Run Report button. Once opened, you can scan the report for errors or simply click the little printer icon at the top to have it print. Then click the red X in the upper left to close the report. We will now complete the same steps for the Summary Report and you will have your two reports in hand to go over and verify the information.
You have now created a job, did a zone takeoff using sub-zones and ran the two most common reports. You are well on your way to using your QuoteSoft Duct program and this completes our Quick Start Takeoff Tutorial.
©2022 ConstructConnect, Inc. All rights reserved.