12. Takeoff
- April Friedman (Unlicensed)
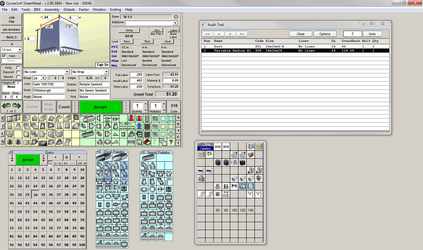
When you are ready to begin inputting fittings into your job you will be taken to the Takeoff screen. This screen gives your options for taking off the fittings that are involved in your job or bid. There are a number of options available to you for each fitting.
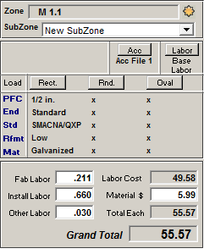
The takeoff screen has a lot of information to give to you with whatever fitting you bring up on screen. With each fitting you are given data on which seam is being used, which joint, what material, etc.
All of the real-time information that is available to you is fully editable, you can change any of the values or calculations that you wish to at any time during your takeoff.
Overview
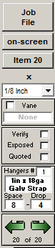
Job Name: This area of the screen will show you the bid/job that you are editing or creating.
Zone Name: The zone that is chosen to work with will be listed here. The last 20 zone names will be listed in the drop down memory menu for the zone name.
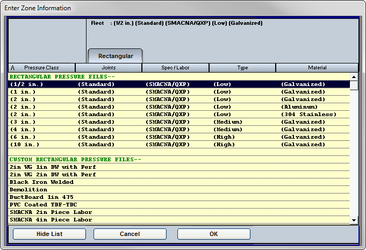
Pressure Files List: The screen lists the pressure files that are loaded for rectangular, round and for oval. You can load another file at any time just by clicking on the load button for either of the different categories.
Labor and Cost Data: The labor and costs that are shown here are exactly the same as the values as what you have entered into your pressure file. Any of the data can be manually changed at any time during takeoff.
Code: The code that is shown is the unique code number assigned to each fitting in FABshop. This is for technical support reasons.
Quantity and Multiplier: The quantity button will allow you to raise the amount of items that are being accepted into the job. The multiplier button is identical to the quantity button, but it will not reset itself to 1 after the accept has been clicked.
The + button will allow you to add identical fittings to your job. After accepting a fitting, simply click on the + button and you will see an identical fitting to that of the last accepted.

Accept: This is the button that really controls the takeoff. Without clicking on the accept, nothing is entered into your bid. The accept is green when it is active and turns gray when there is nothing selected.
The ^ button will reinitialize a fitting that has already been accepted. This will turn the accept yellow letting you know that you are in “Edit” mode. You can now make changes to the fitting and then click the accept again.
Scale: The scale button is a feature that only works with a digitizer. If you don’t have a digitizer then you canignore the button. With the digitizer you are able to scale off long runs of duct, pipe and flex. Simply click on the fitting of choice and then click on the scale button and select the beginning point of the run and the ending point of the run, this length will then be entered into the on screen feet display for that fitting.
Delete: This button will allow you to delete whatever fitting is up on screen.
The fitting number of the fitting you are viewing is located in the top left hand corner of the screen. This is also a button that will open the fitting viewer. Click on this button and a dialog box will open asking you which fitting number you wish to view, wither type in a number or leave the word browse in and click OK. If you typed in a number you will be taken to that fitting. If you left the word browse in the fitting viewer will open and appear at the same size and location you had it open last time.
The button to return to the Customer File is located on the upper left hand side of the takeoff screen.
The dimensions that are listed above the scale and below the Customer File button are the actual dimensions of the duct that you have entered. If you have a liner selected and the program is auto expanding entries for liner, this will show exactly what the “free air space” is inside of the duct you are inputting.
The scale of the plans that you are working from with your digitizer will need to be set. By clicking on the drop down menu you can select the different scales available to you here.
For elbows with or without turning vanes you will either need to check or uncheck the Vane box.
The verify check box is there so you can have the fitting verified before being built. If for any reason you can make a specific fitting have to be verified.
The box under the word Installed is to attach labor to install the fitting. For example if it was an elbow that was to be attached to the end of a duct run or run of pipe before shipping.
The Exposed check box is to add a small amount of labor to the fabrication or installation hours for exposed work that takes more care in handling and fabrication.
The two green arrows on the left of the screen will help you to navigate through your takeoff. Clicking on the left arrow will scroll you one fitting down, and clicking on the right arrow will scroll you one fitting up in your bid. Double clicking on the left arrow will take you to the first item, double clicking on the right arrow will take you to the end of the bid.
The information about which liner or which wrap are selected is located just below the large current fitting section of the takeoff screen. Both liner and wrap are accessed through drop down menus, you just click on the item you want.
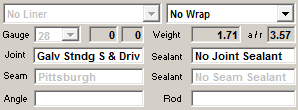
Gauge, joint, seam and angle are listed in a column just under the liner menu. These items are as well located in a menu that opens when you click on the option you wish to change.
Joint sealant, seam sealant and rods are located just below the wrap menu. These items again are in menus that allow you to just click on the item of choice.
Number of standard and non-standard lengths, weight and aspect ratio are three fields that are not editable. These fields are calculations that FABshop does internally and can not be changed on the fly like the other options.
Palettes
The rectangular and accessory palettes are located on the takeoff screen. The rectangular palette has a yellow background and lists all of the available fittings.

While the accessories pallet has the green background and lists all of the items in your Stock/Misc. files. The pallets offer the fittings that are available to you from the pressure file. All of the data entered about costs and hours will be used when a fitting or item is selected. The General Options File is where you set up what fittings you want to appear on these pallets and the others as well.
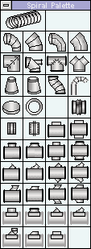
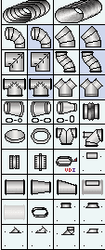
The spiral and oval pallets are floating to the right of the takeoff screen. These pallets will show all of the available fittings from your spiral and oval pressure files that are currently loaded. The information that was entered in the pressure file for you’re spiral and oval will be drawn and used to calculate the hours and costs.
The Entry pallet allow you to enter in the dimensions and feet requirements for the fittings you choose off of the other pallets. The Entry pallet offers numbers that are even beginning with 4 and running up to 52. The Entry 5 pallet has numbers increasing by 5 starting with 5 and ending with 100.
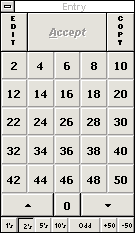
After selecting the first proper dimension of footage, simply right click above either pallet and you will be moved to the next logical entry space. This will help speed up the takeoff process and allow you to enter in the dimensions and lengths you need without having to move from the pallet to the fitting on screen.
File Menu
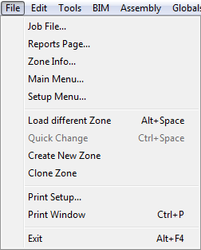
The File menu lists some of the options available to you to make using FABshop easier.
Under the File menu there a few options for you to use:
| Customer File | This will take you back to the Customer File. |
| Print Setup | This will allow you to set up the printing options. |
| Print Pages | This will print the currently viewed page. |
| Exit | This is the same as clicking the X is the upper right corner; it will exit you from the program. |
Edit Menu
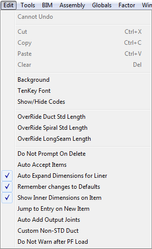
The Edit Menu will offer you a few options as well.
| Background | This will allow you to change the background of the Takeoff screen to a color or to a picture from your hard drive. |
| Fitting Options | This function allows the user to set the default settings for a specific fitting, such as the throats for a square elbow. |
| OverRide | The three over ride features will allow you to specify which length of duct, spiral and long seam you wish to have appear every time you choose one of them. |
Tools Menu
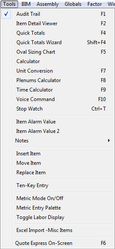
| Fitting Viewer | The fitting viewer is a floating list of the job. |
| Item Alarm Value | You can set an alarm to go off every time a fitting reaches a certain point in cost if you wish. This will help you keep from entering any fittings by accident. |
| Calculator | The calculator is available for you to use to do your basic math functions. |
| Fitting Notes | If you wish to add a note to any particular fitting, just turn on the fitting notes and a notes field will appear on screen just under the joint list and sealant descriptions. |
| Quick Totals | When you use this feature you will get a running total of everything that has been used on the job thus far. |
| Ten-Key Entry | This will allow you to use the ten keypad on your keyboard to choose fittings. |
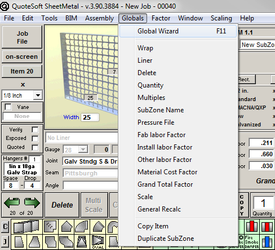
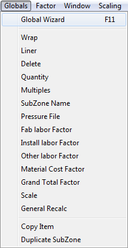
Globals Menu
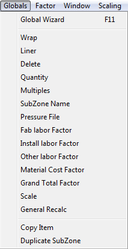
The Global feature will allow you to make changes to the entire job under each classification. Any of the categories listed will be available.
SEE THE USING GLOBALS SECTION FOR MORE INFORMATION
Factor Menu
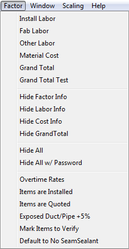
The factor features will allow you to add a factoring percentage to a value for a difficulty factor or any other special instance. Once you have applied the factor you have the option of hiding the factor information.
You may also hide the information on Labor, Cost and even the Grand Total. This is if you are viewing the take off screen with someone you wish not to see the totals.
The Items are Installed feature is the same as checking the box on the takeoff screen that asks for Install. This will add the labor required to install this piece. For example; installing a gored elbow on the end of a run of spiral pipe.
The Exposed Duct/Pipe + 5Â % is adding a percentage for the difficulty factor of installing exposed duct or pipe.
If you wish to have no seam sealant selected for this bid or job, just select the Default to No Seam Sealant.
Window Menu
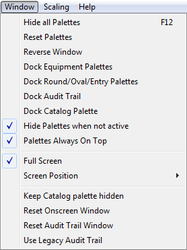
For those of you that are left handed it sometimes helps to have the window reversed it will move the palettes to the other side of the take off screen.
Docking the Equipment Palettes will keep them at the sides of your screen and out of the way until you call for them by selecting a fitting from them.
Help Menu
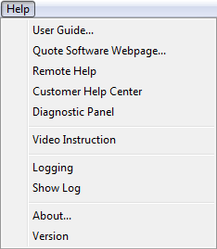
If you need any help with the program or any of your basic Windows operations, feel free to call the support phone, 1-800-813-7020.
Our website is also available to you from this menu.
Global Changes
This will be a quick lesson on using the Global Wizard. The global Wizard allows you to globally change; wrap, liner, zone names, pressure files and scale.
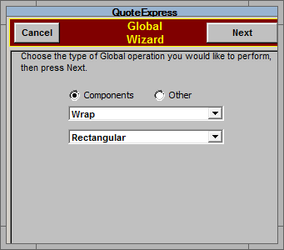
The Global Wizard also allows you to delete items, change your fab, install and other labor factors. The Global Wizard is very easy to use and has proven its self to be a very powerful and useful tool. For this example we will be changing the liner on a specific pressure file.
To reach the global wizard simply press the F11 Key on your keyboard. Or you may go to the Globals drop down menu on your top toolbar. Then select the Global Wizard from the list.
You will get a warning message once you have selected the Global Wizard. It states “Warning!! Global Changes will reset items to there default configuration using the currently loaded pressure files. If you have not used Globals before or would like further explanation of there purpose and how they work please call”. When you click OK on that you will be taken to a window where you will select the changes to be made. Here you will choose what you would like to do. And on what (round, Oval, rectangular, accessories)
Once you have chosen what you would like to globally change and pressed next you will select the changes that you would like to make.
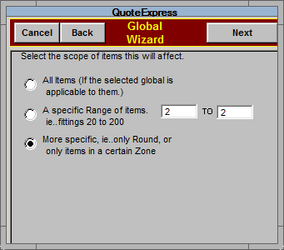
You will then be taken to a screen where you will select the scope of the items the global changes will affect. For instance you can choose to do all items in the job if the global change is applicable to them. You can also do a certain range of items for example items 1-50. Or you can choose to be more specific. Choosing More Specific and pressing next will bring up a screen where you can choose specific zones, systems, tag, wrap, or liner. You can even do a specific range of items in one system or zone. To select the specific scope of items to change you will need to place a check mark in the box or boxes next to your selections. Here we have only selected to make the changes to a specific pressure file.
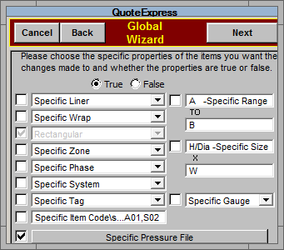
Once you check the box next to the pressure file bar, click that bar. Doing so will bring up a window where you can select the pressure file classification. Once you have selected the appropriate pressure file and pressed OK, the selected file will appear on the bar.
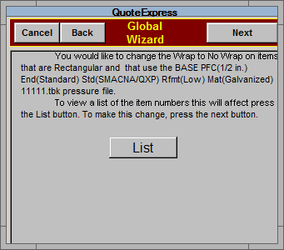
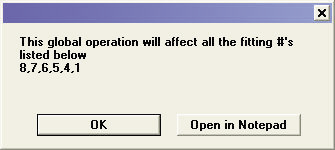
After you have chosen what range of items to do the global change to and pressed next, the next window will tell you what you scope of items you have selected to change and also what changes are to be made. Pressing the list button will bring up a separate list of the individual item numbers that this global change will affect.
Once you click next, the global changes will begin depending on the size of the global change it could take a few seconds. You will see a progress bar indicating how far along the process is.
Congratulations! You have just successfully performed a global change using the global wizard.
Tips and Tricks
Tip: One of the most useful is to use the Entry Palette for your item entry. When you are going to enter in the dimensions of a new item you can simply right click on any of the numbers on the Entry Palette to navigate from entry field to entry field and use the left mouse button to enter in the correct dimensions. This process for mouse entry will greatly speed up your entry time. The Entry Palette will move your cursor with every Right Click and input a number with every Left Click. The pattern to which the cursor jumps can also be customized per item for each user so as to speed up the takeoff process.
Trick: Using the Item Viewer during the Takeoff process to keep track of your progress is no Trick, but using the Item Viewer to sort back through a Zone to find the items you wish to modify would be one. When you have the Item Viewer open and on screen simply click the Filter List button at the bottom and the Filter Wizard will be opened. By checking boxes on this Filter you will see that the Description field to the right will update with a list of what command the Filter is going to perform. Simply check the items that pertain to your criteria and then click the Filter button at the top. The Item Viewer will then only show what is requested. You will have to close and reopen the Item Viewer for it to be reset to show everything.
Tip: Using the Catalog Cart to grab more than one Catalog Item at a time will save you from having to reenter the Catalog multiple times. Simply click on the Catalog Button on the Catalog Bookmark Bar at the bottom of your Takeoff Screen to enter the Catalog. Once the Catalog has opened you can then click the Cart Button and you will see the Cart appear. Now you can use the Catalog Cart to add items to your Takeoff. As you select items you will see them be added to the cart list and remain there until you are ready to add them to your takeoff. When you have added the items desired to the Cart and you are ready to return to your Takeoff simply click the Takeoff Cart button at the bottom of the Cart screen. You will then see the Catalog close and the items being added to your Takeoff. This Tip will allow you to use the Catalog a lot more efficiently.
©2022 ConstructConnect, Inc. All rights reserved.