04. Main Menu
- April Friedman (Unlicensed)
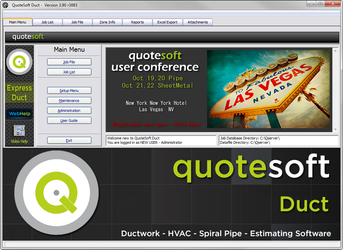
The first screen you will see after logging in will be the Main Menu. This is the center point for navigation throughout QuoteSoft Duct. From here you will be able to view any of the following:
Job File: This is where all of your bid information is stored on all of your jobs and their bids and jobs that have been made in the past. You will also be able to access the Takeoff screen from the Job File.
Data File: This is where you will find all of your pressure files for the different pressure classes as well as your Central Data File.
Maintenance: A feature that will be available in a later version.
Smart Update: This feature will be able to search out updates on the server as well as on the internet website where Quote Software will be posting updates on a regular basis.
Administration: Where you will be able to add and remove users from your user list. You will also be able to set program access attributes to any user or group.
Main Menu includes a viewer from quotesoft.com that allows Quote Software personnel to inform you about updates, events and new features of the program as well as a quick way to receive support from QuoteSoft personnel.
Administration File
Once you have logged in and are ready to start using the program you should go to the Administration page and setup your own unique log in name as well as password.

In order to add a new user click on the “Add New User” button and type in the new log in name you wish to add.
Next type in the unique password for that user (if any) and finally the users real name. The real name of that user will be used in the reporting features as well as in the Job File to record who entered a bid or job.
To remove a user from your user list, select that user you wish to remove and click on the “Remove User” button. This will remove that user and not allow them to access the program any longer.
Changing a user’s password can be done by selecting which user you wish to change and then clicking on the “Change Password” button. Then type in the new password and that user will have to type in the new password to enter FABshop.
To set a user with administrator attributes is accomplished by selecting the user and clicking on “Set as Admin” button. This will put an “A” under the Attributes heading and allow the user to have the freedom of an administrator. To remove this attribute, you select the user and again click on the “Set as Admin” button, this will remove the “A” and return the user to a base user.
Another attribute that can be assigned to a user is the Power User setting. This will allow them all of the same freedom as an administrator, but will not allow them to enter the Administration File and change any of the user settings. In order to set this attribute you simply select which user is to be changed and click on the “Set as Power User” button. Under the attributes heading a “P” will appear symbolizing the Power User setting. The reports area of the Administration page lists the reports that are available to the administrators, such as a job year to date report. These reports will not be accessible by base users.
The Special section of the Administration File has two options. Both of these options should only be used under the request of a Quote Software representative.
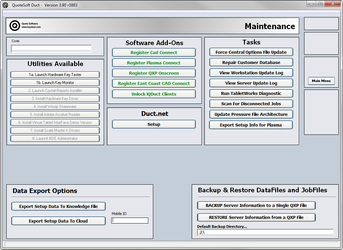
Maintenance
The Maintenance page is your center point of updating and supporting your program.
Please only use this page under the direct supervision of a QuoteSoft support technician.
Utilities are available for launching tools to diagnose and reinstall various components of QuoteSoft Duct as well as entering acquisition codes to unlock optional modules purchased.
This page also contains a backup utility designed to create a single back up file of all QuoteSoft Duct server data.
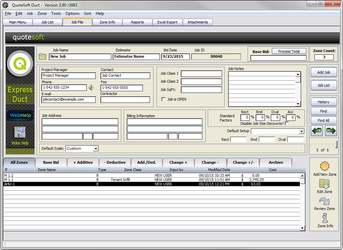
Job Info
The Job Info section of the QuoteSoft Duct program is to allow you to keep data on your jobs and their zones. Tracking this information is an optional, the only data required for creating a new job is a job name.
Data such as job name, owner, estimator, phone numbers and addresses is to be provided by you. QuoteSoft Duct will then use this info on any of the reports where it is necessary.
Clicking on the title of the any optional data will:
Phone: Dial the phone number over the computer speakers; Just hold your phone with a dial-tone near your computer speakers.
E-mail: Creates a new blank email addressed to the listed recipient.
Job Address: Opens your internet browser and locates the address in Google Maps.
You can set up the default pressure files to be used for this job, which will allow you to skip the pressure file.
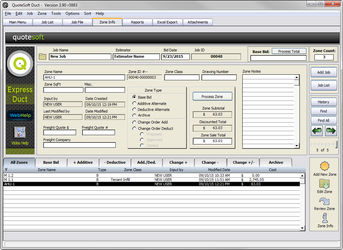
Zone Info
The Job File Zone Info page will allow you to sort and process the data for your zones separately. This option is available for you to run reports on the zones separately or together to get your final bid amount.
Such information as the zone name, contact person and the sq ft information can also be stored with the zone for data processing. Each individual zone can be assigned a sq ft and note data.
Each zone can be assigned a distinctive mark to tell whether it is a Base Bid, Additive Alternate, Deductive Alternate or a Archive Zone. These marks will be displayed in the zones list at the bottom of the page in the type column. Once you have assigned your zone a type mark you can then sort them by clicking on the headings above the zone list, such as All, Add, Neg or Archive.
Standard Factors can be applied for rectangular, round, oval and the accessories in a job or zone. You can increase or decrease the discount or additive you put on a job. These percentages are used when a report is run.
Reports
The reports page has many different reporting options for you to use in managing your jobs and zones. QuoteSoft Duct has over 20 different standard reports. Break projects down by any scope such as floor, zone, or duct run. Make filtered reports based on any scope or type of ductwork using the selection wizard.
QuoteSoft Duct reports enable you to print information in easy, updatable formats such as:
- Audit Trail Details
- Summary / Job Analysis / Pounds per Hour Reports
- Zone Detail Reports
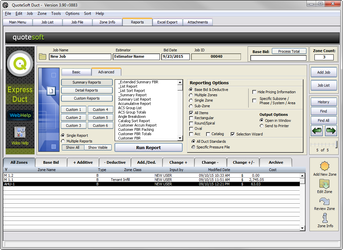
Key Reports
List Report: The audit trail, printed out. This is a list of items in the order that they were taken off.
Extended Summary Report: Our most comprehensive report is designed to show you every detail and breakout on the job, Including breakouts but type, (rect/round/oval) and by pressure file. This report breaks out all subtotals for each component of the job like hangers, rods, angles, liner, etc.
Summary Report: This one page report is designed to show you the grand totals of labor and material on any job in a one page executive summary format.
Item Detail Report: One page of summary information for each item in a takeoff. The Item detail report is great for understanding the total information picture of how each fitting is calculated.
Accumulative Report: Summarizes by accumulating all like items together showing labor and material for each item type.
Zone Breakout Report: Summarizes all zone information.
Many additional reports can help you in the managing of your bids and of your data. Utilize your estimate data to order materials and schedule labor.
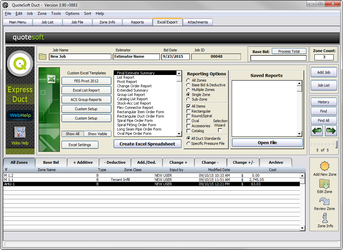
Excel Export
QuoteSoft Duct makes it simple to export the data you need to your worksheet with job summary data and more. QuoteSoft Duct can also export lists of ductwork, pipe, and fittings to fax to a fabricator or to field verify any measurements.
Our advanced integration with Microsoft Excel provides access to sophisticated extension and charting.
- Bid Forms
- Change Orders
- Item Details
- Job Analysis
- Duct and Fitting ordering Reports
QuoteSoft Duct targets and eliminates repetitive data input. Create and edit your own reports using familiar screens and terminology using Microsoft Excel and Office products.
Attach all your electronic files to your job.
Keep job information and documents in one place with integrated knowledge management. You can use the robust document management features in QuoteSoft Duct to incorporate all your business documents. Excel bidsheets, change order sheets, proposals, work orders, RFI and any other Microsoft Excel or Word documents you need.
By providing the right information to the right people at the right time, document management enables companies to make better decisions faster than ever before. If entered once, such information can be used by a variety of programs, such as Word, Excel, accounting, and even a project management applications without tedious reentry.
Because QuoteSoft Duct is server-based, it can be shared across the company and between users automatically.
Options
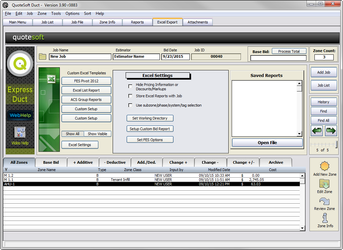
- Hide Pricing Information:
Allows you to hide pricing information on many reports. This is available to use reports for checking quotations and quanities with out letting suppliers or owners see individual labor and material cost subtotals.
- Set Working Directory:
Customizes the location that QuoteSoft Duct uses to start in when saving Excel workbooks.
- Set FES Options:
- Setting Final Estimate Summary Excel Exporting Options:
This screen controls the amount of data that is exported to your “Final Estimate Summary” Excel Workbook.
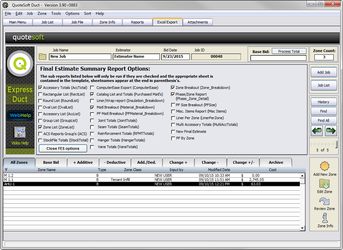
To return to Excel Export screen click the Excel Settings button.
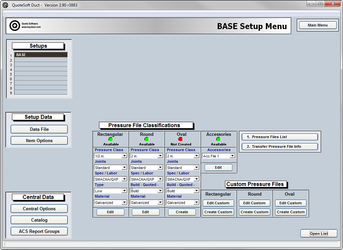
Setup Menu
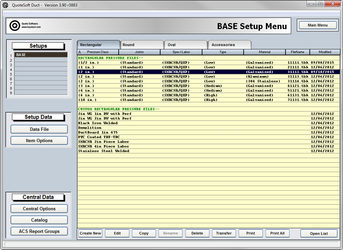
This is the center point for all navigation throughout your pressure files and your Data File. This section will allow you to create, view and edit your pressure files as well as establish your Data File.
The first area of data entry you should visit and input is the Data File. This file will need to be established in order to have some sort of guidelines for your pressure files to fall under. In the Data File you will also assign the pressure classification information required to create the pressure files. The Data File is an accumulation of data that is required for the processing and building of your ducting systems.
This information is all collectively stored here for ease of use by you and by Server. All of the data should be current and correct for the program to run efficiently.
To create a rectangular pressure file you must first select the classifications in which you wish the file to be created. Starting with: Pressure Class: This is the pressure class you wish to have your ducting created under. Such as low (2 inch), medium (4 inch) or high (6 inch).
End Treatment: You must select the end treatment you wish for your ducting. Such choices as TDC, S and Drive and many more are available to you to choose from. No matter which end treatment or joint system you choose, you can still have a combination of end treatments in one pressure file. The treatment that is going to be used more prevalent should be chosen here.
Standard: This is the standard under which you wish the duct to be built.
Reinforcement: Which ever procedure you use to reinforce your ducting systems should be selected. The options are listed in the drop down menu.
Material: Whatever the material is that you are creating this pressure file for. Pressure files for materials such as aluminum, stainless steel, duct board and any other materials you use can be created.
Once you have selected the correct classifications for your pressure file you may then click on the button “Edit/Create”. FABshop will then look to see if there is such a pressure file created and stored, if not you will be asked to choose which already existing pressure file to base it on, or you can select to create it after the default pressure file.
In order to create a pressure file that is unique to one customer simply click on the “Create Custom” button and select a new name for this pressure file, usually the name of the customer you are creating it for. Then you will have to choose a pressure file to create it after, either a file you all ready have or after the default file.
Once you have created this company specific pressure file in order to edit it you will have to click on the “Edit Custom” button in order to choose that file. Then you may edit the pressure file just as you would any of the other files.
All of the round and oval pressure files procedures are the same as that of the rectangular.
If you wish to see a list of all of the pressure files created click on the button “Pressure File List”. This will show you to see a list of all of the pressure files that have been created and stored.
In order to better transfer pressure file information you can use the Transfer Pressure File Info option. This option is designed so that you can designate what info you wish to have transfer from one file to another; you can be as specific as you wish.
The Accessories page is where you assign the Stock/Misc. File and item line number to each of your miscellaneous items.
The Central Options File will allow you to assign all of the procedures you wish the takeoff screen to take while viewing fittings. You can assign the default throat lengths for a 90′ square elbow or the default length of a 2-way transition for example.
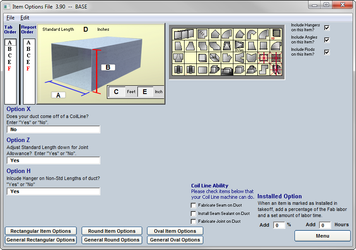
Item Options
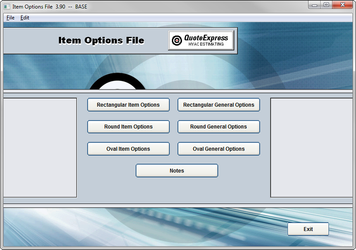
- Default Data
Input default data such as the default throat lengths for a 90° square elbow, or the default length for a two-way transition. - Tabbing Order
Customize the tabbing order for takeoff by assigning field order. - Length Adjustment
Customize the base length and corresponding percentage changes in labor. If a length is greater or lesser than the default length, increase or decrease the labor by the specified percentage. - Rectangular, Round, Oval
The same options are available for Rectangular, Round and Oval. Click on any of the duct system tabs at the bottom of the screen and continue customizing information. - General Options
Secure valuable takeoff data by establishing what data can be changed by another user. For example, the administrator may want to secure the labor data for the Rectangular data file. This ensures that another estimator can only delete or change certain pieces of information from their Takeoff screen.
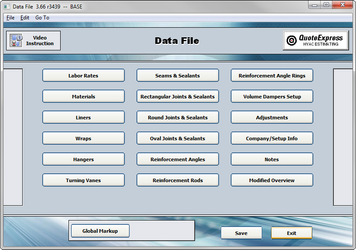
Data File
The Data File is an accumulation of data that is required for the processing and building of your ducting systems. This information is all collectively stored here for ease of use by you and by Server. All of the data should be current and correct for the program to run efficiently.
This is the area where you will keep all of your data for such things as your labor rates, liner, wrap, hanger systems, etc. All of this information should be updated and checked regularly or as often as possible.
This information will be used in the specific pressure files that you create for your company and that of your customer’s files as well.
The Data File tells the program how you would like to build and design the ducting systems that you use. This data is very important to the program and it is strongly recommended that you password protect these files to keep unnecessary changes from being made.
See Table of Contents for specific pages detailing information about the Data File.
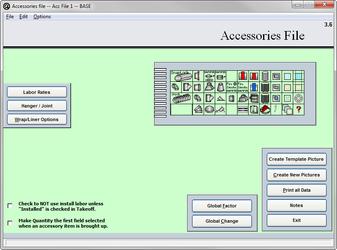
Accessories File
The accessory file will tell you where to install all of the data for your accessory items. Snap lock pipe, adjustable elbows, wyes and other fittings such as these are all located in the miscellaneous files, but you need to visit this section to know where to input the proper information.
All of your accessories are the items that you buy, the items that are not classified as rectangular, round or oval. Such items would be your snap lock pipe, adjustable elbows, snap wyes, flex, etc. These items are generally bought items and don’t have any fabrication hours, but if you are fabricating them there is an area for the labor hours to be included.
See Table of Contents for specific pages detailing information about the Accessories File.
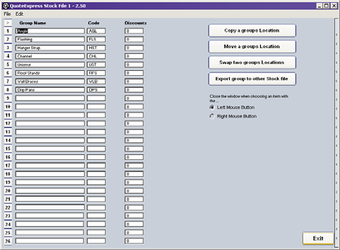
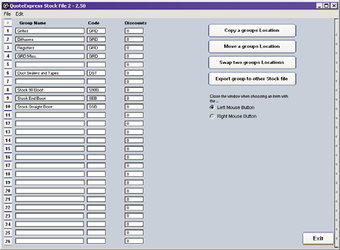
Stock Files
The stock files are being phased out of QuoteSoft Duct.
They have been replaced by the Catalog File. The catalog file has all the features of the stock files and many additional features not possible in the stock files.
Please do not use the stock files, they remain for legacy use only.
Pressure File List
Click on the Pressure File List button to view pressure files that you have created.

Click on any pressure file to open, make changes, or delete. Right click on a pressure file name, to assign it to be the default pressure file.
Close List: Will revert you to the classic drop down style.
Pressure File Transfer
After having made a copy of the default pressure file you can decide what information you wish to have copied form any other pressure files that have been created previously by you.
First you must choose which file you are copying from. Then select which information to be copied by checking the appropriate boxes. Now you must select the pressure files listed below to copy the information into.
All of these options are the same whether you are copying a rectangular, round or oval pressure file.
![]()
Pressure Classifications
You can find your pressure file classifications by first going to the Central Options File and then into program architecture. The different classification options that are available on the Data File Center main page for your pressure files are listed here. What ever is listed on this page will be shown in the drop down menus on the data file center’s main page.

New Pressure Files
The first thing you should do when creating a new pressure file is choose a file that currently exists to base the new one off of. You should take into consideration that if you choose a pressure file that has similar standards to the one you wish to create there are fewer changes that will need to be made.
Once you have chosen a suitable file to copy click on it to highlight it. Now click the copy button at the bottom of the page. For this exercise we will be creating a custom 2" pressure file. Choose custom off of the window that pops up. Your next step will be to name this pressure file. Name it “2 in. Custom.”
After you have named your pressure file you will see it on your pressure file list. We must now go into that pressure file. To do that simply double click it on the list. The pressure file will now be open to edit it.
After you have named your pressure file you will see it on your pressure file list. We must now go into that pressure file. To do that simply double click it on the list. The pressure file will now be open to edit it.Once opened you will see a list of options on the left hand side. On the right hand side is a template of the available ductwork and fittings. First we will click the labor rates button. On the labor rates page you will be able to choose which labor rate you would like to have used for this pressure file.
Once opened you will see a list of options on the left hand side. On the right hand side is a template of the available ductwork and fittings. First we will click the labor rates button. On the labor rates page you will be able to choose which labor rate you would like to have used for this pressure file.
©2022 ConstructConnect, Inc. All rights reserved.