10. Job File
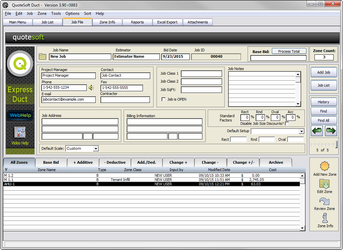
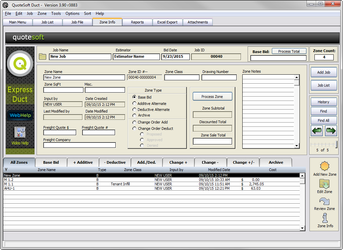
The Job File is the center point of navigation throughout your Jobs. The information for all of your jobs are viewed in this area.
To get started and add a new Job, click on the “Add Job” button and type in the name of the new project.
As an option: you can enter a unique ID for the Job, it can forced into a specific format as in three letter and three number format (AAA123). Once you have assigned a new ID to the customer you may then begin inputting the job specific data.
The information that is optional for the job Owner, Estimator, Addresses, etc. There are spaces available to also input email address, phone and fax numbers, discounts and contacts. All of this information will help you keep more comprehensive records of your projects. The job files can be sorted by clicking on the Sort menu at the top of the screen and selecting which of the options you wish to have them sorted by.
Any optional custom pressure files that have been created for this job can also be listed. This will make sure that when a new zone is being created for this job that it is done off of the custom pressure files that have been created.
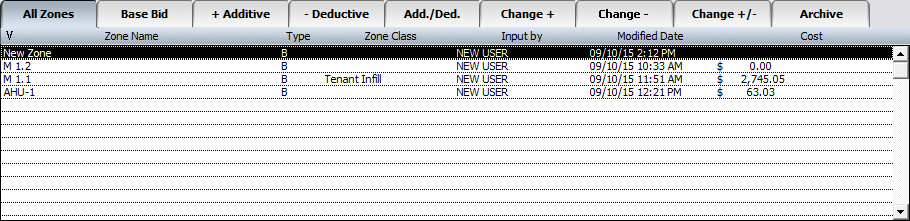
All of the zones for this job are listed on the zone list. This All Zones tab will show all entered zones of any type.
You can sort zones by clicking on the tab headings above the list. Once you have separated them in any of the tabbed categories( Base bid, Additive Alternates, Deductive Alternates,Etc., you can sort them even further. The list can be then sorted by zone name alphabetically, by estimator, by input name, by date entered, by cost, by clicking on the column headings. Click the column headings again to reverse the sort order by zone name; A to Z or Z to A.
To delete a Job, select the Job menu and click on the “Remove Job” item and you will be asked if you wish to delete the currently viewed job. Click yes to remove the job from your file. This action can not be undone.
Add a New Zone
As soon as you have all of the job information input it is time to begin adding new zones. These zones will be listed below the job information in the zone list.
To begin, click on the “Add New Zone” button.
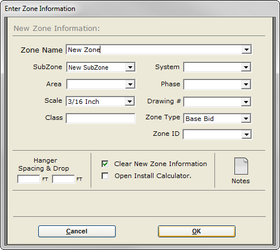
Type in a new zone name (required) and any other optional information as needed.
This information is stored on the job info page and will help you to manage your bids further.
You can always modify the name of the zone and add the optional zone information after the zone has been created.
Click OK to continue.
The next step is to select the initial Round / Rectangular / Oval pressure files (duct construction standards) that the zone will initially use. A zone can have many different types of pressure files. This dialog also lets you choose an alternate Accessory File and select a Labor Rate.
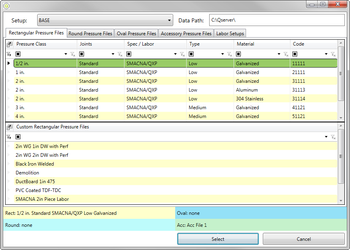
If you have dozens of duct construction standards you may wish to use the “drop down” dialog. This was created for quick access when a listing view was to long. Simply use the drop down menus to select the rectangular, round and oval files you wish to use.
Both screens accomplish the selection of your pressure files / duct construction standards. Once you have completed these two steps click “OK” to be taken to the Takeoff screen where you can begin inputting your bid items.
Edit Zone
To open an existing zone click on the zone line you wish to open from the list below the job information. Then click on the “Edit Zone” button and you will be taken into the Takeoff screen where you can make your changes or add new items as needed.
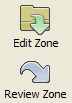
To review an existing zone without making changes click the “Review Zone” button. This will open the zone into Takeoff, but remove the options in Takeoff for changing existing items or adding new items.
If you have not entered a fitting into zone, you will need to reselect the pressure files that you wish to use with this zone. The pressure file and labor selection data is saved with the initial fitting of each zone.
Zone Info
As soon as you have completed inputting items for your zone, you can return to the customer file by clicking the “Job File” button on the Takeoff screens upper left corner. QuoteSoft Duct will calculate all the items costs automatically and give you a grand total for all items in the zone.
If a zone has no cost associated with it, click the “Process Job Total” button to recalculate all the jobs zones. A zone will not calculate if the user quits QuoteSoft Duct directly from Takeoff and did not return to the Job File.
Input any additional information for the zone you have completed. To change zones simply click on the zone you wish to edit in the list and then click on the “Zone Info” button to go to the proper page.
Here you can enter and modify all of the data for the zone.
If you need to delete a zone, select it from the zone list and click on Zone menu and select the “Delete Zone” item and click either yes or cancel when you are asked if you are sure if you want to delete this zone.
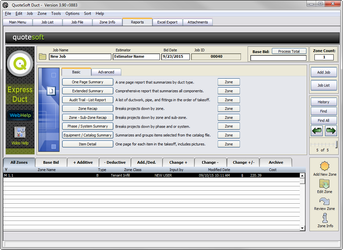
Reports
To run a report, click on “Reports” tab and you will be shown the reports that are available for printing.
The most commonly used report is the “Extended Summary Report”. The “Extended Summary Report” is QuoteSoft Duct’s main report for displaying information to quickly and easily analyze all labor to material subtotals on every part of a takeoff.
To run a report on a single zone listed for a job, select the zone and the report and “Single Zone” from Reporting Options then click on “Run Report”.
Job Searches
If you wish to do a search to find a specific job in your files simply click on the button “Find Job” and you will get a blank job file page for you to type in whatever option you wish to use to search for a specific job. You can search by the name, a letter in the name, the ID number, and many other ways. The searching option will allow you to find the specific customer that you are in need of finding.
Sort Bids and Jobs
All of the bids and jobs you have stored for your job can be sorted for managing. There are Seven buttons across the top of the job list, which allow you to sort.
| All | Will show all of the bids and jobs together |
| Base | This will only list the bids that have been accepted and are now jobs either being processed or already sent. |
| Add | This option will only show the bids that are awaiting approval. |
| Deduct | This will show future zones. |
| Archive | These are the bids that were declined. |
Above each part of the job list there is another series of buttons for sorting.
| Job Name | Will list everything in alphabetical order. |
| Salesman | So you can sort or group by salesman. |
| Input By | This will show you who entered the bids or jobs. |
| Cost | To sort by dollar value |
| Bid Sent | Will let you know if the birds were sent or if they are still awaiting release. |
| Shipped | Will let you know if the job has been completed and shipped. |
All of these sorting options are available to you to help in the managing of your jobs and customers.
©2022 ConstructConnect, Inc. All rights reserved.