Working with the Directory
- Margie Komp
- Zach Johnson (Unlicensed)
- Zach Johnson (Deactivated)
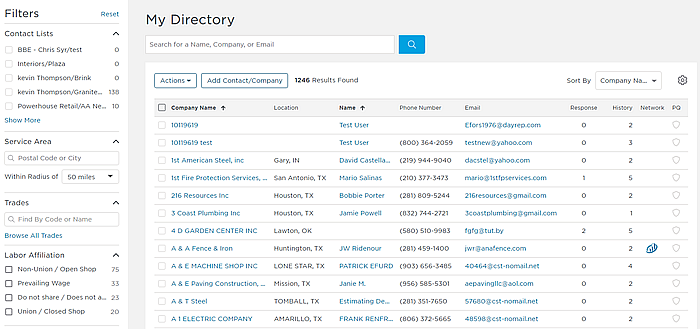
The Directory contains all of the business contacts that you have added to your account. Included are company and contact name, location and contact information, the number of times you have invited the company, and a record of their response. You can also add a contact and company to the list:
This section contains the following topics:
Accessing the Directory
To access the Directory, click the Directory icon from the sidebar menu:

Understanding the List
The following table describes the fields in the Directory window.
Note: Clicking on a company or contact name opens the corresponding details page for the entry.
| Field | Description |
| Company Name | The name and location of the company. |
| Location | |
| Name | The name, phone and email address for the contact. |
| Phone Number | |
| Response | The number of times the company has responded to an invitation from you. This includes all bid response types. |
| History | The number of times you have invited the company to a project. |
| Network | When the ConstructConnect logo is displayed, indicates that the company is a paid subscriber. |
Searching the List
The search bar at the top of the window lets you search your Directory by contact and company name and by email address.
To search the list:
- Enter your search terms in the box. The list will automatically refresh with the results as you type.
Note: You can use partial names in your search. This includes partial company and contact names, email addresses and street names.
Filtering the List
You can filter the list to find companies according to company location, trades, certifications and labor affiliations.
To filter the list:
- Select the filtering options you want to use from the Filters menu on the left side of the page. Your list will refresh with each filtering option you select.
The following table describes the options you can use in the Filters menu.
| Filter | Description |
| Contact Lists | By default, all of your contacts are displayed in the list. Click a list name to show only those contacts from one your your saved lists. The number of contacts displayed in the list will appear next to the list name. |
| Service Area | Use with the radius selection to display the matching counties for the code. You can remove counties by clicking the x next to the county name. |
| Trades | Use to filter the list by your custom trades lists. |
| Labor Affiliations | Use to filter by specific labor affiliations. |
| Certifications | Use to filter by specific minority certifications. |
Using the Directory List Actions Menu
This section covers the tasks you can perform using the Directory List Actions menu, as described in the following table.
| Option | Description |
Create New List | You can create customized lists to save companies and contacts for specific uses. Your custom lists are displayed at the top of the Filters list. To create a new list:
Your lists will also be displayed when you use the Manage Lists option. |
Delete Lists | Use this option to delete a list. To delete a list:
|
Add to List | Use to add the contacts of a personal list to your Directory. To use this feature:
|
Remove from List | Use to remove a personal list fromS
|
Export to Excel | Use to export company information as a formatted spreadsheet. To use this feature:
Result: The export runs and you are prompted to save the export on your local device. |
Export All to PDF | Use to export the entire Directory as a formatted PDF. |
Working with Company and Contact Details
The Directory contains a list of companies and associated contacts that you have added to your account for potential business. You can access and edit the details for both contacts and companies.
Accessing the Company and Contact Details Pages
To access the details for companies and contacts:
- Click on the company or contact name in the list.
To switch the view:
- Click on either Company or Contact.
Understanding Company Details
The following table describes the fields in the Company Information section of a listing.
| Field | Description |
| About | Contains basic information about the company, including website and a general description.
|
| Service Area | The physical location of the company.
|
| Trades | The trades associated with the company. You can use the search menu in the section to find the trades for the company by name or code. |
| Certifications & Labor Affiliations | The certifications and labor affiliations for the company. To add a certification:
|
| Labor | The labor affiliation for the company. To add an affiliation:
|
| Project Activity | Lists the projects where the company is currently engaged.
|
| Notes | Any notes added to the company. |
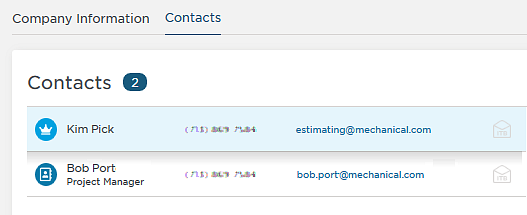
Understanding Contact Details
The contacts for a company are displayed on the Contact tab for a company listing.
Each contact on the page has a different set of information.
- Click the contact name to display the details for that contact. The contact currently being viewed is highlighted blue in the list (as shown below).
The following table describes the fields in the Contact section of a listing.
| Field | Description |
| Name | The top of the listing includes the following information:
A contact listed as Gone from Company is no longer included in your project results. |
| Trades | The trades associated with the company. You can use the search menu in the section to find the trades for the company by name or code. You can also add or edit the trades for a contact. To add or edit trades:
Note: In the menu, the trades already associated with the contact are highlighted blue. |
| Service Area | The location in which the company generally performs work. You can use the search menu in the section to find the specific service areas for the company. You can also add or edit the service area. To add or edit the service area by postal code within a radius:
To add or edit the service area by state or county:
|
Contact Lists | The Contact Lists section displays the custom lists that you have added to the contact. Using the menu you can add, edit and create custom lists. Note: The custom lists attached to the contact are displayed at the bottom of the section. To add or remove a custom list:
To add a contact list:
|
Adding a Contact or Company
When you add a contact or company, you are asked to search for the contact email and company name to avoid creating duplicates.
To add a contact and company:
| 1 | Click Add Contact/Company from the top of the Directory list. |
| 2 | In the Add Contact/Company menu, enter the the contact email address you are adding. |
| 3 | Did the system return a matching contact?
|
| 4 | Do you want to add the contact to your Directory?
|
| 5 | This step requires that you search for the company name to avoid duplicates.
|
Does the system return a matching company?
| |
| 6 | In the Add Contact/Company menu, enter the information for the company and then click Next. |
| 7 | In the menu, add the information for the contact and then click Next. |
| 8 | In the menu, select the trades for the company and then click Next. |
| 9 | In the menu, select the location for the company and then click Add to Directory. |
| 10 | In the Add to Projects menu, select the projects that you want to add the project to and then click Add to Projects. |
Deleting and Marking Contacts as "Gone"
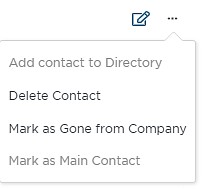
You can both delete a contact and edit their status from a contact listing.
To access the delete or status change menu:
- Click the three dots next to the pencil icon at the top right of the window.
To delete the contact:
- Click Delete Contact from the list.
- When prompted, click Yes, Continue to delete the contact.
To remove the contact from your Directory:
- Click Gone from Company from the list. The contact is no longer returned in your project searches.
- To return the contact to an active status, click Unmark as Gone from Company.
Adding, Editing or Deleting Custom Fields
Occassionally, our customers will have a need to add information about their sub-contractors that isn't associated with a standard data field (i.e., name, email, company, etc.). If you need to add, edit, or delete a customer field to better manage the contacts or companies you work with in your private directory, these step-by-step instructions will guide you through the process.
Related content
© ConstructConnect All rights reserved.