Working with the Project List
- Zach Johnson (Unlicensed)
- Daniel Wal
- Shunte McMillian (Deactivated)
The project list page displays the projects that match either your profile search criteria or the criteria of a specific search:
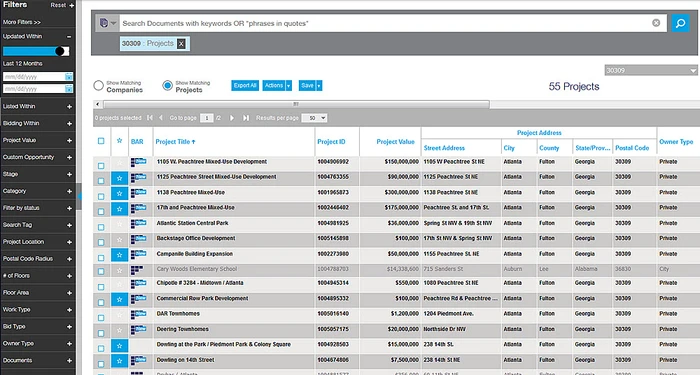
You can also access this page by clicking Show Matching Projects from the top of the company list page.
Quick tips for using this page
- Automatically get search results – Automatically display the results of your favorite saved search each time you log in. For more information, see Understanding the Manage Searches menu.
- Filtering your results – For information about using the Filters menu to refine the projects in the list, see Filtering the project list.
- Saving your search – You can save any search for future use. For more information, see Saving a project search.
- Opening a project in a new tab – Right-click on the row for the project and select Open project in new tab.
- Changing the columns displayed – To add, remove, reorder and filter columns, see Setting up your work space.
Missing an option? – Not all options described in this section may be available in your account. Contact your system administrator for more information.
This section contains the following topics:
Viewing matching companies
You can view the companies acting as participants or bidders on the projects in the list.
To view matching companies,
- click Show Matching Companies from the top of the list.
Result: The window refreshes and the company list page is displayed. For more information, see Working with the Company List.
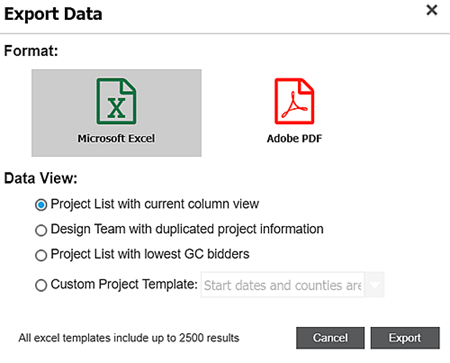
Exporting projects and participants
You can export a list of projects and project participants in either PDF or Excel format. You can export both single projects and the entire list of projects on the page. You can also choose your own customized Excel layout from your list of saved export templates.
To export projects and participants,
1 | From the results, select either
Result: The Export Data menu is displayed:
| ||||||
| 2 | You can choose to export your selections as a formatted Excel spreadsheet or in PDF format, as described in the following table.
| ||||||
| 3 | Once you are done, click Export. Result: Your export runs and is available by
Tip: The Exported Documents menu displays all of the documents ready to download. |
| For smartphone and tablet users: Downloads of exported files are only available from a personal computer. |

Assigning projects to CRM export
You can assign projects to be included in your Customer Management System (CRM) export. The data is formatted in XML and sent to your CRM system using FTP.
To assign projects to CRM export,
1 | Select the project or projects you want to add to your CRM export. |
| 2 | Click Export and then click Add to CRM export. Result: Your selection is added to your CRM export queue. Notes:
For more information on this topic, see the topic CRM Information and Guides. |
Adding projects to your Watch List
You can add projects that you want to follow for future development to your Watch List. You can set your account to receive an email each time there is a significant update to any of your Watch List projects.
Using the Watch List star
To use the Watch List star,

- Click the star at the top of the list to add all the projects displayed on the page to your Watch List. Click again to remove the projects from your list.
- Click the star on the individual project row to add the project to your Watch List. Click again to remove the project from your list.
Assigning projects to your Watch List using the Actions feature
You can assign projects to your Watch List using the Actions feature at the top menu bar.
To use this feature,
- select the projects you want to add to your Watch List.
- Click Actions and then select Add to Watch List.
Note: Click Remove from Watch List to remove selected projects from your Watch List.
For more information on this topic, see Working with your Watch List projects.
Marking projects as viewed
A project listing is shaded gray in the search results when the project is marked as Viewed.
To mark a project as viewed,
1 | Select the project or projects you want to mark as viewed. |
| 2 | Click Actions > View. Result: The selected projects are shaded gray in future search results. Note: Select Unviewed to remove the viewed status. |
Marking projects as hidden
You can use the hidden projects feature to keep projects from displaying in any of your search results. You can restore your hidden projects using the Hidden Projects section of the Watch List Projects page.
Notes:
- Hidden project counts in excess of 1K can impact system performance.
- Hidden projects
- retain their Watch List status when marked as such, and are included in your Watch List project email updates.
- are displayed in company search results, even when the company match only includes the hidden project.
To hide projects,
- select the projects to hide and click Actions > Hide.
Result: The menu refreshes and the selected projects are no longer included in your search results.
To show hidden projects,
- Click Watch List in the menu side-bar.
- In the Watch List Projects menu, select the Hidden Projects option.
- From the display, select the projects you no longer want hidden.
- Click Unhide Project.
Result: Formerly hidden projects are no longer hidden and are included in all of your project results.
Assigning projects to users
You can assign projects to other users in your company. You can assign single users to multiple projects, and you can assign multiple users to a single project. For each assigned project, the Personal Notes section of the project details page shows the assigned user, the date of the assignment, and any notes added by the individual assigning the project. In addition, assigned projects are automatically added to the user's Watch List project's list. For more information on this topic, see Working with Watch List projects.
Note: This feature may not be available for your account. For more information, contact your system administrator.
To assign projects to users,
1 | Select the projects you want to assign. |
2 | Click Action > Assign to User. Result: The Assign project(s) to Users menu is displayed. |
3 | Check either
Note: Only system administrators can assign projects to users other than themselves. |
| 4 | By default, each user assigned to the project receives an email alert once the project is assigned.
Note: The assignee receives only one email per session regardless of how many projects have been assigned to their account |
| 5 | By default, the project listing displays a public notice in the Personal Notes section listing the users assigned to the project. Optionally, you can enter a note that is also displayed in the Personal Notes section. All notes are public and visible to all users in your company. You only need to add the note once, both for single users with multiple assigned projects and for single projects with multiple assigned users.
Tip: Use this feature to add notes with specific keywords to a range of projects without having to open each project individually. You can then list the projects with the same keyword by using the the Personal Notes filtering option. |
| 6 | Click Save. Result: The projects are assigned to the selected users and are added to the user's Watch List. |
Saving a project search
The Save Search feature lets you save a new search, change the name of a search, and save modifications to an existing search.
For more information about using the save search feature, see Working with saved project searches.
Assigning a search
System administrator's can assign searches to other users in the company.
To assign a search,
1 | Once the search runs, click Assign > Assign Search from the top menu bar. | ||||||
2 | In the Assign Search menu, choose from the following options.
|
Assigning tags
For system administrators, assigning a tagged search to a user does not automatically transfer the tags along with the search. You must manually assign the tags for each tagged search for each specific user.
Note: This procedure is for customer administrators only.
To assign a tag to user,
| 1 | Save a search and add a tag to the search as described in Saving a project search. |
| 2 | With the search results displayed, click Assign > Assign Search and assign the search to the desired user. For more information, see the topic for assigning searches in the Assign Search menu. |
| 3 | With the search results displayed, click Assign > Assign Search Tag. Result: The Assign Search Tag menu is displayed, showing the search name, tag color and the users assigned to the search. |
| 4 | Select the users for the tag from the list. When you are done, click Assign Search Tag. Result: Going forward, the tag appears in the Tag column in search results for both projects or associated companies when a match is found with the tagged search criteria. |
Adding and removing search terms
Once your search runs, the terms used in the search are displayed below the search bar. You can add and remove search terms to further refine your results:

Each time you add or remove search terms, the project list refreshes with the projects matching the revised terms.
To add terms to your search,
- enter the additional terms in the bar and then click the spyglass icon.
Result: The list refreshes with the matching results and the revised terms are displayed below the search bar.
- enter the additional terms in the bar and then click the spyglass icon.
To remove a search group,
- click the x on the search term group to open the menu and then click the trashcan icon:

Result: The search group is removed and the list refreshes with the results matching the remaining search terms.
Column value descriptions
Each column in the list contains information relating to the projects in the list. All of the information available for the project is displayed on the line for the project.
Notes:
- Clicking on the project name opens the details page for the individual project. For more information, see Working with the Project Details Page.
- For information about adding, removing, reordering, locking, and filtering columns, see Setting Up Your Workspace.
The following table describes the column values in the project search results list.
| Field | Description | |
CRM icon
| The folder icon indicates that the project is selected for CRM integration. For more information, see CRM Information and Guides. | |
Watch List icon
| The star icon indicate that the project is in your Watch List. For more information, see Working with your Watch List projects. | |
BAR icon
| The BAR icon indicates that the Buyer Activity Report (BAR) is included with the project details. For more information on this feature, see the section for BAR on the Working with the project details page. | |
Search tags indicator
| Indicates that the project meets the criteria of a tagged search. To set up tags for searches, see the step for tagging searches in Saving a project search. | |
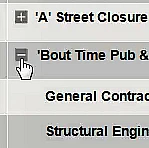
| Project Title | The name of the project. Note: Click to expand the project listing to see the project participants, including participant contact information:
| |
| Bid Date | The bid date and bid date time for the project. | |
| Bid Time | ||
| Bid Type | The bid type for the project, which can be Invited Bidders, Negotiated Bidders, Open Bidding and Prequalified Bidders. | |
| Custom Opportunity | Projects that are neither civil or single family that fall within a specific value range agreed upon by the customer. Note that this is a custom field and may not appear in your account. For more information, contact your sales representative or Customer Service. | |
| Design Team | The design team responsible for the project. Information includes the role the company is playing on the project, the company name, the contact name and phone and email for the contact. | |
| Floor Area sq. ft. | The total floor area of the project in square feet. | |
| Floor Area sq. m | The total floor area of the project in square meters. | |
| Floors Above Grade | The number of floors above and below the standard grade of the project site. | |
| Floors Below Grade | ||
| List Date | The date the project entry is created in Leads. | |
| Mandatory Prebid Conference | The date for the mandatory prebid conference, when required. | |
| Matching Documents | The number of documents matching the keyword used in your search. Clicking on the number opens Document Center with the documents for the project loaded in the window with your keywords highlighted. For more information, see Working with Document Center. | |
| Material Demand Value | The estimated value of the project using RSMeans construction cost estimates. For more information, see the section for Material Demand by RSMeans in the description of the project details page. | |
| Owner Type | Indicates the type of owner of record for the project, such as Private or City. | |
PSA Docs
| Indicates the type of documents available for the project listing:
Note: To access PSA documents, click to open the project and then click Download Documents at the top of the page. | |
| Participants | The name and contact information for the company playing the primary role on the project. | |
| Role | ||
| Company Name | ||
| Contact Name | ||
| Phone | ||
| Personal Notes | Personal Notes are the notes added to the project listing by you or other users in your company. Besides the Note field, you can select to view the user name, the create date for the note and if the note is marked private. | |
| Plans Specs Available | Indicates if plans, specs, or addenda for the project are available:
| |
| Project Address | The physical location of the project. | |
| Street Address | ||
| City | ||
| County | ||
| Postal Code | ||
| Project ID | The CMD identification number for the project. | |
| Project Value | The value of the project. | |
| Search Tag | Displays the tags when the project matches the criteria of one of your saved tagged searches. Hovering over the tag displays the name of the search. | |
| Site Area | The site area for the project, in square feet, square meters, acres, or hectares. | |
| Site Area Unit of Measure | ||
| Stage | U.S. and Canadian construction data is mapped to a single common standard, the North American Standard Data (NASD) format.
The following lists both project stage and the corresponding sub-stages:
| |
| Note: See the previous section on Stage to see the data mapping using NASD. The category and subcategory for the project, as listed in the following:
| |
| Start Date | The date the project is expected to commence. Note that the start date can vary over the lifetime of a project. For Forecast, the start dates are fixed as this value is derived using historical data. | |
| Units | The number of units in the project, such as | |
| Update Date | The date of the most recent update to the project. | |
| Work Type | The work type for the project, which can be Addition, Addition/Alteration, Alteration and New. | |


Note: For information about the filters you can apply to your results, see Filtering the project list.
Related content
© ConstructConnect All rights reserved.