/
Connection Group Options
To open any link in a new tab, preserving your position in the current article, just hold down the <CTRL> key on your keyboard before clicking the link or click using your mouse wheel.
Connection Group Options
- Former user (Deleted)
- Former user (Deleted)
Owned by Former user (Deleted)
Last updated: Mar 28, 2018
Connection Group Options
The Connection group options in the PlanSwift Integration to Excel include Connect/Disconnect (which are toggled) and Unlink, shown in Figure 1. These are available on both the PlanSwift Ribbon-bar and on the Right-click Menu. This procedure will demonstrate the functionality using the Right-click Menu, but the functionality of these options is identical in both the PlanSwift Ribbon-bar and the Right-click Menu. To use the Connection and Unlink options, follow the procedure below.
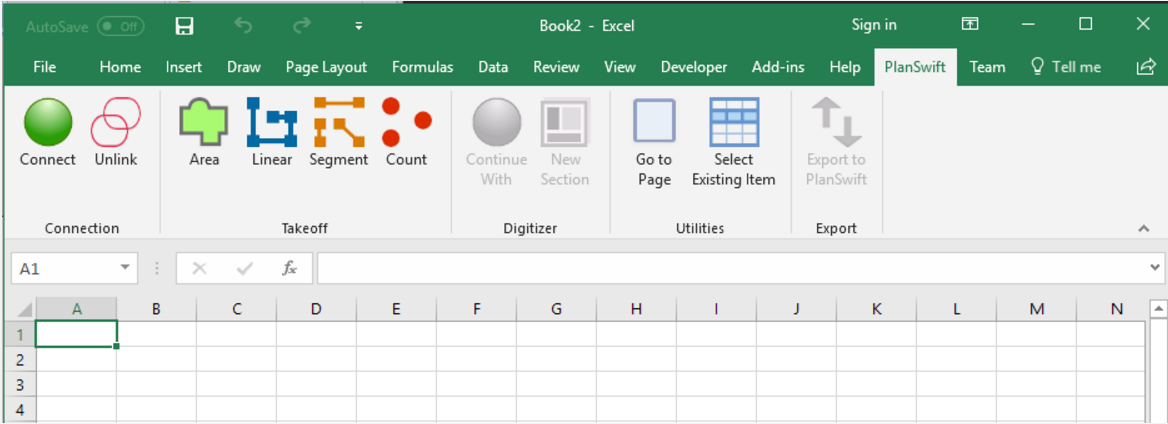
Figure 1
- Open PlanSwift.
- Click on Open in the Home / Ribbon-bar (arrow 1 in Figure 2).
- Click on Sample Plan (arrow 2 in Figure 2).
- Click on Open Job (arrow 3 in Figure 2).
- Click on A1.2 Floor Plan - Sample Plans (arrow 4 in Figure 2).
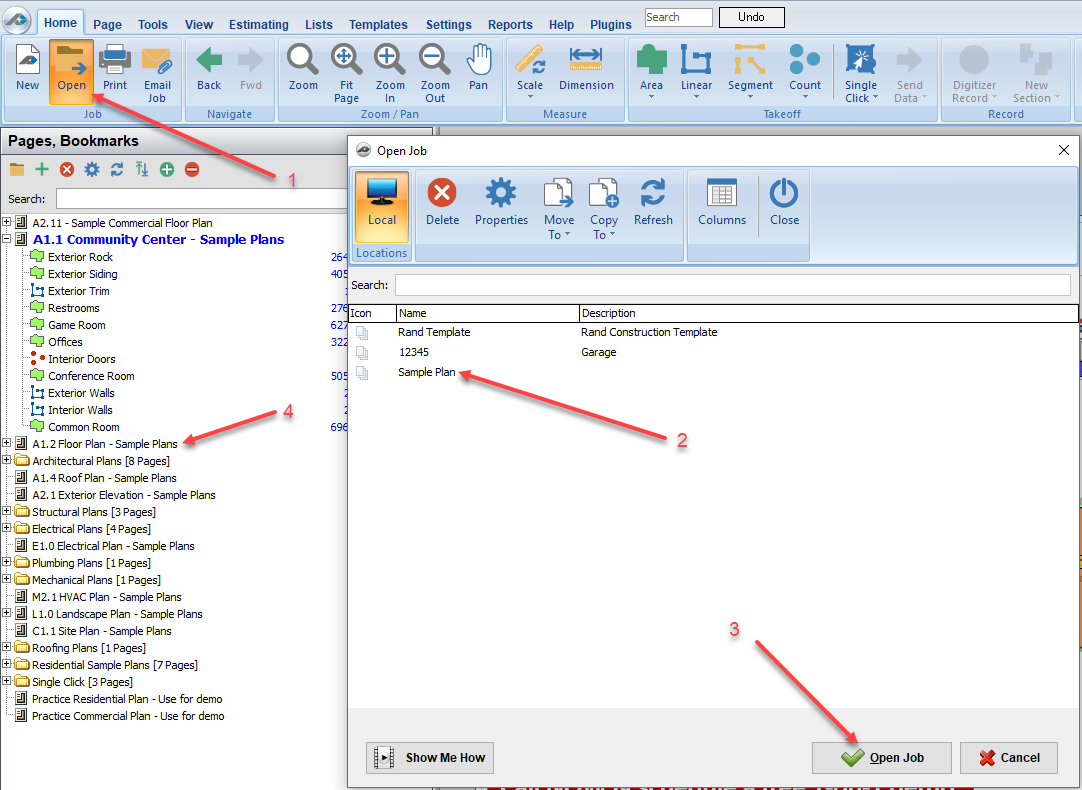
Figure 2 - The A1.2 Floor Plan - Sample Plans appears, shown in Figure 3.
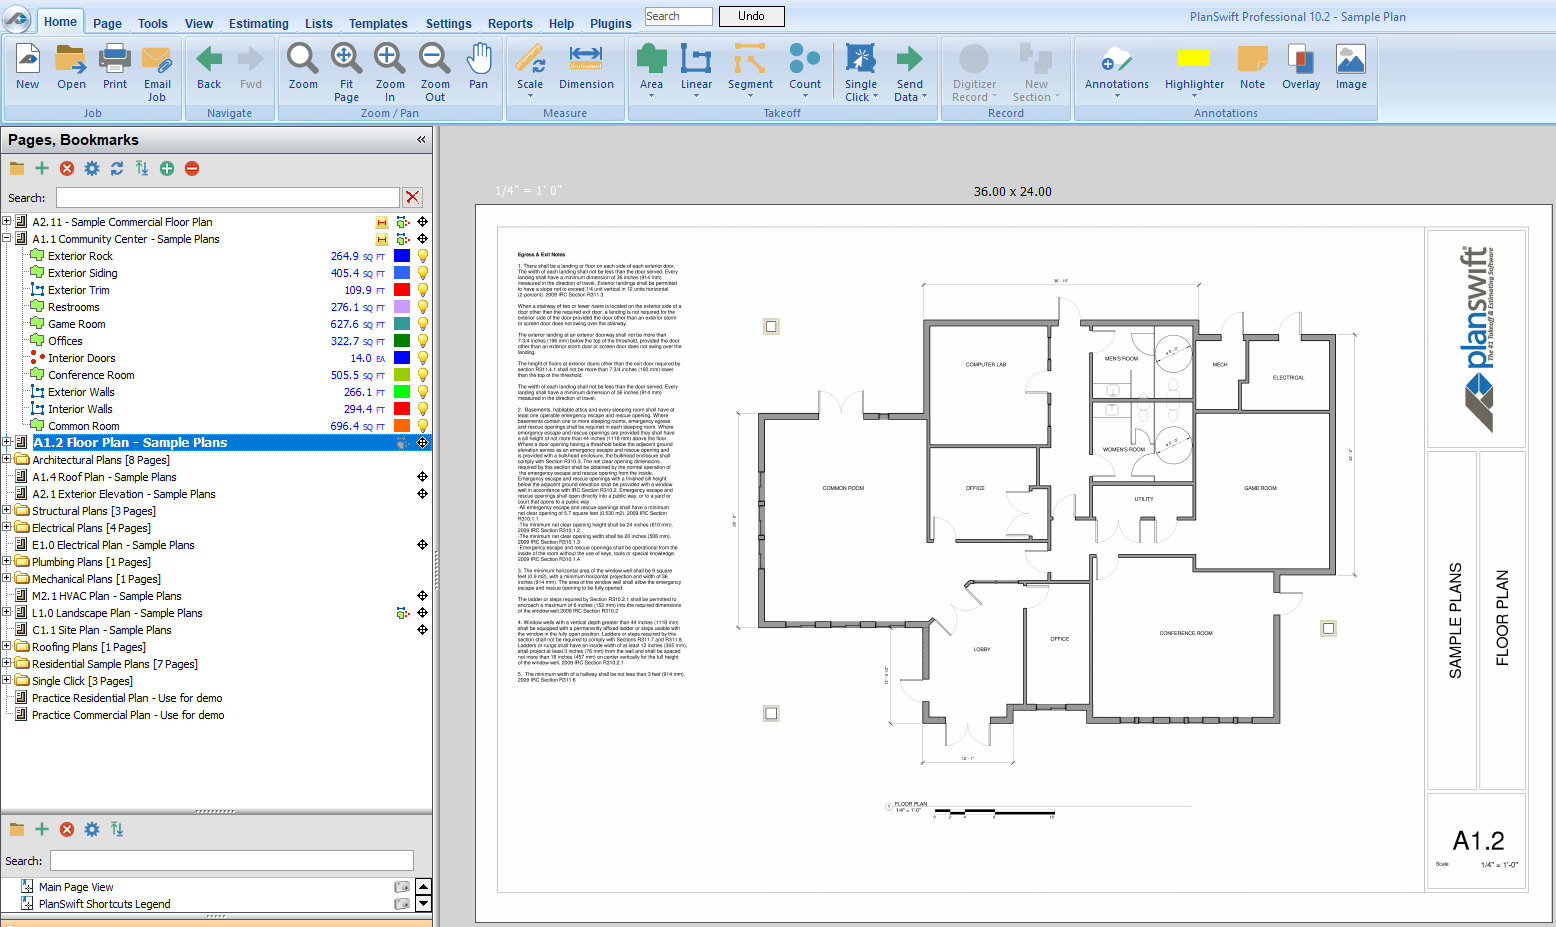
Figure 3 - Open a WorkBook in Microsoft Excel, and create a spreadsheet similar to the one in Figure 4.
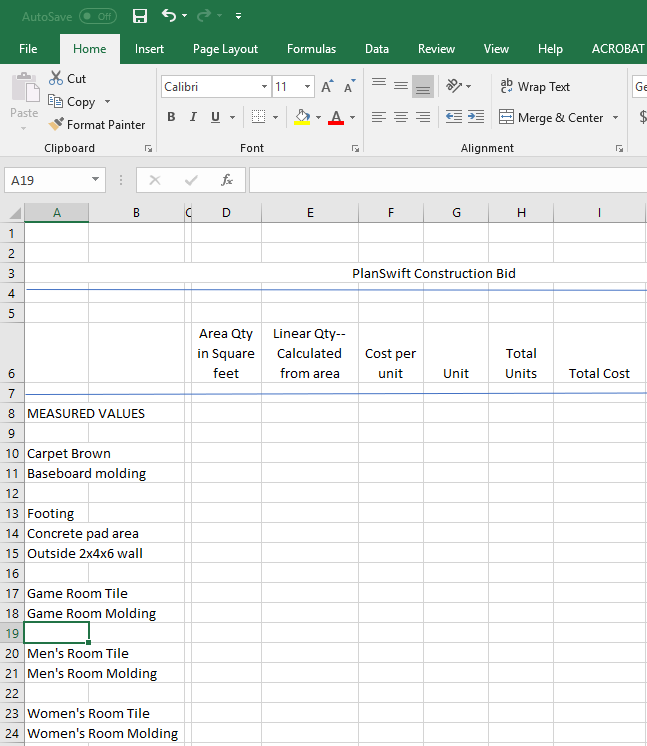
Figure 4 - In PlanSwift, perform some area takeoffs that resemble those in Figure 5, and call it Carpet Brown. Once the area takeoffs are complete, the total area should add up to approximately 1702 square feet.
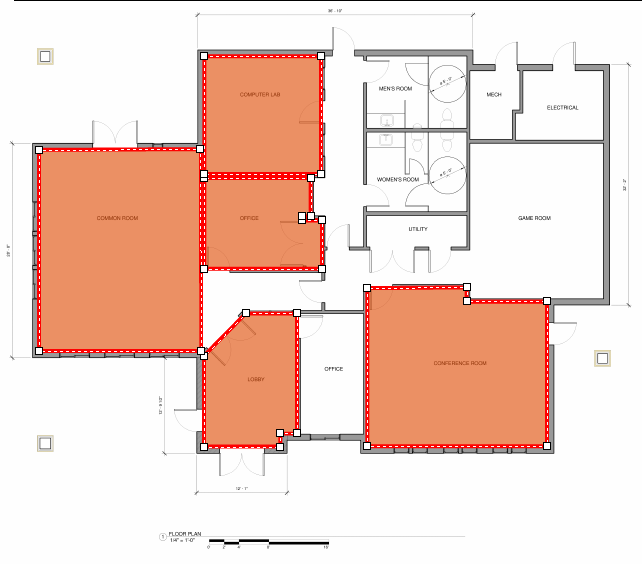
Figure 5 - Now perform a linear takeoff for the footing as shown in Figure 6, and call it Footing. The completed footing should be approximately 262 linear feet.
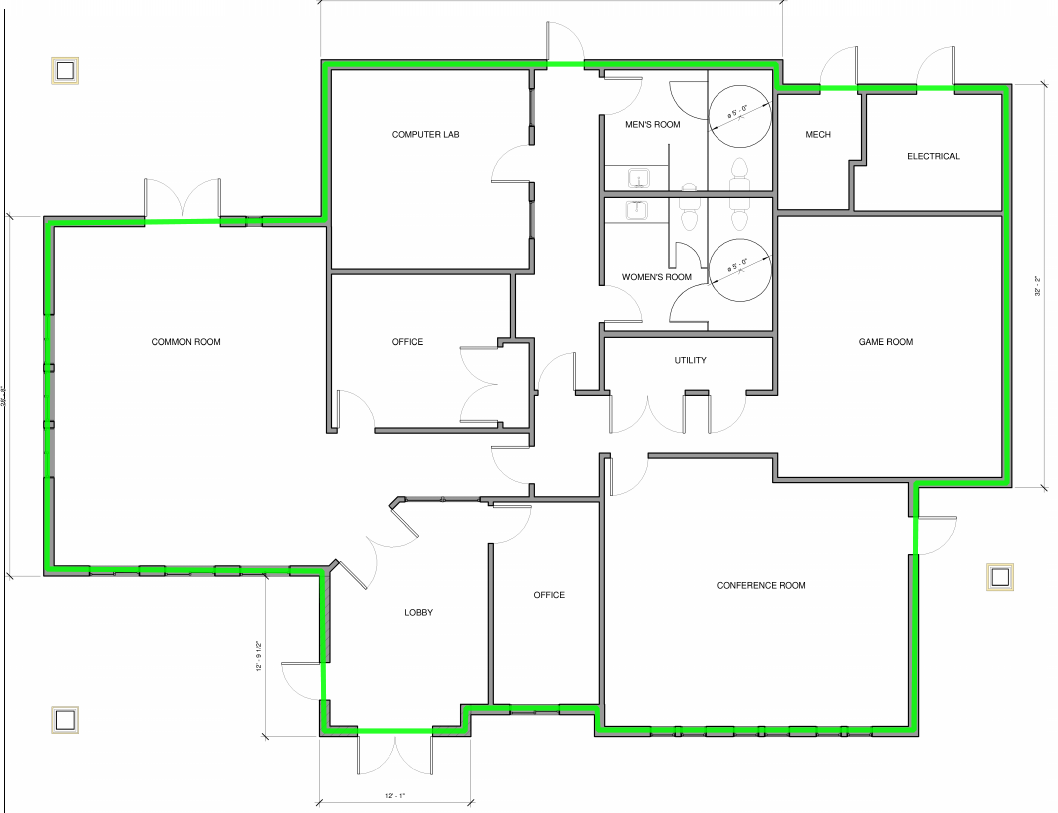
Figure 6 - The Pages, Bookmarks window should resemble Figure 7, with the Carpet Brown area takeoff and the Footing linear takeoff.
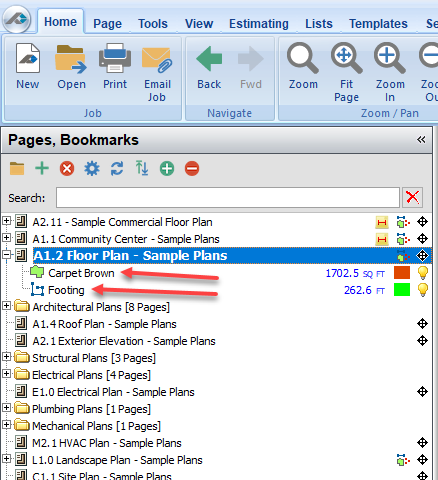
Figure 7 - Now move to the Excel spreadsheet you opened and right-click on cell D10 (see arrow 1 in Figure 8); hover over PlanSwift - Takeoff until the Right-click Menu appears (arrow 2 in Figure 8), and then click on Connect (arrow 3 in Figure 8). An alternate way to connect is to click on the PlanSwift Ribbon-bar Tab and then click on the green Connect orb in the PlanSwift Ribbon-bar Tab (Figure 8).
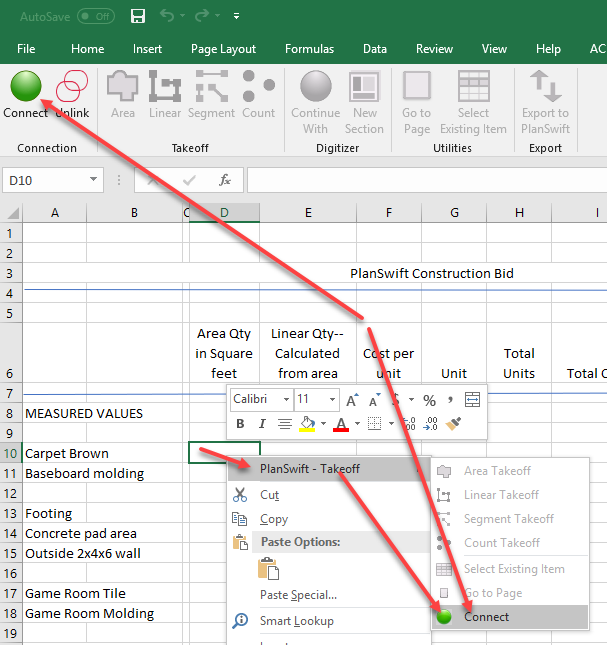
Figure 8 - After you click on Connect, a green dot connect indicator will appear next to the PlanSwift Ribbon-bar Tab (Figure 9). Additionally, the PlanSwift Ribbon-bar Connect orb will toggle to a red color and show Disconnect, which may be used to disconnect the link.
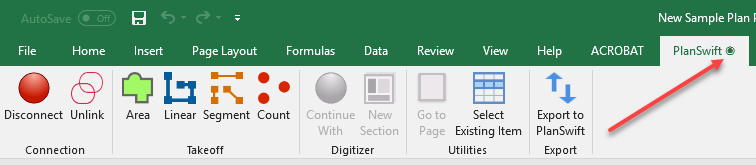
Figure 9 - To insert a link into Excel from Planswift for an existing item, right-click on Carpet Brown cell D10, hover over PlanSwift - Takeoff, and click on Select Existing Item (see Figure 9). An alternate way is to click on cell D10, then click on Select Existing Item on the PlanSwift Ribbon-bar Tab, also shown in Figure 10.
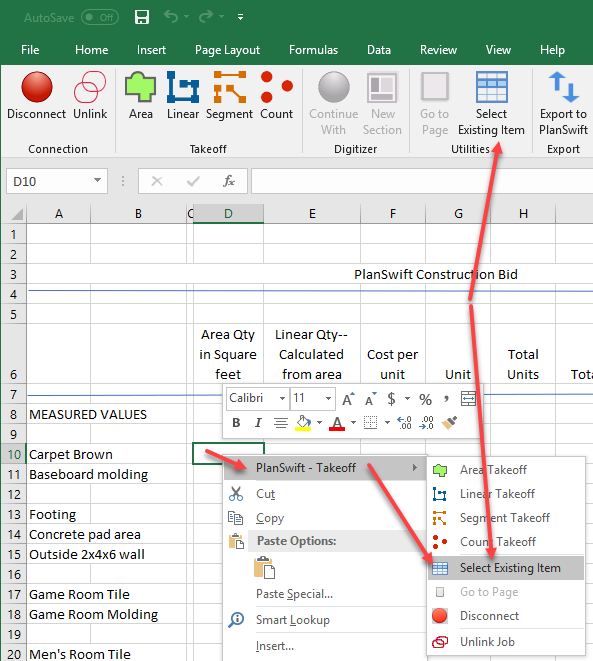
Figure 10 - The Select Existing Item window now appears (Figure 11). The Carpet Brown takeoff you did earlier is now visible in the left window (scroll the window if necessary to see it). Click on Carpet Brown to select it.
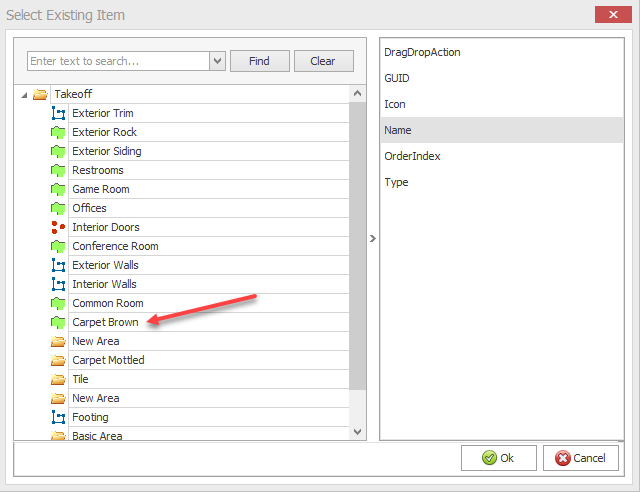
Figure 11 - After clicking on Carpet Brown, the right side of the Select Existing Item window displays a list of properties to choose from (Figure 12). The default property is Qty for quantity. An alternate selection you might want would be Area. For now, stay with the default Qty, and click on OK. The Qty option will retain the Area (square foot) properties used in PlanSwift when the takeoff was performed.
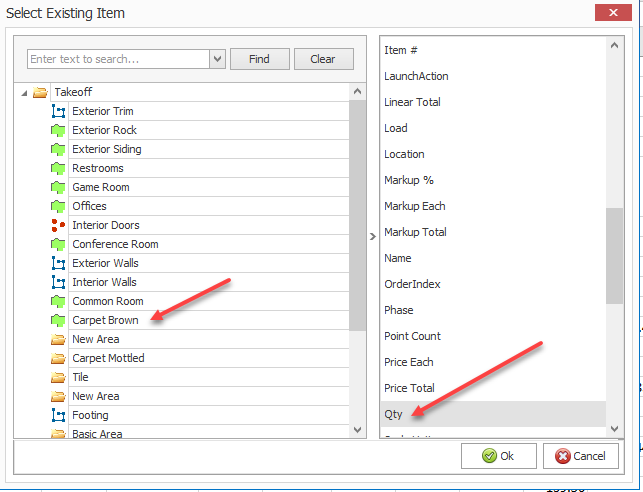
Figure 12 - Figure 13 now shows the Carpet Brown / Area takeoff value in cell D10, which matches the value shown in the PlanSwift takeoff for Carpet Brown.
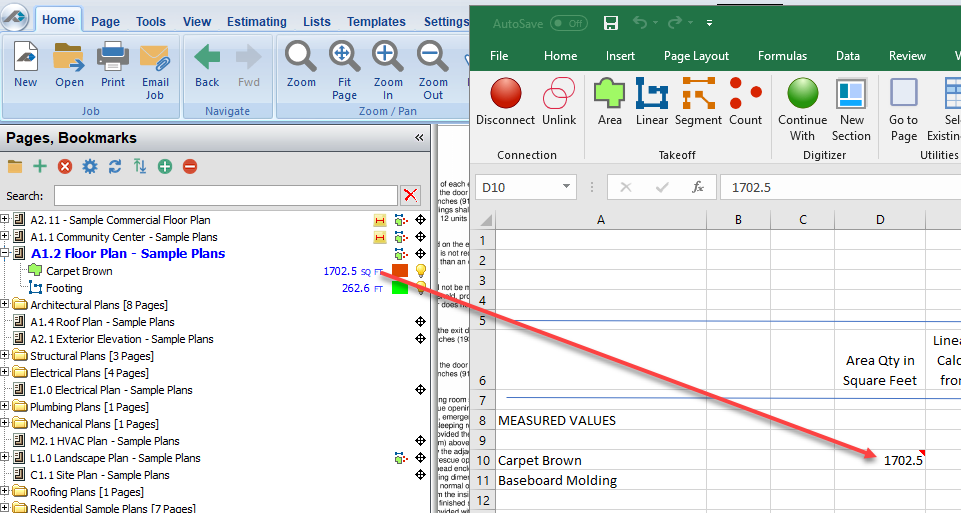
Figure 13 - To see what happens when a section is deleted, delete the OFFICE section of the Carpet Brown takeoff section in the A1.2 Floor Plan - Sample Plans (see Figure 14).
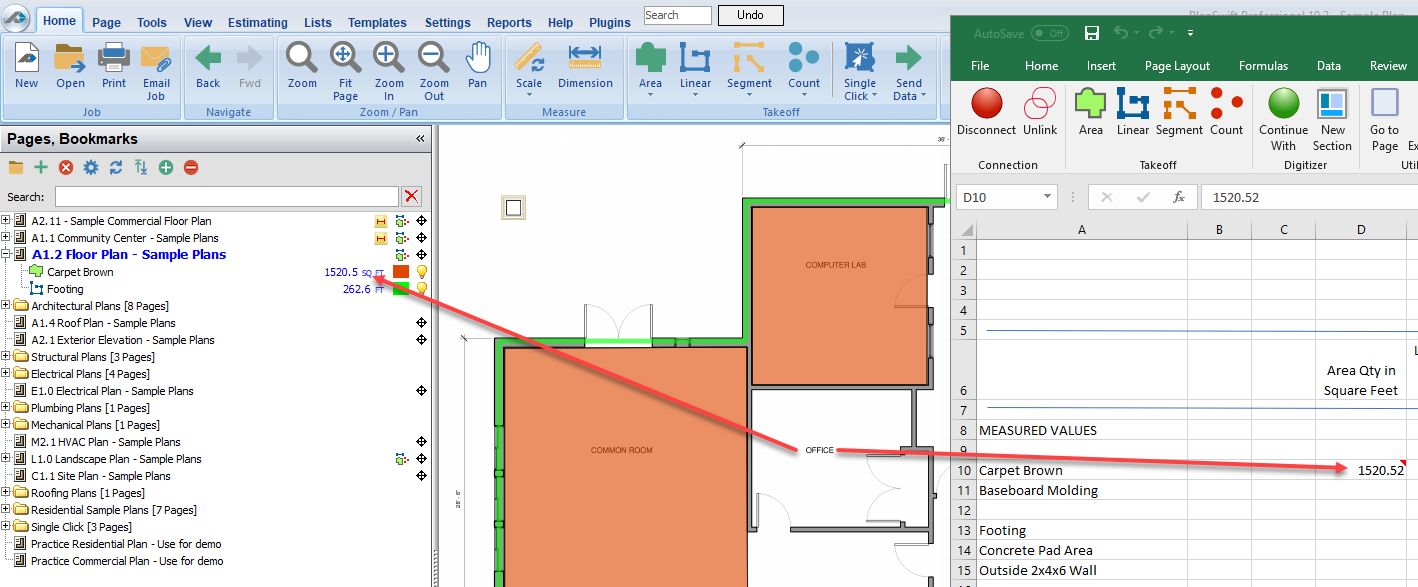
Figure 14 - The Disconnect option is available by right-clicking any cell in the spreadsheet, hovering over PlanSwift - Takeoff, and selecting Disconnect (Figure 15). It is also available by clicking the Disconnect orb icon on the PlanSwift Ribbon-bar Tab (Figure 15). Click on Disconnect using either method to disconnect Excel from PlanSwift.
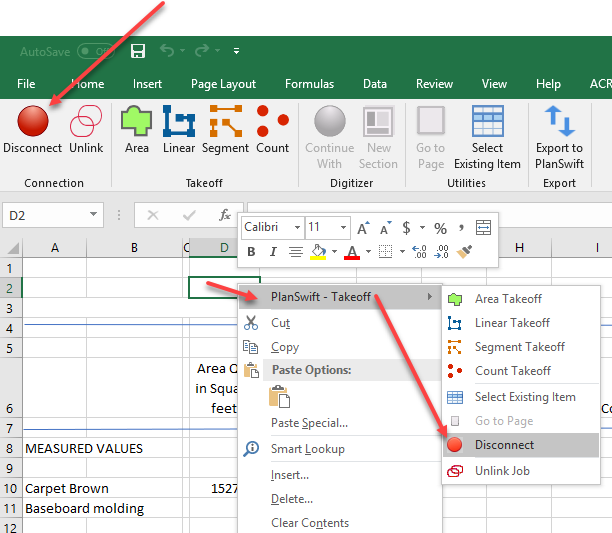
Figure 15 - Once disconnected, the green status indicator on the PlanSwift Ribbon-bar Tab disappears. If you now go into PlanSwift and click on Undo so that the previously deleted OFFICE Carpet Brown section is restored, you'll see that the takeoff value for Carpet Brown returns to approximately 1702 square feet in PlanSwift (Figure 16), but the Excel value for Carpet Brown remains at approximately 1520 square feet (Figure 16).
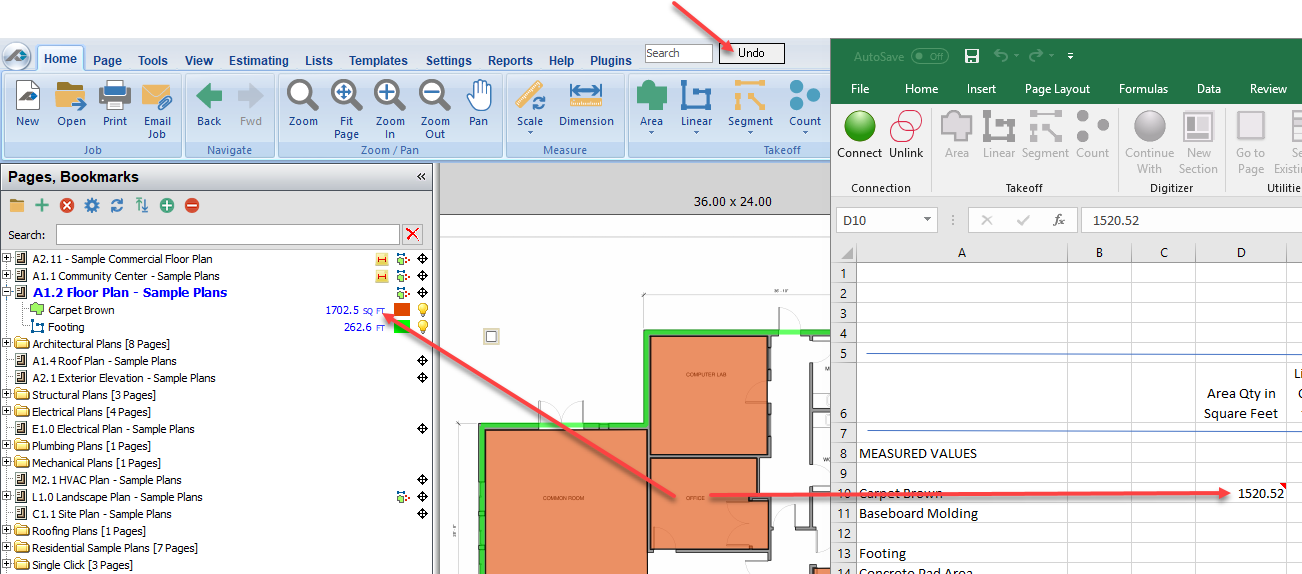
Figure 16 - By right-clicking on any cell in the Excel spreadsheet, hovering the cursor over PlanSwift - Takeoff, and then selecting Connect, all Excel values will connect and match those values for the takeoffs in PlanSwift. The alternate way to reconnect, of course, is to click on the Connect green orb icon from the PlanSwift Ribbon-bar Tab.
- The Unlink option completely unlinks all links between PlanSwift and the linked WorkBook. The Unlink menu option is only available in a spreadsheet that is Connected (thus, a disconnected spreadsheet cannot be unlinked). Unlink is selected by right-clicking on any Excel cell, hovering over PlanSwift - Takeoff, and then selecting Unlink (Figure 17). It may also be selected from the PlanSwift Ribbon-bar Tab (also shown in Figure 17). You should generally not need to use the Unlink option unless a PlanSwift job inadvertently gets connected to two different Excel WorkBooks. It is advisable not to connect a PlanSwift job to more than one WorkBook. Go ahead and select Unlink using either of the two ways.
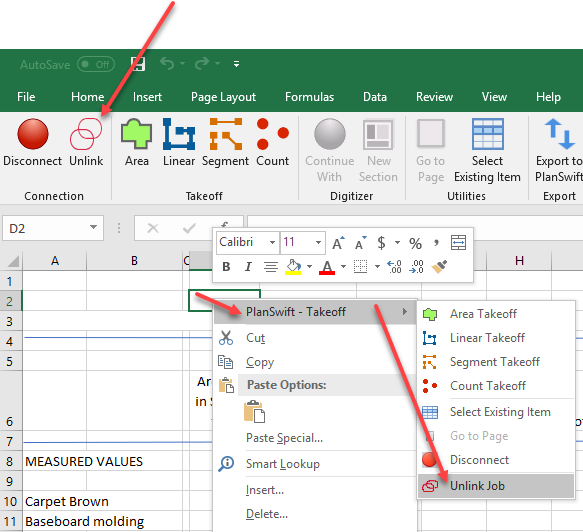
Figure 17 - A warning appears that the Excel WorkBook is already linked to a PlanSwift job (Figure 18). If you want to permanently un-link the WorkBook from that job, click on Yes. For this exercise, click on Yes.
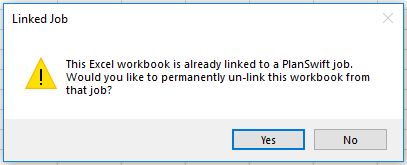
Figure 18 - You are now asked if you are sure you want to permanently un-link this WorkBook (Figure 19). If you click on Yes here, the WorkBook is permanently un-linked. The values, although un-linked, will remain in the spreadsheet. If you wish to re-link an un-linked WorkBook, it must be done using the same steps outlined in this exercise (steps 11-16).
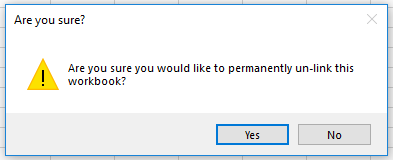
Figure 19 - Click on No, so that this spreadsheet will remain linked. Save this spreadsheet, since it will be used in the further discussion of the PlanSwift/Excel Integration directions.
, multiple selections available,
Related content
Takeoff Group Options
Takeoff Group Options
Read with this
Configure PlanSwift to Connect to a Shared Network Data Storage Location
Configure PlanSwift to Connect to a Shared Network Data Storage Location
More like this
The PlanSwift Customer Portal (MyAccount)
The PlanSwift Customer Portal (MyAccount)
More like this
How to Install a Plugin or Starter Pack
How to Install a Plugin or Starter Pack
More like this
How to Download a Plugin or Starter Pack
How to Download a Plugin or Starter Pack
More like this
Storing Your Jobs on a Shared Network Drive (Setting up a Network Data Storage Location)
Storing Your Jobs on a Shared Network Drive (Setting up a Network Data Storage Location)
More like this
Copyright 2023 ConstructConnect