08. Becoming Familiar with the Touchpen and Templates
- April Friedman (Unlicensed)
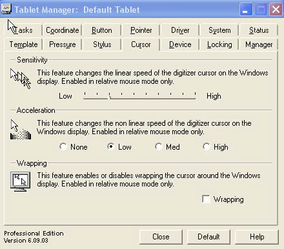
The digitizer is the key to a fast takeoff. When the digitizer is hooked up, there is a separate program running alongside QuoteSoft Pipe. This software is Virtual Tablet Trade Mark and you will see this icon on your task bar. This is the software that is the interface between the digitizer and our software. It enables the touchpen to be a mouse/counting/measuring device.
There are two tools you use with a digitizer: the touchpen and a template. The touchpen is similar to the mouse (from the previous exercise) and the template is a menu that goes onto the digitizer (it looks just like the template that is onscreen when doing a “mouse” takeoff.)
The following picture is a sample template that is placed at the bottom of your digitizer. Notice there are several Accept buttons on the template. This is one way to speed up your takeoff since you don’t have to move your touchpen a long distance to accept items into your takeoff.
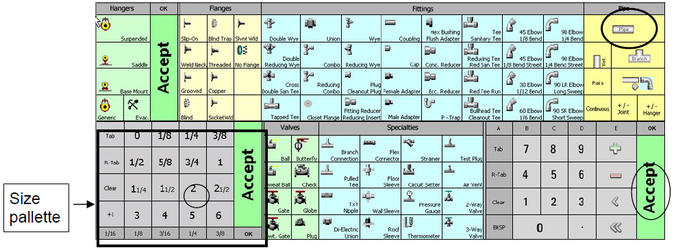
The order of the digitized takeoff is just like when you took off a run of pipe with the mouse:
SIZE, ITEM, QUANTITY (or LENGTH).
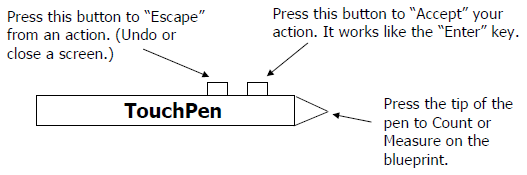
Notice there are two buttons on the touchpen – one is an “Escape” button and the other is an “Accept” button. These two buttons are quick ways to execute these commands (since your hand is already on the touchpen). Keep in mind that you must have the pen close to the digitizer for the touchpen buttons to work.
There are two templates you can use during Takeoff. You may choose to use the on-screen template (and use the touchpen as a mouse) or the template that is attached to the digitizer. When you use the on-screen template, the touchpen moves the mouse cursor around on the computer monitor. In other words, we have incorporated mouse functionality with the ability to count and scale items with our touchpen. When you use the digitizer template, you use the touchpen to touch on the boxes on the digitizer touchmenu.
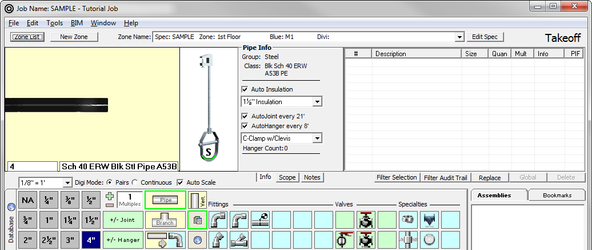
Before you can use your touchpen as a measuring and counting device, you must turn on Auto-Scale on the Takeoff screen. To do so, make sure there is a checkmark next to Auto Scale.
In addition, you should have installed the VTI at your set up and selected the template option under your configuration settings. If you are having difficulty with your digitizer working the way you expect, contact Quote Software’s Technical Support at 1-800-813-7020.
For the next couple of exercises, make sure the button next to Continuous is selected. (You’ll learn more about this later.)
Place the tutorial drawing on the digitizer. Notice there are three exercises on the drawing: Touchpoint practice, Continue vs. Paris, and the actual tutorial drawing.
Exercise 1 – Using the touchpen to take off a run of pipe
There are two parts to this Exercise. The first part shows you how to take off a run of pipe using the digitizer template. The second part shows you how to take off a run of pipe using the touchpen as a mouse.
- On the digitizer template, touch
 with your touchpen.
 - Touch
 .
.
The scale window is active at the bottom of the screen which tells you the system is ready to scale off pipe. This screen only appears when you are using the touchpen to scale or count.
- On the blueprint where it says Exercise #1, touch the first touchpoint and then touch the second touchpoint.

- Now, on the digitizer template, touch
 .
.
OR
- With your touchpen hovering over the digitizer, move the touchpen around until the mouse cursor on the monitor is over
 , click straight down on the digitizer to select 4″. (Note: You are not touching 4″ on the digitizer template, you are using the touchpen just like when you click your mouse buttons.)
 - Again, move the touchpen over the digitizer until the mouse cursor on the monitor is over . Click straight down on the digitizer to select Pipe. Touch the first touchpoint on Exercise #1 and then touch the second touchpoint.
- Instead of selecting Accept on the template, you will press the button on the touchpen that is closest to the tip. This accepts the run of pipe into the Takeoff list.
NOTE: Instead of touching Accept on the template or touching the button on the touchpen, you can also touch TWICE on the last touchpoint on the blueprint. This may be even faster than the other two methods of “accepting” the item. Keep in mind this only works in taking off PIPE.
Two takeoff methods: Pairs vs. Continuous
We have two methods of scaling off pipe – pairs or continuous. At the start of Exercise #1, we had you set the method to continuous. Every user seems to have a preference to which one they prefer – pairs or continuous. If you prefer, you can toggle between the two methods at any time. Select the method that will give you the best performance. The example below illustrates the differences between the two methods.
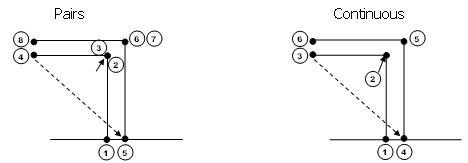
Continuous means you take off a whole run of pipe by touching only where the pipe changes direction. Pairs means you touch each change in direction twice. The pairs mode is a start/stop, start/stop method.
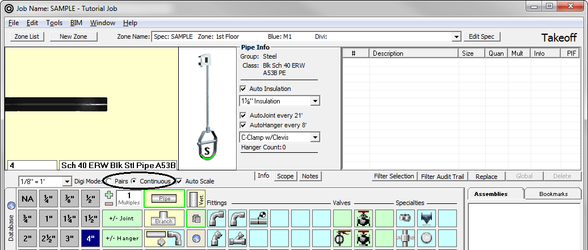
Here is the take off screen where you select whether you want pairs or continuous.
Exercise 2 – Taking off a run of pipe with Continuous and Pairs
Check to make sure the button next to Continuous is selected. In the previous exercise, you already selected 4″ pipe. The system remembers the size so you don’t have to select that again. But you still have to tell the system that you want pipe.
- Click (You can do this with the digitizer touchmenu or the on-screen touchmenu).
- On the blueprint in Exercise #2, touch point 1, 2, 3, and . Had you clicked on touchpoint 4, you would have gotten additional pipe that is not needed (the system would have thought there was a pipe run between 3 and 4.
- Continue by clicking on  again. (You have to click on Pipe again because you clicked on Accept in the previous step. The system is waiting for you tell it what type of item is next.) Click 4, 5, 6 and .
Now you’ll see the difference by taking off a run of pipe in Pairs mode.
- Change to Pairs. (Click the button next to Pairs to change the Takeoff mode.)
- You are already in 4 – so you don't have to select the size. Select since the computer is waiting for you to tell it what type of item to take off. Touch points 1, 2, 3, 4, 5, 6, 7, and 8. Select . (You didn’t have to touch Accept between 4 and 5 like in the previous example because in Pairs mode, the system is only seeing segments, not runs of pipe.) Touchpoint 1 to 2 is a segment, touchpoint 3 to 4 is a segment, etc.
Exercise 3 – Taking off a drawing
You're now ready to start the tutorial drawing; however, you need to start with a blank Takeoff list.
- Using your touchpen, touch the first item in the Takeoff list to highlight the item.
- On your keyboard, hold down the Control key and press A at the same time (Ctrl-A). This selects all the items in the Takeoff list.
- Click
 . (Top right side of the screen.)
 - The system asks if you want to delete the selected items. Click Yes.
©2022 ConstructConnect, Inc. All rights reserved.