05. Specs
- April Friedman (Unlicensed)
In QuoteSoft Pipe, Specs are used to define pipe, fittings, valves, hangers, etc. for a particular piping system. This information is used later during job takeoff. Specs can be created from scratch, copied from the Global Specs, or copied from any other job. It is generally easier to copy Specs and modify them than to set them up from scratch.
It is helpful to name the Specs to reflect the actual systems for a particular job. It is even acceptable to have exactly identical Specs with different names and descriptions to help organize your Takeoff. The amount of detail and the number of valves and specialties you put into a Spec will affect Takeoff speed and the usefulness of your Specs for ordering materials and figuring change orders.
Global Specs
Global Specs are ALL specifications that are available in the product. Quote Software has provided you 45 pre-built specifications so you can have a quick startup.
To view the Global Specs, either click  from the Main Menu or click on Global > Specs from the Job List screen. The Global Specs window appears.
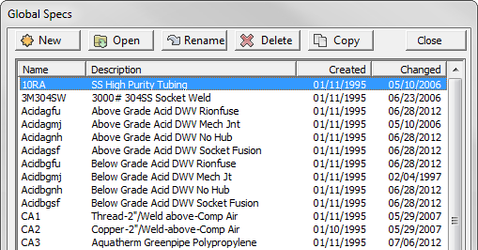
You can sort the columns by the Name or the Description. (Click on the column header that you would like to sort the information by.)
Creating a Spec
Before creating a new specification, you should decide if you would like it to be a GLOBAL specification (available for all new jobs) or specific to a particular job (available only to that job).
If you would like to create a GLOBAL spec, go to the Global Spec screen and at the top of the screen, click  .
.
If you would like to create a specification specific to a job, select the job in the Jobs tab, and then click the Spec tab. On the left side of the Spec screen, click  .
.
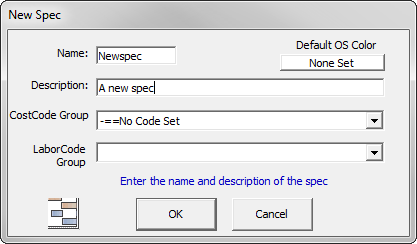
In either case, provide a Name and Description for the new Spec. Names for Specs can be up to 8 characters long (letters and numbers only). Descriptions can be up to 30 characters long. When the Name and Description are entered, click  and a blank Spec screen appears with the name of the Spec at the top.
Adding Size Information to a New Spec
Sizes can be added or deleted to conform to desired Spec requirements. To add a size, click  on the top center of the screen.

Key in the desired size as shown in the Size box.
To delete a size, click  on the top center of the screen and select the size to be deleted. Note that it is not recommended that the size NA ever be deleted, as it may be required for specialty items.
Pipe
- To add a particular Class of pipe to the Spec, click on
 > Pipe.
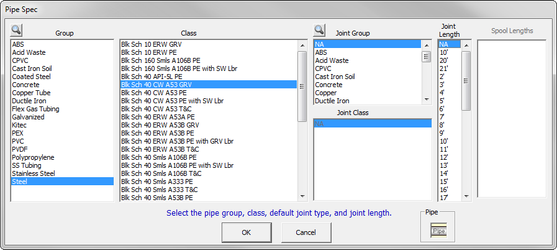
- Select the Group and Class to which the desired pipe belongs.
- Select the Joint Group and Joint Class for automatic generation of joint quantities. Note that you should always select a coupling for types of pipe that require couplings. Any solder or other pipe joint material will be added automatically with the coupling. In some classes of pipe, Joint Groups, Classes or both may be automatically selected by default.
- Select the Joint Length as desired for this Spec. Most of the time this should be the length of the pipe as purchased, but can also be shorter to reflect a job condition that limits the handling of full lengths.
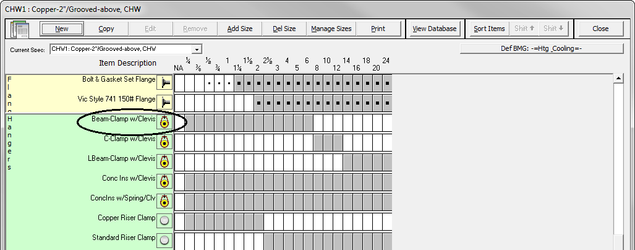
- Once the items are selected, click . The new pipe appears under Item Description on the Spec screen. (At the bottom of the list of Pipe.)
- Select the size range for this particular Pipe Class by clicking on the first size in the desired range, and while holding the left mouse button down, slide the mouse to the last size in the range and release the button. (To delete sizes from the desired range, follow the same procedure using the right mouse button.)

Notice in the above picture there are large dots and small dots. The big dots indicate the size you selected in the Spec (Step 6 above). The small dots indicate the sizes that are available from the Database (when the item was created).
Using the above steps, any number of pipe selections can be made for a particular Spec, provided that the size ranges do not overlap.
Fittings
- To add a particular Class of fittings to the Spec, click on > Fitting.

- Select the Group and Class to which the desired fitting belongs.
- Select the Joint Group and Joint Class for automatic generation of joint quantities. In some classes of fittings, Joint Groups, Classes or both may be automatically selected by default. When joints for fittings are selected, this selection will also apply to valves, flanges, and specialties in the same size range, whose joints are not defined in the Database.
- When done, click . This selection will appear under Item Description on the Spec screen. (At the bottom of the list of Fittings.)
- Select the size range for this particular Fitting Class as explained above in Step 6 for Pipe. Since the SPEC for joints is used for specialties, it is recommended to include NONE as a size for one of the fitting Specs.
- Any number of fitting selections can be made for a particular Spec, provided that the size ranges do not overlap.
Valves
- To add a particular Class of valves to the Spec, click on > Valve.
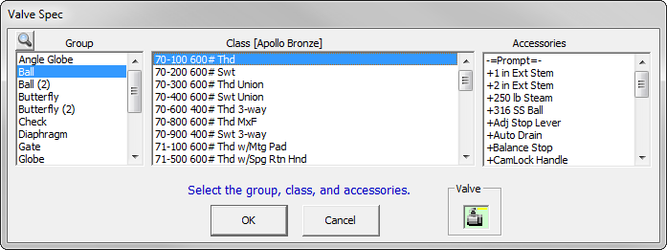
- Select the Group, Subclass (if required), and Class to which the desired valves belong.
- Select any accessories, if desired, as required for this Spec.
NOTE: You can select as many accessories as you want. (For industrial contractors, you may want to select QUOTED valves since you may only be interested in getting the labor for the item.) - When done, click . This selection will appear under Item Description on the Spec screen. (At the bottom of the list of Valves.)
- Select the size range for this particular Valve Class as explained in Step 6 for Pipe.
- Any number of valve selections can be made for a particular Spec, provided that the size ranges for each type of valve do not overlap. This allows you to select many different types of valves, e.g. ball, gate, globe, etc., in a single piping system.
Flanges
- To add a particular Class of flanges to the Spec, click on > Flange.
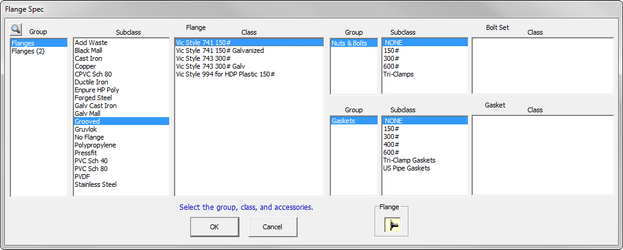
- Select the Subclass and then the Class to which the desired flange belongs.
- Select any Bolt Sets and/or Gaskets, if desired, as required for this Spec.
- When done, click . This selection will appear under Item Description on the Spec screen. (At the bottom of the list of Flanges.)
- Select the size range for this particular Flange Class as explained in Step 6 for Pipe.
- Any number of Flange selections can be made for a particular Spec, provided that the size ranges for each type of flange do not overlap. This allows you to select many different types of flanges, e.g. weld neck, threaded, blind, etc., in a single piping system.
Hangers
Keep in mind you can have up to 7 hangers per Specification (including Riser Clamps).
The hanger that is first (at the top) of the “Hanger” section in the spec will be the default hanger that shows up in the Takeoff screen.
If you want to change the order in the Spec, use  . This will eliminate extra clicking when you get to Takeoff.

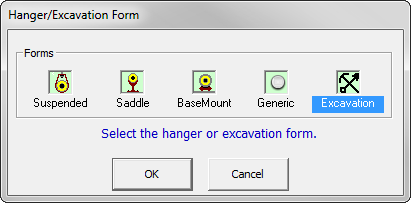
- To add a particular hanger to the Spec, click on > Hanger/Excav. A window appears where you can select which type of hanger you would like to add to the Spec.
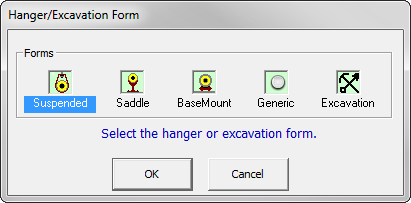
- Select the desired Hanger Form and click .
- A screen appears for the Hanger Form you selected. The following screen is for the “Suspended” Hanger.
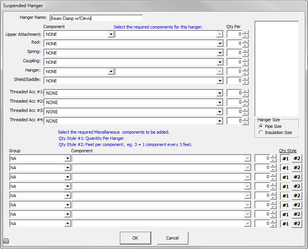
- Select the desired Components. Some components will require an extra selection if the Group has a Subclass in the Database. (If the Generic Hanger Form is selected, the Group must also be selected.)
- Enter the quantity of each Component, by clicking on the up/down arrow to the right of each component. (A quantity of 1 will automatically be entered for each component.)
- Once all of the Components have been selected, select the Hanger Size in the box at the lower right of the Hanger Form screen. If Pipe Size is selected, hangers and other components will be sized to fit the pipe, when selected during takeoff. If Insulation Size is selected, hangers and other components will be sized to fit outside the insulation, when selected during takeoff.
- When done, click . This selection appears under Item Description on the Spec screen. (At the bottom of the Hanger section.)
- Select the size range for this particular Hanger Form as explained above in Step 6 for Pipe.
Excavation
Note that excavation is treated as a special case of a Hanger Form.
This is separate so you can automatically estimate excavation costs as you take off pipe.
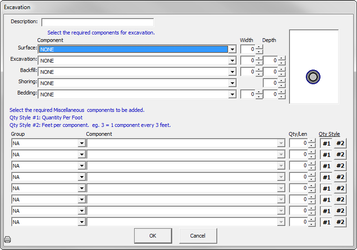
Excavation hanger forms are nearly identical to other hanger forms with the following exceptions:
- No Hanger Spacing Required
If you select to automatically take off excavation using the AutoHanger option, you need not supply a hanger spacing in the spec. All excavation is assumed to have a spacing of 1 foot.
- Depth Dimension for Excavation and Backfill
The excavation and backfill components of the Excavation hanger form support an extra quantity for depth. During job calculation, the total quantity of the associated item is equal to Width times Depth times number of feet of pipe (giving total cubic feet of excavation or backfill). Items in the Database are defined using cost/hours per cubic foot).
As with other hanger forms, the same graphical view of the excavation spec is available during both specification and takeoff. The width and depth components are included to add clarity to the dimensions.
Hanger Spacing
- To define hanger spacing for the Spec, click on > Hanger Spacing.
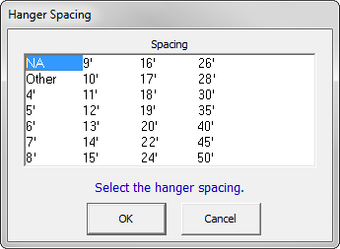
- Select the desired spacing from the Hanger Spacing window. When done, click . This selection appears under Item Description on the Spec screen. (At the bottom of the Hanger Spacing section.)
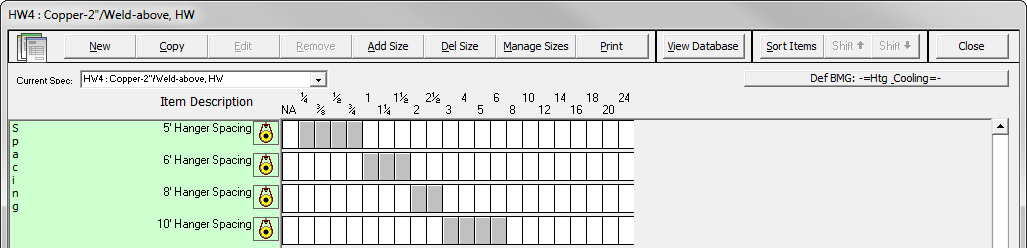
- Select the size range for this particular Hanger Spacing as explained in Step 6 for Pipe.
- Any number of Hanger Spacing selections can be made for a particular Spec, provided that their size ranges do not overlap. This allows your Spec to have varying spacing for different pipe sizes for a single piping system.
Insulation
- To define insulation thickness for the Spec, click on > Insulation.
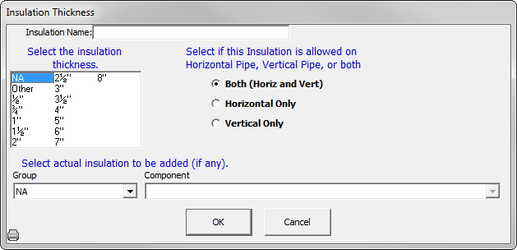
- Select the desired insulation thickness from the Insulation Thickness window. When done, click . This selection appears under Item Description on the Spec screen. (At the bottom of the Insulation section.)
- Select the size range for this particular Insulation thickness as explained in Step 6 for Pipe.
- Any number of Insulation Thickness selections can be made for a particular Spec, provided that their size ranges do not overlap. This allows your Spec to have varying insulation thicknesses for different pipe sizes for a single piping system.
Specialties
- To add a particular Class of specialties to the Spec, click on > Specialty.
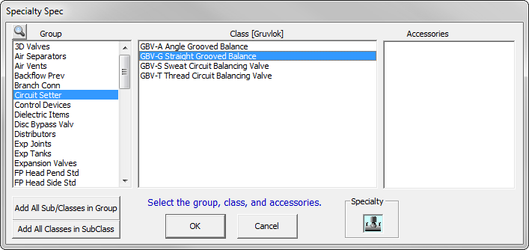
- Select the Group, the Subclass (if required), and then the Class to which the desired specialties belong.
- Select any available accessories, if desired, as required for this Spec. When done, click . This selection appears under Item Description on the Spec screen. (At the bottom of the Specialty section.)
- Select the size range for this particular Specialty Class as explained in Step 6 for Pipe.
- Up to 16 specialty selections can be made for a particular Spec, provided that the size ranges for each type of specialty do not overlap. This allows you to select many different types of specialties in a single piping system.
Once you have added all the items you wish to this Spec, click  at the top right of the screen. A window appears to confirm that you want to save any Spec changes. Do so by clicking
  .
.
Changing the Information in a Spec
There are two ways to open a Spec you would like to change:
- Highlight the spec and click
 .
. - Double click on the spec.
Any information in a Spec can be changed.
- Click on the component (Pipe, Fitting, Hanger, etc.) of the Spec you wish to change. Click
 at the top of the screen.
 - Re-select the item as was done when the Spec was created.
- Make as many component revisions, new selections, or size range changes as desired.
- When all desired changes have been made, click . Confirm saving changes by clicking .

Renaming and Changing the Description of a Spec
- Highlight the Spec you would like to rename (or change description). Click
 Â on the left side of the screen. The Spec information screen appears.
 on the left side of the screen. The Spec information screen appears. - Make revisions to the Name or Description as desired, and click .
Copying a Spec
QuoteSoft Pipe allows you to copy a Spec from any existing job OR from the Global Spec list.
- Click
 on the left side of the screen. The Copy Spec screen appears.
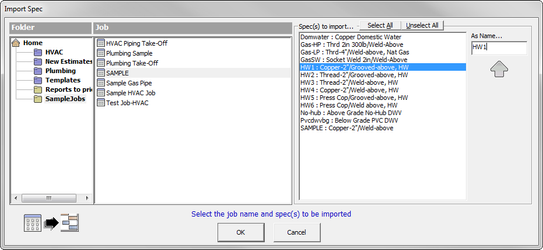
- To copy from an existing job, select the folder and job from which you would like to copy a Spec. Select the desired Spec. (Multiple Specs may be selected by holding down the control key). Note that ALL specs can be selected by clicking on
 .
. - To copy from the Global Specs, select the Home Folder (
 ). Select the desired Spec. (Multiple Specs may be selected by holding down the control key). Note that ALL specs can be selected by clicking on .
 - Edit the Spec Name (if desired) by clicking on the name shown under As Name… and type in the new name for the Spec.
- Click to save the Spec. It will now appear in the list alphabetically.
Printing a Spec
- Make sure you are in the Spec you would like to print. Click
 .
.
©2022 ConstructConnect, Inc. All rights reserved.