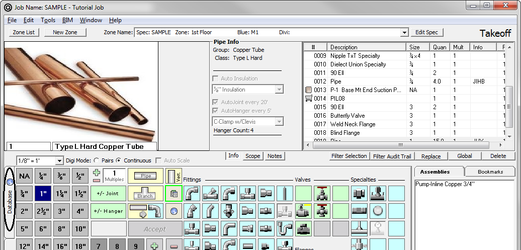
09. Takeoff
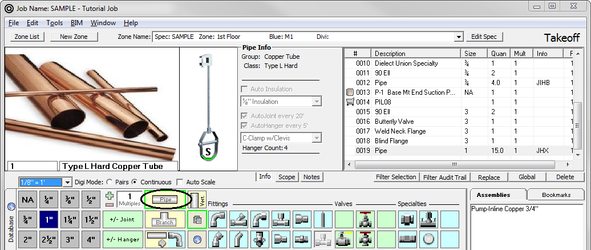
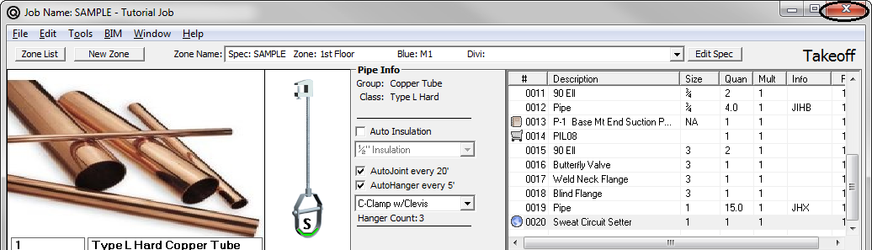
The Takeoff screen for a Zone is built using the Spec for this Zone, including sizes, types of pipe, fittings, valves, hangers, and specialties. The information in the Header of the Zone is in the upper left hand corner of the screen.
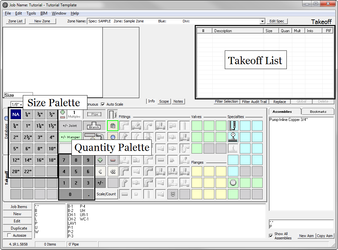
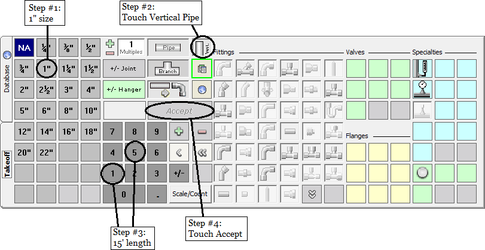
The steps for taking off items are always: SIZE, ITEM, QUANTITY.
Here is an example of one takeoff line (for Vertical Pipe):
With your mouse, touch the 1″ size, touch  , touch 15′ and then touch
  .
.
Items can be taken off with the mouse and keyboard OR with the digitizer. Even with the digitizer being utilized, you can still use the mouse when taking off risers, “not to scale” details, and other times when scale is not available.
How to use the digitizer will be discussed later.
NOTE: Marking items as they are taken off is recommended.
Shortcuts to Entering Items in the Takeoff List
After you enter in the quantity (or length), you can log the item into the Takeoff List by doing one of the following:
- Either press Enter on the keyboard or touch on the keypad.
- Select the next item to be taken off. This second item must be of the same size.
- Select the next size of items to be taken off.
Pipe Takeoff (Without Digitizer)
Pipe can be taken off with the mouse and keyboard or with the Digitizing Tablet. Do the following to take off a length of pipe:
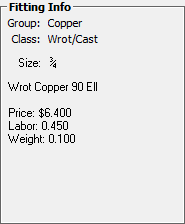
- Click on the size to be taken off and then click
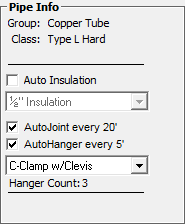
 . Note that the Information Box contains Pipe Info from the Spec.
This information includes the Group and Class of the pipe. But the takeoff of pipe also has the following features:
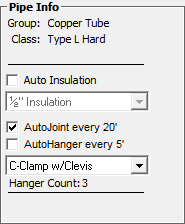
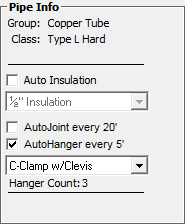
AutoJoint – If this is selected, the system automatically includes the joint defined in the Spec at the spacing shown. AutoJoint will automatically be engaged when you click on pipe, but can be disabled by clicking on the check box on the screen. When activated, AutoJoint will provide for calculation as many joints required for the length of pipe taken off.
AutoHanger – If this is selected, the system automatically includes a hanger contained in the Spec at the spacing shown. The type of hanger is shown in the window below AutoHanger. If a Spec contains more than one type of hanger for a given size, you can choose the hanger you wish to have by clicking on the down arrow button and selecting from the list. AutoHanger will automatically be engaged when you click on pipe, but can be disabled by clicking on the check box. When activated, AutoHanger will provide for calculation as many hangers (rounded to the nearest hanger) required for the length of pipe taken off. - To continue with pipe takeoff, enter the desired length in feet.
- Once a length of pipe is taken off, it will be logged into the Takeoff List in the upper right hand corner of the Takeoff screen.
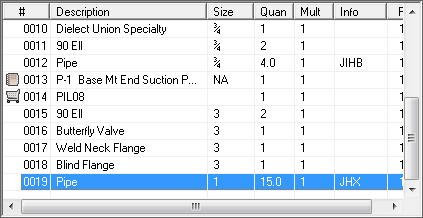
A beep will sound to confirm that the previous item was inserted into the Takeoff List.
When AutoJoint is activated, a JX appears in the Takeoff List following the pipe taken off. When AutoHanger is activated, a JHX appears in the Takeoff List following the pipe taken off. (Do not be alarmed that the length is not long enough to require a hanger and/or joint; the calculation of this feature occurs later and will generate a joint quantity of 0.)
Fittings, Valves, Flanges, and Specialties Takeoff (Without Digitizer)
These items can be taken off with the mouse and keyboard or with the Digitizing Tablet (optional).
Take off the fittings, valves, flanges and specialties for a Zone as follows:
- Click on the size (when taking off the first item of a given size.)
- Click on the desired type of fitting, valve, flange, etc. Note that information about the item from the Spec appears in the Information Box.
When there is more than one item in the Database with the same first size, a list of the available sizes appear on the screen. The proper size must be selected before a count can be taken.
- You can move to the next item by clicking on that item. The previous item will be logged into the Takeoff List in the upper right hand corner of the screen. A beep will sound to confirm that the previous item was inserted into the Takeoff List.
Digitizer – Understanding the Virtual Tablet (Digitizer)
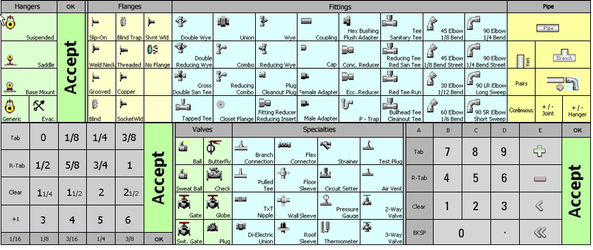
The digitizer is the key to a fast takeoff. There are two tools you use with a digitizer: the touchpen and a template. The touchpen is similar to the mouse (from the previous section) and the template is a menu that goes onto the digitizer (it looks just like the template that is onscreen when doing a “mouse” takeoff.)
In this session, you will first become familiar with the digitizer and how to customize it for the way you work. Then, you’ll practice taking off items with the digitizer, touchpen, and template.
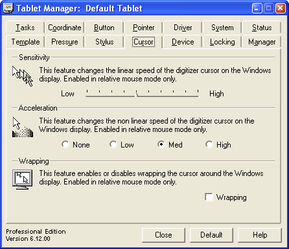
When the digitizer is hooked up, there is a separate program running alongside QuoteSoft Pipe. This software is Virtual Tablet™; you will see this icon on your task bar. This is the software that is the interface between the digitizer and our software. It enables the touchpen to be a mouse/counting/measuring device.
Understanding the Template and Touchpen
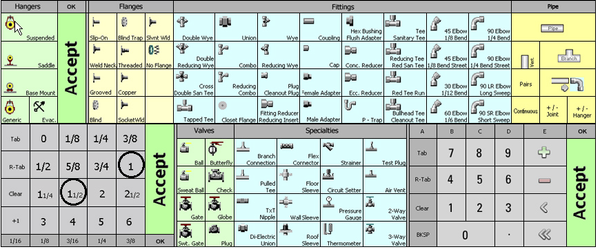
The following picture is a sample template that is placed at the bottom of your digitizer. Notice there are several Accept buttons on the template. This is one way to speed up your takeoff since you don’t have to move your touchpen a long distance to accept items into your takeoff.
The order of the digitized takeoff is just like when you took off a run of pipe with the mouse: SIZE, ITEM, QUANTITY (or LENGTH).
Here is a picture of the touchpen and the functions of the buttons.
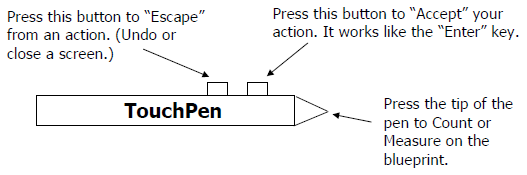
NOTE: If you selected Pipe and you really wanted to select Pipe Branch, you can cancel your command by pressing the top button on the touchpen. (You can also hit the Escape key on the keyboard.)
Using the Touchpen Like a Mouse
You can use the touchpen on the digitizer to control the mouse cursor on your computer monitor. Hover your touchpen over the middle of the digitizer. Notice the mouse cursor is moving on the computer monitor. Move the touchpen so that the mouse cursor is over Pipe on the “onscreen template.” Click down. The scale window appears. On a drawing that is on the digitizer, press two touchpoints and the press the bottom button on the touchpen to Accept the length.
Setting the Scale with a Digitizer
There are four places where you can define the scale:
- at the Configuration screen, when you want to enter in a “standard” scale. Most likely, this scale is standard for your company. (See the Configuration section.)
- when you add a new job. (See “Adding a New Job.”)
- when you add a new Zone. (See “Adding a New Zone.”)
- in Takeoff, specific to this item. (See below for details.)
Each of these places gives you more and more flexibility (i.e. starts out at the company level, then job level, then zone level, then item level).
In Takeoff:
- Determine the scale of the drawing from which you are going to take off items.
- Using the mouse, select the desired size and click on Pipe.
- Underneath the picture of pipe, click
 .
.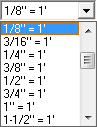
- A pulldown list of pre-loaded drawing scales appears. Select from the list.
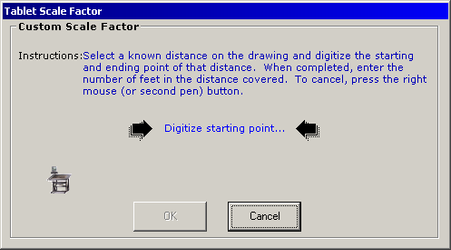
Creating a Custom Scale
If a custom scale is chosen, you must set up the scale based on a known dimension from the drawing from which you are going to takeoff. Click on the beginning point and then the ending point of this known straight length. Then with the keyboard, enter the known distance (in feet) to establish the scale. The scale will be shown as 1″ = x’.
Two Takeoff Methods: Pairs vs. Continuous
You have two methods of scaling off pipe – pairs or continuous. Continuous means you take off a whole run of pipe by touching only where the pipe changes direction. Pairs means you touch each change in direction twice. The pairs mode is a start/stop, start/stop method. Every user seems to have a preference to which one they prefer – pairs or continuous. Select the method that will give you the best performance. The following picture illustrates the differences between the two methods.
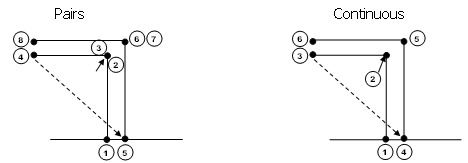
If you prefer, you can toggle between the two methods at any time. On the takeoff screen, select the circle in front of Pairs or the circle in front of Continuous.
Customizing Your Takeoff Options
There are times when you do not want to go into scale or count mode when you select an item. When you are in takeoff, click File > Takeoff Options. The following screen appears. Most users turn off the Vert Pipe AutoScale, Assemblies AutoCount, and the Auto Size options.

Pipe Takeoff (With Digitizer)
Please take a moment to read the section in this manual called “Pipe Takeoff (Without Digitizer).” There is some important information in that section that we did not want to repeat to this section.
- With your touchpen, click 2″ on the size palette and then click . At the bottom of the takeoff screen, a scale window appears. This is where you will see the quantity or length as you are taking off the item.

- Click on the starting point of a straight length of pipe. Then click on the ending point. The length will be logged into the Takeoff List.
Now you have a choice on how to Accept that run of pipe.- On the template, touch Accept.
- Touch the bottom button on the touchpen.
- Do a “double touch” at the end of the pipe run. For example, at point 2, do a “touch, touch.”
- Continue in this manner. The total length will be displayed in the window on the screen, while each length will be logged into the Takeoff List. It is important to notethat each segment of pipe from fitting to fitting should be taken off individually for accurate counting of hangers and joints. For example, a 60′ length of piping with 6 tees in it may not require any couplings.
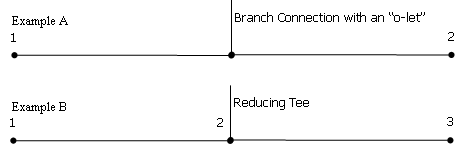
Understanding Touchpoints to Receive the Correct Number of Joints
If there is a branch line coming off the main line, this branch line could either be a reducing tee or some type of “o-let.” An “o-let” does not break the pipe at that connection; however, a reducing tee does break the pipe at the connection. In Example A (since there is no break in the pipe), you'll only have to touch point 1 and 2. In Example B (where the reducing tee breaks the pipe), you have to touch point 1, 2, and 3.
Fittings, Valves, Flanges, and Specialties Takeoff (With Digitizer)
NOTE: Valves and Specialties that are taken off will automatically include any accessories defined in the Spec.
NOTE: Flanges that are taken off will automatically include gaskets and bolt sets as defined in the Spec.
- Select a size.
- On the template, touch a 90 elbow. The scale window appears. Since this is a fitting and not a run of pipe, you will be in “count” mode instead of “length” mode.

- Touch all the elbows in a pipe run, and then touch Accept (or touch the top button on the touchpen OR double touch on the last elbow).
Taking Off Fittings That Have Multiple Sizes (Reducing Fittings)
Fittings that have multiple sizes can be entered in several different ways. On the following example, we took off a reducing tee on the run. That type of fitting has 3 sizes to it. Once you touch the fitting on the template, a selection box appears on the computer monitor.

There are two ways to select the size of the fitting:
- You can use the touchpen to move the mouse cursor on the computer monitor. Move the touchpen (and mouse cursor) to the correct size on the selection box and click down. This accepts the item into the takeoff list.
- You can go to the template and hit 1-1/2 and then 1 on the template. After selecting the 1″ system goes into the count mode.
The system is now in quantity mode. Touch on all of the fittings in a pipe run.
Generating 90 Elbows “On-The-Fly”
You may want to generate fittings while you are in takeoff.
- Select
 .
. - Touch all fittings.
- Notice the scale window is showing the count of fittings.
NOTE: You will only want to touch when there are changes of direction or you will generate too many elbows.
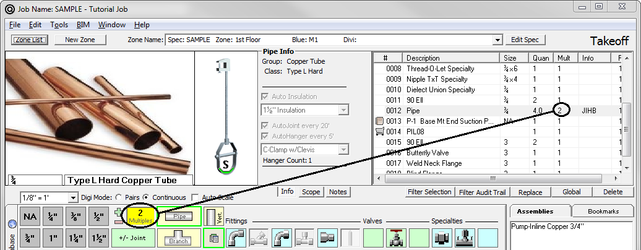
Using Multiples in Takeoff
Often times, you may have multiple lines running side by side, e.g. when you have two (or three) chilled water pipes running to several lavatories. When you have this situation, you can turn on a “multiples” feature. You only have to take off one line of pipe and the rest are automatically added.
On the takeoff screen, type in the number of multiples to generate the correct number of times you want that item duplicated.
NOTE: Multiples is a great feature; however, REMEMBER TO TURN IT OFF. When you take off multiples, you will hear a beeping sound. Those beeping sounds keep you aware that you are in “multiple mode.”
There are times when, after you finish your takeoff, changes occur that require you to take quantities OUT of your takeoff. Multiples can be toggled to negative to deduct those quantities. Turn your multiples to negative and it will turn red.
Making Changes to Your Takeoff List
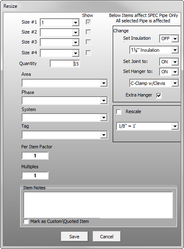
Once an item is entered into your takeoff, a simple double click on the item will allow you to change that item. A “Resize” window appears where you can change the size, quantity, area, phase, etc.
When you are done making changes, click  . The changed line item will appear in your Takeoff List.
There are times when, after you finish your takeoff, changes occur that require you to take quantities OUT of your takeoff. Multiples can be toggled to negative to deduct those quantities. Turn your multiples to negative and it will turn red.
Deleting Items
Deleting an item in the Takeoff List is simple. Click the item and click  . If you want to confirm that you want that item deleted, go to File > Takeoff Options and change the setting for deletion.
Replacing Items
When you take off a new item, the system automatically puts it at the end of the list in the Takeoff List. If you want to replace an item in the list with another item (when you cannot simply edit the item), click  . This is helpful is you want to keep the order of takeoff.
NOTE: If you wish, you can delete the item and take it off again; however, the new item will appear at the end of the Takeoff List.
Converting Valves and Flanges
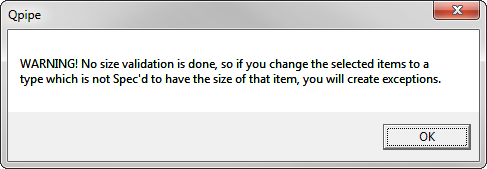
When you select multiple items in the Takeoff List (by holding the shift key or Control key), the Replace command changes to the  command. This command is used when you want to convert valves or flanges from one type to another. It is mainly used for Value Engineering. For example, use this command if you want to change from a grooved system to a welded system. You would change Grooved Butterfly Valves to Flanged Butterfly Valves.
When you select the Convert command, a warning screen appears:
Making Global Changes
If you would like to change the same attribute for multiple items in the Takeoff List, you can use the  command. Highlight all the rows you would like to change (Control-Shift to highlight just the rows you want.) Select the button. The Resize window appears.
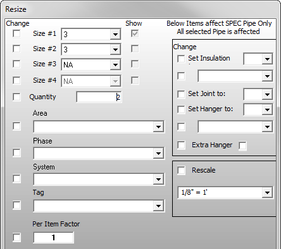
Change the items you wish and then click .
Printing Items
You can print the Takeoff List by clicking  .
.
Viewing a Visual Takeoff
After you've taken off your blueprint, you can bring up a screen that shows you a visual of your takeoff. This is helpful for you to get a quick glance to make sure you got all your pipe runs. First you have to configure your system to show the visual audit trail. Then, when you are in takeoff, you can press a single key to see the diagram.
- On the Main Menu, click
 . The Workstation configuration screen appears.
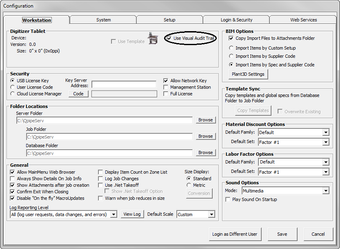
- Check the box next to Use Visual Audit Trail.
- Click .
- Go to your takeoff.
- Press F2 on the top of your keyboard. A picture of your takeoff appears.
Database Items (in Takeoff)
You have available to you in Takeoff the entire Database.
The Database in Takeoff is very similar to the Database on the Main Menu. When you click  , the Database screen appears where you select Family, Group, Class, etc. Select the quantity by clicking on the number pad on the right. Click Accept.
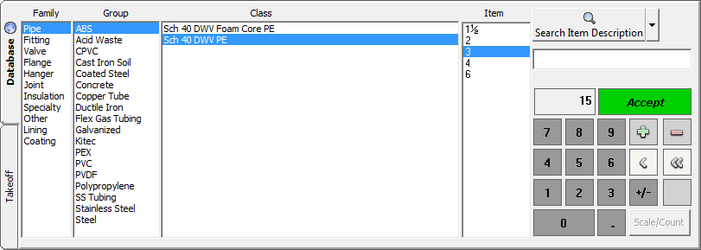
When you are done adding Database items, click  .
.
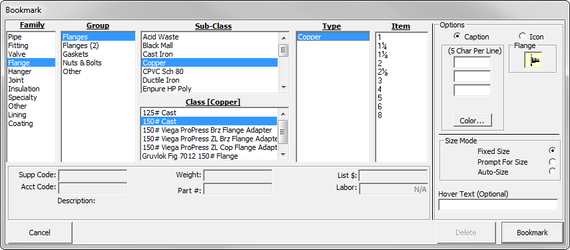
Bookmarks
Bookmarks can be any items from the Database that you repeatedly use in this takeoff. You have 50 buttons per palette available with an unlimited number of palettes. You set up bookmarks so that they can default to the Specification selected.
NOTE: There are no automatically generated items from bookmarks, e.g. if you take off a victaulic fitting from a bookmark, you will only get the fitting and no couplings.

NOTE: If you hover your mouse over a bookmark, a full description appears.
If there is a item on the bookmark palette you would like to take off, simply click on the picture or description of the item and then click . The item appears in the Takeoff List.
Changing (Editing) a Bookmark
You can change the picture or description of the bookmark.
Hover your mouse cursor over the bookmark you would like to edit. Right-mouse click on the bookmark.
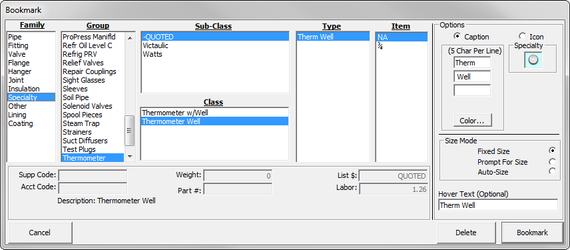
You can change anything on this screen. When you are ready to save the changed information, click  .
.
Adding a New Item to Bookmarks
You can either add a whole new palette of bookmarks or you can add a single new bookmark to an existing palette. If you’d like to add a single item to an existing palette, move your cursor to a blank spot on a palette and click your right mouse button.
Like the Database, select the Family, Group, Class, etc. and then click . The new item appears on the blank spot on the palette.
Deleting a Bookmark
To delete a Bookmark, move your cursor to the item you would like to delete and click your right mouse button. On the bottom right side of the screen that appears, click ![]() .
.
Adding a Palette
You can add a whole new palette of bookmarks.
- Click
 at the bottom of the Bookmark palette.
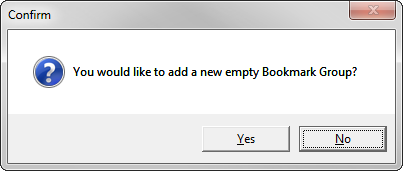
- Click Yes.
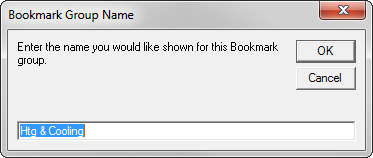
- Type the name of the bookmark palette, and then click OK. A blank palette appears. Now you can right mouse click on an empty space and create a new bookmark OR you can copy in an existing palette and modify that palette. See the next section on loading and copying bookmark palettes.
Loading and Copying an Existing Palette of Bookmarks
Bookmark palettes are stored in a special directory. If there are bookmarks from other palettes you would like to use, click the Load or Copy commands.
- Use the Load command to bring in a completely different set of 50 bookmarks.
- Use the Copy command when you want to copy in a set and then make changes.
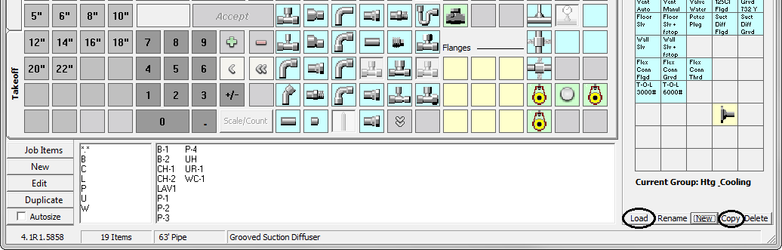
Click the  button to bring in an existing palette. NOTE: Any changes you make to this palette will be permanent.
If you would like to start with a specific palette and then change it (without altering the first palette), click the  button.
- When you click , a screen appears confirming it is what you would like to do.
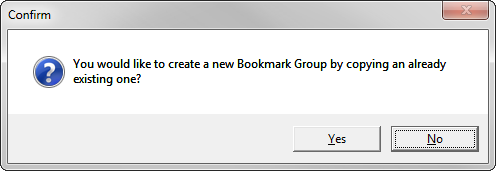
- Click
 . A screen appears asking what you would like to name the copied group.
 - After typing the name and clicking OK, a window appears with a list of palettes. Click on the palette you would like to copy.
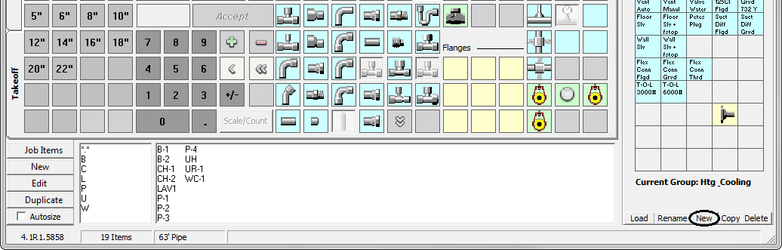
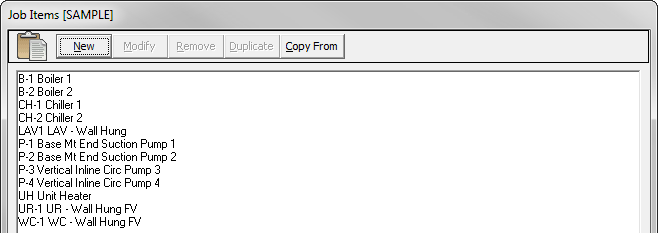
Job Items (in Takeoff)
The Job Items store all of your Equipment, Fixtures, Specialty and Other Items. The Job Items also allows you to import your own custom items like Angle Iron Stands and piping and plumbing accessories.
Taking Off Existing Job Items
If you already defined Job Items (on the Job Item tab), they will be displayed on the bottom half of the takeoff screen.

To select a Job Item, simply click on the Job Item from the list and and begin counting in the same way you would for fittings, valves, flanges or specialties. Click when you are done.
Adding New Job Items
You can enter new job items by clicking  on the left side of the screen. You will be presented with a list of all items currently defined for this job.
- Click
 . A New Job Item screen appears.
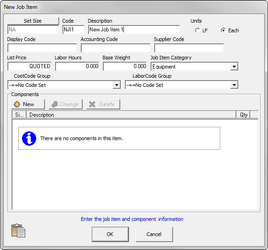
- Type in the information you want for the new Job Item. Click
 .
. - The list of Job Items returns. Select the Job Item you want added to the Takeoff List and click
 or double click on the Job Item. The Takeoff screen reappears.
Symbols in the Takeoff List
To help remind you what you have taken off, the system puts a small symbol next to each takeoff line (when appropriate).
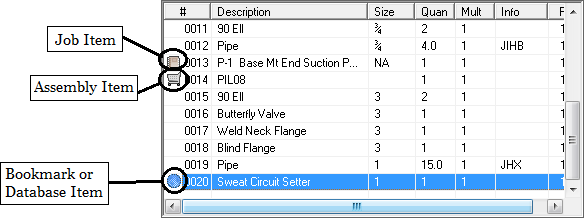
AutoJoint and AutoHanger
On the Takeoff List, there is an Info column that tells you information about joints and hangers.
- JHX means AutoJoints and AutoHanger are turned on.
- JX means AutoJoints is turned on and AutoHanger is turned off.
- HX means AutoHanger is turned on and AutoJoints is turned off.
Closing and Saving Your Takeoff
When you are done taking off all the items on your blueprint, you are ready to run reports. To save and close Takeoff, click  on the upper right corner of the screen.
NOTE: The system will NOT ask if you want to save your Takeoff. It will automatically be saved and closed.
©2022 ConstructConnect, Inc. All rights reserved.