10. Takeoff
- April Friedman (Unlicensed)
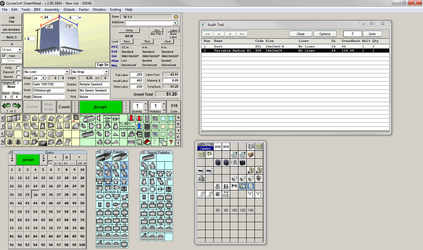
Takeoff consists of palettes of items available per Pressure File and the information about each of those items as calculated. QuoteSoft Duct will do instant calculations based on the Pressure Files and Data Files that you have loaded. The data is then stored immediately upon clicking the Accept button so you never have to click Save or run the risk of losing hours of work with a computer crash.
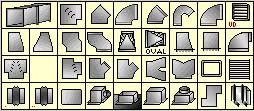
The Rectangular Palette will change based on the Pressure File you have loaded. For example, when you load a Welded Black Iron File, you may choose to have the Flex Connector, Double 90° Elbow, and Register Box disabled. The screen will update and remove the items you have marked as unavailable for this file. This same feature is available for the Round and Oval files as well.
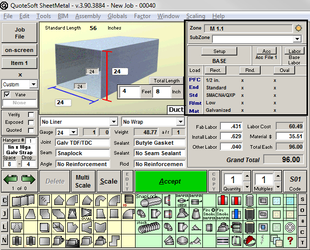
Entry Palette
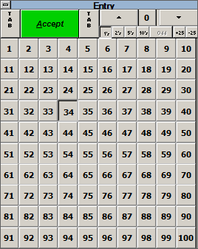
Use the Entry palette to input dimensions and lengths. The palette can be set to show numbers incrementing by 1’s, 2’s, 5’s, or 10’s.
Located to the right and left of the Accept button are Tab buttons. These buttons will allow you to Tab (move) through your fitting’s entry points without having to enter in any data. Once the item has been Accepted, the Tab buttons become Edit and Copy—Edit for making changes to the already saved item, and Copy to duplicate the item currently on screen.
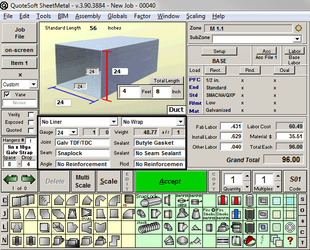
Liner & Wrap
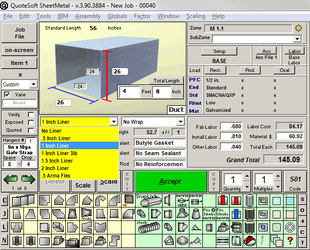
Within a Zone takeoff, you have the ability to turn Liner on at any time. The Liner selector is located just below the current item picture on the main Takeoff window. Click the drop down menu and select the Liner you wish to have applied to your items. Once selected, the Liner will highlight yellow and stay on until you turn it off. The yellow is a visual reminder that you have enabled Liner.
The program can also be set to expand the outer dimensions (OD) of the item for the internal sound liner addition. If you’ve selected 1″ Liner, the program will expect duct that is 28 x 20 to 30 x 22 for the internal sound liner addition.
Wrap insulation has the same setup process. Once selected, the Wrap will highlight yellow and stay on until you turn it off. The yellow is a visual reminder that you have enabled Wrap. The program will allow you to have both Wrap and Liner on at the same time. Wrap will not expand the dimensions of the duct, however.
Item Components
During the Takeoff process you can modify the Gauge, Joint, Joint Sealant, Seam, Seam Sealant, Angle, and Rod Reinforcements just like you did the Liner and Wrap.
Mouse over the field you wish to modify, click on the current item selected, and you will be given the alternates available per the currently loaded Pressure File.
For example, if you wish to add a Seam Sealant to the current item, click on the word “None” that is currently listed and then select from the popup window which Seam Sealant you wish to use. That Sealant will be displayed and highlighted yellow as a reminder that it is now the default for this Pressure File.
Vanes, Hangers, and Scale
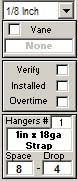
Changing the Vane and Hanger is done with the options available on the left side of the screen. Selecting an item that can have a Vane assembly installed in it and checking the Vane box will add the assembly to the item’s cost and materials.
Remember to set the scale of the blueprint in order to use a digitizer accurately. The system will automatically calculate the length of the duct based on the scale that is selected in that drop down. This is critical for the number of connections needed, hanger systems used, and correct length of duct and pipe. The Hanger Spacing and Drop will need to be set as well. The program will calculate the number of Hangers used based on the Spacing.
Labor & Costs (Real-Time Data)
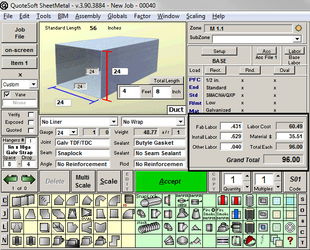
All of the Labor and Costs for the item currently selected can be found on the right. This information is updated in real-time after every change is made. If you modify the size or component attached to this item the Real-Time Data will be updated giving you an accurate look at the item on screen.
You can override the Labor and Costs for the item you have on screen at any time. If you chose to make an adjustment to the Install Labor you’d simply click in the box and type in the new install hours. The program will save the item with the Labor hours you input but will not override what is stored in your Data Files. This is a change to the current line item only.
Quantities & Multiples

Located to the right of the Accept button you'll see Quantity and Multiples. The Quantity will allow you to set the number of items you wish to have saved for this line item. The Quantity will always reset itself to 1 for the next line item. The Multiples option will do the same function, with one added feature; it will lock on until turned off.
Multiples are commonly used when taking off one classroom, office, or united that is duplicated throughout your zone a multiple of times. Simply set the multiple to the number of classrooms, offices, or units you are taking off at the same time.
For example, if you are taking off 3 identical classrooms, select the first item and set the Multiple to 3. This will allow you to still use the Quantity for multiple elbows, spin-ins, flex runs, or diffusers and have them automatically multiplied by 3 for the quantity of classrooms included in the takeoff.
Setups & Pressure Files
Listed above the Real-Time Data is the currently loaded Setup and Pressure Files for each family. To load another Setup or Pressure File click the Load button and select the desired file.
SubZones will allow you to label the items you input for future reporting purpses. You will have the ability to extract only parts of your Job based on the SubZone name. This feature is very useful in organizing bids with Add/Deduct Alternates as well as Change Orders.
Once you’ve completed a SubZone and are ready to start the next, bring up the first new item needed and you can then click into the SubZone box and input the new name. The program will then keep that name until you change it or Globally modify it to another name. This process is the same for System, Cost Code, or Area.
Takeoff Tools
The Takeoff screen is full of utilities and tools to assist you with your Takeoff process. These tools are designed to be used before, during, or after the Takeoff. Change Orders and system modifications are common in the industry so we’ve constructed Tools to assist you.
Labeling your items with SubZones, Systems. Cost Codes, and Areas will make the post-Takeoff changes easier to accomplish. However, if you've completed the Takeoff and have not labeled the items you can still perform modifications as long as you have the item number ranges (1-7, 23-42, etc.) that need to be modified. This may cause you to perform the operation a number of times but the changes can still be made for you.
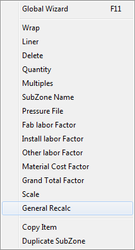
Global Wizard
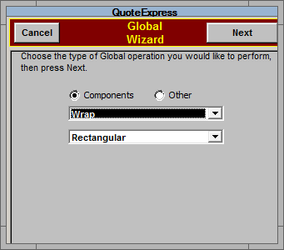
After an item has been accepted into a Zone, you can’t make any changes to it without clicking the Edit button just to the left of the Accept button. This will reopen the item in Edit mode and allow you to make modifications and resave it. This works great for one or two items, but if you wish to modify the entire Zone, SubZone, System, Cost Code, or Area then you will need to use the Global Wizard.
The Global Wizard will allow you to be specific about the changes you wish to make and the items you want to modify. The Global Wizard is located under the Globals drop down menu or shortcut key F11.
The Wizard will give you the ability to change any of the components added to your items such as Liner, Wrap, Gauge, Joint, Sealers, Seams, Hangers, and Hanger Connectors. You can also modify items such as the blueprint scale used, hanger spacing, hanger length, Pressure File used, quantities of item, and many others.
For a complete explanation of how to use the Global Wizard, see the exercise following this section for an example.
Factors
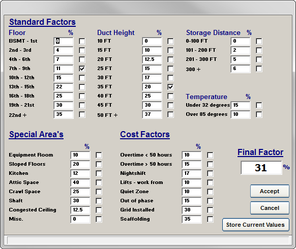
Your Labor hours are set up in the program for a typical job and we use factors to adjust the labor for the job. The factoring feature will allow you to add a percent to the labor for difficulty or any other special need.
Install Labor can either be adjusted with a known percent or using the Factor Calculator. The Calculator comes preloaded with suggested adjustments based on National Averages. Simply check the box of the adjustment factors you wish to use and click the Accept button to enable the correction factor.
Fab and Other Labor, Material Cost, and Grand Total can all be factored as well. Factors allow you to have a default labor setup and make adjustments as needed rather then having multiple labor setups.
Assemblies
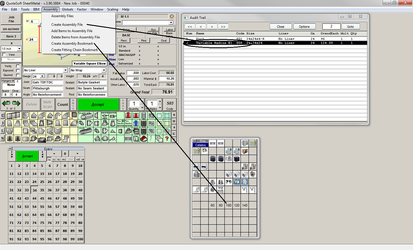
While in Takeoff you can use Assemblies to quickly add a few items together in one motion. Assemblies can be made up of items from any family (Rectangular, Round, Oval, Accessories, or Catalog).
After you have accepted the items into your Takeoff you can tell the program to save them as an Assembly for future use.
Assemblies are not stored with the Job or Zone; they are stored with your Data Files to be used with any job.
To create an Assembly, click on the drop down menu from Takeoff. You will need to know the line numbers of the items you wish to save as an Assembly. Click the Create Assembly File link and follow the on screen directions. After creating the Assembly you can choose to have a bookmark created on the Catalog Bookmark palette to the right. This will allow you to click a single button to add the Assembly quickly.
Setup Exercises: Takeoff
For the first exercise, we will assume that you have already done a few Takeoffs in the program and have come up with the adjustment factors of -17% for all Fabrication labor on all items except Standard Length Duct for which we will use a -35% factor. For Install labor, we will use a -22% for the labor adjustment of all items.
The second exercise will show you how to change a Digitizer scale setup to the Single Point mode and have elbows and transitions automatically added.
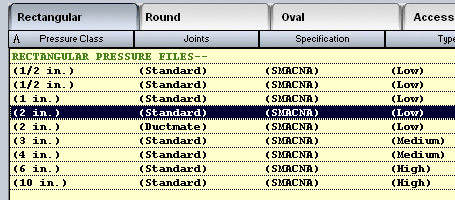
Exercise 13: Adjust the Rectangular Pressure File Labor, Recalculate Zone
- On the Setup menu select the pressure file you wish to modify and click the Edit button at the bottom of the screen.
- First we will adjust the Fabrication labor for all items other than Standard Length Duct. Click on the Global Factor button. Using this tool will adjust all the labor factors in one motion.
Check the Fab boxes for all three of the aspect ratios. Then put in the percentage of -17 for all three. At the bottom of the screen, make sure it is set to NO for Include Standard Length Duct. Then click Factor and click Yes on the “Are You Sure?” screen.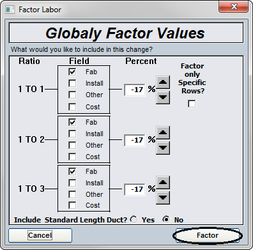
- After the program has finished we will repeat all these steps only using a -22 as the factor and checking the Install boxes, all three. Make sure to set the Standard Length Duct to a Yes this time. Again, click Factor and Yes on the verification screen.
- Next we have to adjust the Fabrication of the Standard Length Duct. Click the icon for the Duct on the fitting palette. There are three aspect ratio tables for labor. We will need to adjust all three separately.

Click on the word Fab for the 1 to 1 Aspect Ratio. It will prompt you to type in a Factor. Enter in -35 and click the OK button. You will then see the column be adjusted down 35%. Repeat this process for the Fab columns of the 2 to 1 and 3 to 1 tables. - (After adjusting the labor, you will need to perform a General Recalc to again check the labor hours and verify that your adjustment was correct.)
- Return to the Job File and the Job you used to determine your labor adjustment. Edit the Zone with the items that you accepted. Go to the Globals drop down menu and select General Recalc.
- You will be asked which item numbers to recalculate; for this procedure, we will do All Records so just click OK.

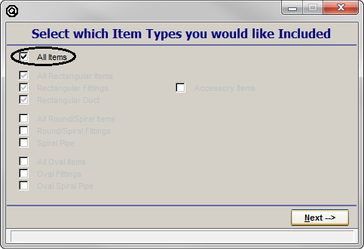
- Next you must choose which Item Types you wish to recalculate. For our example, choose all items.
- Lastly you will be asked to either Keep Changes or Set to Defaults. During the Takeoff process, if you made manual overrides to the default Joint, Sealers, Seams, Hangers, or Vanes, then you will want to choose Keep Changes; if no changes were made, then select Set to Defaults.

Exercise 14: Change the digitizer scale
The Digitizer can be set up in two modes, Pairs mode and Single Point mode. Pairs mode required you to click the start and the finish of each run of duct and pipe that you wished to have scaled for you; however, you were then required to come back and select your fittings. Single Point mode allows you to click through the elbow and have them automatically inserted.
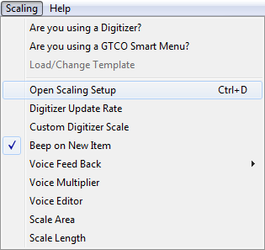
- Click on the Scaling drop down menu while in Takeoff. Select Open Scale Setup to view the options for the digitizer setup.
- When you scale multiple runs of the same dimensions or diameter you have the option of adding all the lengths together and creating one line entry or having each individual length added in as an entry.
If you allow the system to add all the lengths up you may not get all the non-standard lengths that you need.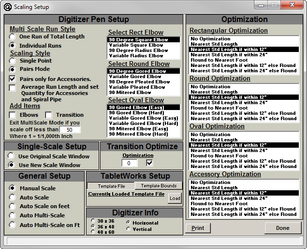
- Scaling Style should be set to Single Point to allow you to click through the fittings rather than having to stop at a fitting and add it before continuing on with the duct or pipe scale.
- Add Items options should have Elbows and Transitions checked to ensure that the elbow (selected to the right) is automatically added whenever you stop scale. The system does not store the direction change and will not pick a 45 or 90, you must select the elbow to the right that you wish to have Auto added.
- Single-Scale Setup should be set to New Scale Window unless you are having troubles with the scale operation. Tech support will change this for you.
- General Setup should be set to Auto Multi-Scale. This operation will allow you to scale off multiple runs of the same dimensions or diameter and have the elbows automatically added.
- Optimization Setup, select how you would like the program to treat the lengths you scale. If you generally prefer seeing your lengths rounded to the nearest foot select the appropriate option.
©2022 ConstructConnect, Inc. All rights reserved.