12. Digitizer
- April Friedman (Unlicensed)
The digitizer is the key to a fast takeoff. There are two tools you use with a digitizer: the touchpen and a template. The touchpen is similar to the mouse (from the previous exercise) and the template is a menu that goes onto the digitizer (it looks just like the template that is onscreen when doing a “mouse” takeoff.)
 The Digitizer section will take approximately 2 hours.
In this session, you will first become familiar with the digitizer and how to customize it for the way your work. Then, you’ll practice taking off items with the digitizer, touchpen, and template.
Understanding the Virtual Tablet (Digitizer)
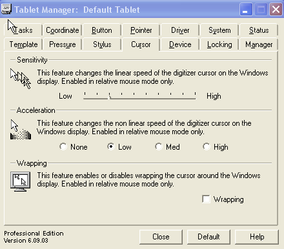
When the digitizer is hooked up, there is a separate program running alongside QuoteSoft Pipe. This software is Virtual Tablet Trade Mark and you will see this icon on your task bar. This is the software that is the interface between the digitizer and our software. It enables the touchpen to be a mouse/counting/measuring device.
Understanding the Template and Touchpen
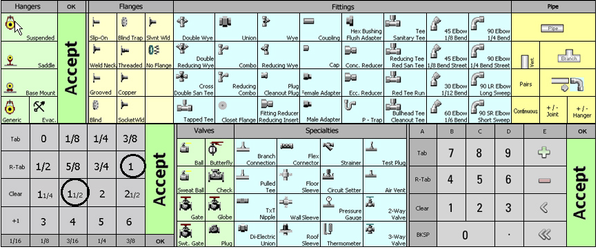
The following picture is a sample template that is placed at the bottom of your digitizer. Notice there are several Accept buttons on the template. This is one way to speed up your takeoff since you don’t have to move your touchpen a long distance to accept items into your takeoff.
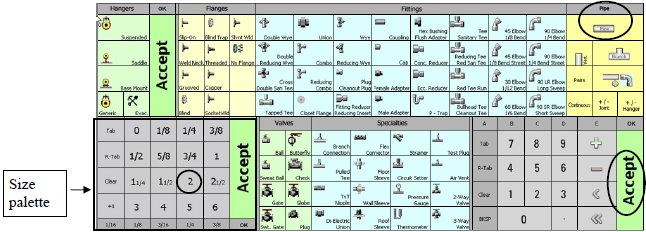
The order of the digitized takeoff is just like when you took off a run of pipe with the mouse: SIZE, ITEM, QUANTITY (or LENGTH).
Here is a picture of the touchpen and the functions of the buttons.
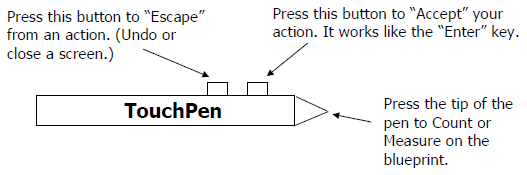
NOTE: If you selected Pipe and you really wanted to select Pipe Branch, you can cancel your command by pressing the top button on the touchpen. (You can also hit the Escape key on the keyboard.)
Exercise 48: Using the Digitizer for Taking Off Pipe
You’re ready to take off a length of pipe. You will be using Example A on the Drawing Handouts.
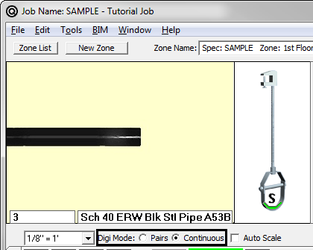
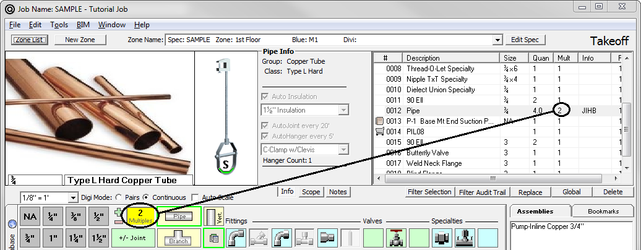
With your touchpen, click 2″ on the size palette and then click Pipe. At the bottom of the takeoff screen, a scale window appears. This is where you will see the quantity or length as you are taking off the item.

With your touchpen, touch 1 and 2 on Example A. Notice in the scale window, the length of the pipe run appears. Now you have a choice on how to Accept that run of pipe.
- On the template, touch Accept.
- Touch the bottom button on the touchpen.
- Do a “double touch” at the end of the pipe run. For example, at point 2, do a “touch, touch”.
Using the Touchpen Like a Mouse
You can use the touchpen on the digitizer to control the mouse cursor on your computer monitor. Hover your touchpen over the middle of the digitizer. Notice the mouse cursor is moving on the computer monitor. Move the touchpen so that the mouse cursor is over Pipe on the “onscreen template”. Click down. The scale window appears again. On the drawing that is on the digitizer, press points 1 and 2.
Understanding Touchpoints to Receive the Correct Number of Joints
To learn about where to touch on your drawing to receive the correct number of joints, you will take off the pipe in Example B and Example C. As you can see in Examples B and C, there is a branch line coming off the main line. This branch line could either be a reducing tee or some type of “o-let.”
An “o-let” does not break the pipe at that connection; however, a reducing tee does break the pipe at the connection. In Example B (since there is no break in the pipe), you'll only have to touch point 1 and 2. In Example C (where the reducing tee breaks the pipe), you have to touch point 1, 2, and 3.
Two Takeoff Methods: Pairs vs. Continuous
We have two methods of scaling off pipe – pairs or continuous. Continuous means you take off a whole run of pipe by touching only where the pipe changes direction. Pairs means you touch each change in direction twice. The pairs mode is a start/stop, start/stop method.
Every user seems to have a preference to which one they prefer – pairs or continuous. Select the method that will give you the best performance. Example D illustrates the differences between the two methods.
If you prefer, you can toggle between the two methods at any time. On the takeoff screen, select the circle in front of Pairs or the circle in front of Continuous.
Exercise 49: Taking Off Fittings That Have One Size
- On the template, touch a 90 elbow. The scale window appears. Since this is a fitting and not a run of pipe, you will be in “count” mode instead of “length” mode.

- On Example E, touch on all the Xs. These are elbows. After touching the last X, touch Accept (or touch the top button on the touchpen OR double touch on the last X).
Exercise 50: Taking Off Fittings That Have Multiple Sizes (Reducing Fittings)
Fittings that have multiple sizes can be entered in several different ways. On the example below, we took off a reducing tee on the run. That type of fitting has 3 sizes to it. Once you touch the fitting on the template, a selection box appears on the computer monitor.

There are two ways to select the size of the fitting:
- You can use the touchpen to move the mouse cursor on the computer monitor. Move the touchpen (and mouse cursor) to the correct size on the selection box and click down. This accepts the item into the takeoff list.
- You can go to the template and hit 1-1/2, 1 on the template. After selecting the 1″, the system goes into the count mode.
The system is now in quantity mode. Go to Example D and touch on all of the "X"s.
Customizing Your Takeoff Options
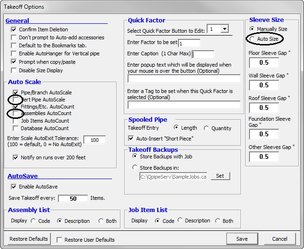
There are times when you do not want to go into scale or count mode when you select an item. When you are in takeoff, click File/Takeoff Options. The following screen appears. Most users turn off the Vert Pipe AutoScale, Assemblies AutoCount, and the Auto Size options.
Exercise 51: Generating 90 Elbows “On-The-Fly”
You may want to generate fittings while you are in takeoff.
- Select
 .
. - Go back to Example D and touch each X again.
- Notice the scale window is showing the a count of fittings.
NOTE: You will only want to touch a changes of direction or you will generate too many elbows.
Exercise 52: Using Multiples in Takeoff
Often times, you may have multiple lines running side by side, i.e. when you have two (or three) chilled water pipes running to several lavatories. When you have this situation, you can turn on a “multiples” feature. You only have to take off one line of pipe and the rest are automatically added.
On the takeoff screen, type in the number of multiples to generate the correct number of times you want that item duplicated.
Go back to Example A and take of a run of pipe.
NOTE: Multiples is a great feature; however, REMEMBER TO TURN IT OFF. When you take off multiples, you will hear a beeping sound. Those beeping sounds keep you aware that you are in “multiple mode.” Listen and you will hear a specific sound associated with multiples.
There are times when after you finish your takeoff, changes occur that require you to take quantities OUT of your takeoff. Multiples can be toggled to negative to deduct those quantities. Turn your multiples to negative and it will turn red.
Exercise 53: Making Changes to Your Takeoff
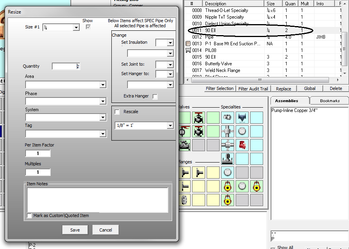
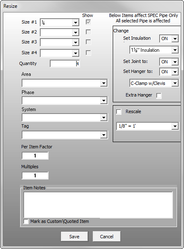
Once an item is entered into your takeoff, a simple double click on the item will allow you to change that item.
Deleting an item is simple. Click the item and click the delete button. If you want that to happen a little slower, go to your takeoff options and change the setting for deletion.
When you want to change multiple items, you can use Ctrl and Shift to highlight just the rows you want. You now have to select the Global button to make changes to the rows selected.
Exercise 54: Viewing a Visual Takeoff
After you’ve taken off your blueprint, you can bring up a screen that shows you a visual of your takeoff. This is helpful for you to get a quick glance to make sure you got all your pipe runs. First you have to configure your system to show the visual audit trail. Then, when you are in takeoff, you can press a single key to see the diagram.
- On the Main Menu, click
 . The Workstation configuration screen appears.
- Check the box next to Use Visual Audit Trail.
- Click
 .
. - Go to your takeoff.
- Press F2 on the top of your keyboard. A picture of your takeoff appears.
©2022 ConstructConnect, Inc. All rights reserved.