03. Jobs Tab
Now that you are familiar with the Database, Material Multipliers, and Labor Factors, you can start adding and manipulating jobs and folders.
Folders
Use Folders to keep your jobs organized. You may choose to have two folders to allow you to keep your Estimates and Jobs separate. This will help show you the percentage of Jobs bid versus awarded. Some contractors set up the folders by names of estimators.
 The Jobs Tab section will take approximately 40 minutes.
Exercise 9: Create New Folders
- On the menu bar at the top, click File and select New Folder from the pulldown list.
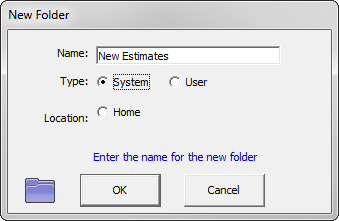
- Type New Estimates.
- For the Type, you can select System (if you want all users on your network to access) or select User (if you would like only the person using this computer to access).
- Click
 .
. - Add another folder called New Jobs.
Basic Job
During this session you will make a New Job inside the Estimate Folder. This is the first step after you receive your blueprints and when you are ready to start a takeoff.
Exercise 10: Moving Jobs Between Folders
- Move your cursor to the job you want to move.
- Click and hold down the left mouse button.
- Drag the job to the new folder.
Exercise 11: Create a New Job
- Make sure the New Estimates folder is selected. Click
 .
.
NOTE: The only field you need to fill in is the Name field. The other fields can stay blank or whatever is defaulted.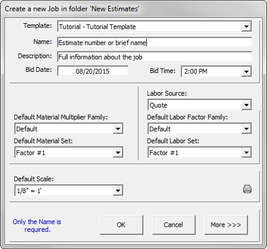
- Use the pulldown menu to select a template to use in your job. NOTE: You may want to set up a template for change orders and it will default to a different material and labor set.
- Type a name and description for the job.
NOTE: If you select  at the bottom right side of the screen, you can enter in a Project Manager’s name, Job Contact’s name/phone/fax/email, and the Job Address.
Exercise 12: Copying a Job
You may want to copy a job. This is helpful if you have change orders or you’d like to make modifications without changing the original job. You can compare your changes: new and old.
- Make sure your cursor is on the job you would like to copy.
- Select
 . A screen similar to the New Job appears. Enter the information for the copied job.
Exercise 13: Backing Up a Job
Normally you would back up a job after you are done. In this example, we'll back up the job now.
See what the trainer gives you for giving them a brownie point. ☺
- Select the job you want to back up.
- Select
 . A directory of folders appears.
 - Select the thumb drive you just received (external drive, possibly E:). Select
 . The system tells you the job was exported successfully.
©2022 ConstructConnect, Inc. All rights reserved.